Tag Archives: knitting

Beginning at the Beginning: Casting on

You get the basics of knitting. You know how to follow a pattern, what “raglan” means, and why merino is infinitely superior to acrylic (not that I’m being a snob…). It’s time to start getting technical. Really technical.

Let’s talk about casting on. OLYMPUS DIGITAL CAMERA

Casting on (making that very first row of stitches) is something that most knitters basically ignore. Most of the time, I cast on only as a way to get to the meat of my pattern. But, spending a little time to find the perfect cast on for your project can elevate your knitwear from good to great.

So, for the next couple weeks, I want to talk to you about the various ways that you can cast on; each method’s benefits, problems, and how to use them.

Stellar’s Jay Sweater: Stagnation

So, I have this spreadsheet that I use to plan out my blog posts (because I am a nerd, and like to be organized).  Today I was supposed to tell you about how I knit up the arms on my Stellar’s Jay Cardigan.  It was going to be a nice little post, to give you an update on my progress, and tell you about how well everything was going.

Well.   It turns out that today’s post will actually be a little different.  It will be about how I forgot to work on my sweater at all since you last saw it, over a month ago.

It’s sitting in its little project bag, between my stash of sock yarn and my little chest of finished projects.  I look at it every couple days and think, “I should probably pick that up and knit a row or two.”  But, still it sits there, forlorn and neglected.

I could make excuses, pleading that I have been too busy with other projects (which is sort of true).  I could say that I have been busy with work, or getting ready for summer.  But the truth of it is, I’m just not feeling inspired by my little blue sweater.

I’m sure I’ll pick it up again, one of these days.  I’ll suddenly get the urge to finish it, and I’ll dive back in head first, but for right now, I’m happy chugging away on some other projects I’ve got in the works.  It’ll be waiting for me  when I get back to it.

Do you ever put a project on hold?  What do you do to get your inspiration back?

Listening and Knitting

Sometimes, I need my eyeballs while I knit.  I can usually get away with watching TV, but sometimes I have a project that needs more of my attention (especially if I’m working up a new pattern, or I’m working on something with a lot of counting).

When that happens, I like to turn on my podcasts.  Podcasts are great. They’re basically radio shows that you can have your smart phone download automatically (like magic!).  You can listen to them whenever you have the time, and can pause them whenever you need.  It’s as if there was a radio station that only aired the shows you liked, and followed your schedule.  Genius!  (And, if you don’t have a smart phone, you can find them online, and listen to them through your computer.)

Here are a couple of my favorites:

Sawbones500_35[1]Sawbones is a podcast about the weird things that people have done to try and cure disease throughout history, presented by the totally hilarious Justin McElroy and Dr. Sydnee McElroy.  (Did you know that tying a frog to your forehead is supposed to cure headaches?  Now you know.)

pchhblogrect1_custom-ac140c703215b507ceb79d3edbff1eb73ae6011d-s3-c85[1]Pop Culture Happy Hour is produced by NPR, and is an hour-long intelligent discussion of pop-culture-related topics.  That makes it sound totally dry and nerdy, but it’s actually really interesting.  And, the hosts give really great suggestions for books, TV shows, and other media.  I’ve discovered lots of cool things by listening to these guys.

mza_3767929519462584539.600x600-75[1]The Knit Picks’ Podcast is (surprise!) put out by the staff of Knit Picks.  They just updaged their format, and now pick a single topic for each episode.  They interview each other, knitting designers, and local knitters about that topic.  Sometimes it gets a little commercial-y, but I enjoy listening to what’s going on at my favorite online yarn store.

What do you listen to while you knit?

Knitting In Public

header-b-w-arctic

We almost missed it!  It’s World Wide Knit In Public Week!

Since 2005, knitters across the world have picked up their needles and yarn and taken to the streets (and cafes, and libraries, and yarn shops) to share their love of knitting with the world.

Search their website to find an event in your area, or to start your own.  Or, just take your project out into the local park and work a couple rows.

I’m heading out right now to celebrate WWKIP week!  Join me!

Pattern: Phoenix Pouch

OLYMPUS DIGITAL CAMERAA perfect pouch to put things in, decorated with Professor Dumbledore’s familiar, Fawkes the phoenix. This little drawstring pouch is of a size to house a deck of cards, a small camera, or a handful of Bernie Bott’s Every Flavor Beans. Originally designed for a Harry Potter-themed gift exchange, the Phoenix Pouch would be well received by Potterheads, or anyone else who loves a good fiery bird.

Knit from the top down, the construction of the Phoenix Pouch is very simple. A row of eyelets allow the addition of a drawstring. The suggested I-cord drawstring may be substituted for a ribbon, if you so choose. The Phoenix is created through Fair Isle knitting following the included chart.

Get the pattern here for free!

Phoenix Pouch

Techniques: Tubular Cast-On

Nine times out of ten, when I cast on for a project, I use a basic long-tail cast on.  But sometimes, if the Knitting Gods so move me, and if the project is really special, I like to break out my Tubular Cast-On.

(I’m using it for my Stellar’s Jay Sweater.)

It’s absolutely gorgeous, especially paired with fine ribbing (it’s perfect with a 1×1 ribbing on sock cuffs).  Properly executed, it looks like the stitches on the front of the piece simply swoop around the edge and continue on the back.

tubular8[1]And (double bonus!), it is super stretchy, so you don’t have to worry about weird tension issues that sometimes happen at cast-on edges.

There are a couple ways to do it, which have all been written about online many, many (many) times.

The way I learned, is apparently the “Italian Way.” Who would have thought?  There’s a great tutorial for it here.

There’s another way to do a tubular cast on, that frankly, looks much easier, but I haven’t tried it, so you’ll have to give it a shot and let me know how it goes.  Here‘s a tutorial that looks pretty good.

What kinds of cast-ons do you like?

Stellar’s Jay Sweater: Changing Plans

I’ve been hard at work on my Stellar’s Jay sweater.  The body is almost up to the armpits!

I’m following my pattern as I wrote it, except for a couple (sort-of) minor details.

First, I decided that I didn’t like doing the scallop rows the way I had planned it out, so I modified it a little.  Now, it is slightly shallower (worked over two rows, instead of three), and I think it looks much better.  I’m probably the only one who would ever notice, but I’m picky that way.

Second (and this is a larger change), my pullover had turned into a cardigan.  I don’t know what happened- I was casting on and some knitting spirit whispered in my ear that I needed a cardigan, not a pullover, and one thing led to another.  I’m still following the pattern as I designed it, but instead of working the sweater in the round, I’m knitting it flat.  When I finish up the sweater, I’ll pick up stitches along the selvedge edges and knit on some button bands.  It should look pretty good (I hope!).

OLYMPUS DIGITAL CAMERAIt’s important to remember that regardless of how much planning goes into your knitting, it’s still possible to change plans as you work.  You’re in charge of your project, and being flexible when you don’t like how something is working up will end up giving you a better finished project.

What changes have you made to projects as you knit them?

Yarn + Electricity = Winning

This weekend MakerFaire is happening in San Francisco!  I am so excited to finally get to go after years of reading about it.  MakerFaire is a super cool craft fair/creative festival that  celebrates innovation and ingenuity.  Anyone who has a cool idea is welcome to share it with other fair-goers.

You made a bicycle-powered sewing machine?  You developed a robot that tends your garden for you?  You used scrap metal to build a car?  You have a spot at MakerFaire. People at MakerFaire are especially known for taking two things that don’t usually go together, combining them and making something amazing.

Like fiber arts and electronics.

E-textiles (aka soft circuits) are a really cool way to try your hand at electronics and create some amazing projects.

The basic idea is that you use conductive thread (nylon thread, coated in a conductive metal) instead of wires to connect your electronic components (like leds, batteries, sensors and tiny computers).

You could go super simple, and make a pair of texting gloves.  The conductive thread woven through the fingertips allows you to use a touchscreen  without removing your gloves.  (Handy in the Great White North in February.)

Teknika Gloves by Laura Nelkin

6437487283_bc44cb9a7d_z[1]Or you could get your embroidery on, and make a little sampler, including LEDs, a battery and an on/off switch.

SANYO DIGITAL CAMERAOr, if you have more tech experience than I do, you could get your hands on a LilyPad Arduino.  It’s a tiny computer that you can plug into your computer, program, and use to make LEDs blink in cool patterns.

SANYO DIGITAL CAMERAWhat would you use soft circuits for?

Tutorial: Shawl Pins

I’ve got shawls on the brain. When I wear a shawl, especially if it’s a particularly oddly-shaped one, I like to break out a shawl pin.  You can find super fancy ones, but basically a shawl pin is a stick of some kind that you use to hold knitwear in place (I’ve been known to use pencils, chopsticks and knitting needles in a pinch). There are as many kinds of shawl pins as there are shawls, all gorgeous, most expensive.

So, in the name of DIY Cheapskate-y-ness, let’s make some functional, fashionable, and simple shawl pins.  An accessory for your accessory… what’s not to love?

Here’s what you’ll need:

  • A ¼-inch dowel
  • Small hacksaw (or other dowel-cutting implement)
  • Pencil sharpener
  • Sandpaper (I used 120-grit)
  • Acrylic paint
  • Paintbrush

OLYMPUS DIGITAL CAMERAStart by cutting your dowel into pieces. I made my pins about 5 inches long, but you could go longer or shorter, depending on what you like.

OLYMPUS DIGITAL CAMERAThen, sharpen one end of each pin with the pencil sharpener.

OLYMPUS DIGITAL CAMERAGrab a piece of sand paper and sand your shawl pin until it’s nice and smooth (get rid of anything that could catch on your shawl and make a hole. No bueno). Sand the point down a little bit so that it isn’t dangerously pointy, and don’t forget to smooth out any corners on the other end, too.

OLYMPUS DIGITAL CAMERABrush off any sawdust, and break out the acrylic paints. I like how they look when they’re mostly wood with just a pop of color on the end, but feel free to experiment. How about stripes? Polka dots? Let the paint dry, and you’re ready to go.

OLYMPUS DIGITAL CAMERAGrab a shawl (or scarf, or cardigan) and pin away.

OLYMPUS DIGITAL CAMERA

Stellar Jay Sweater: Gauge and Math

It’s here! It’s here! Let’s all ooh and ahh at the beautiful yarn!

OLYMPUS DIGITAL CAMERANext step is to whip up a swatch. I have been brainstorming this sweater, and I think that plain stripes are too boring, so I’ve decided to do a little scallop design between each stripe, so I’m going to include that in my swatch, to see how it looks. Two birds. One stone.

I knit up a square of fabric about six inches by six inches. And I’ve worked my scallop pattern both right-side-up and upside down, to see which I like better.

This is the upside-down version, but I think it makes the scallops look a little rectangular.

OLYMPUS DIGITAL CAMERAThis is the right-side up version, which I like better.OLYMPUS DIGITAL CAMERA

This means that I will need to work my sweater from the bottom up, which is important to know when I start designing my pattern.

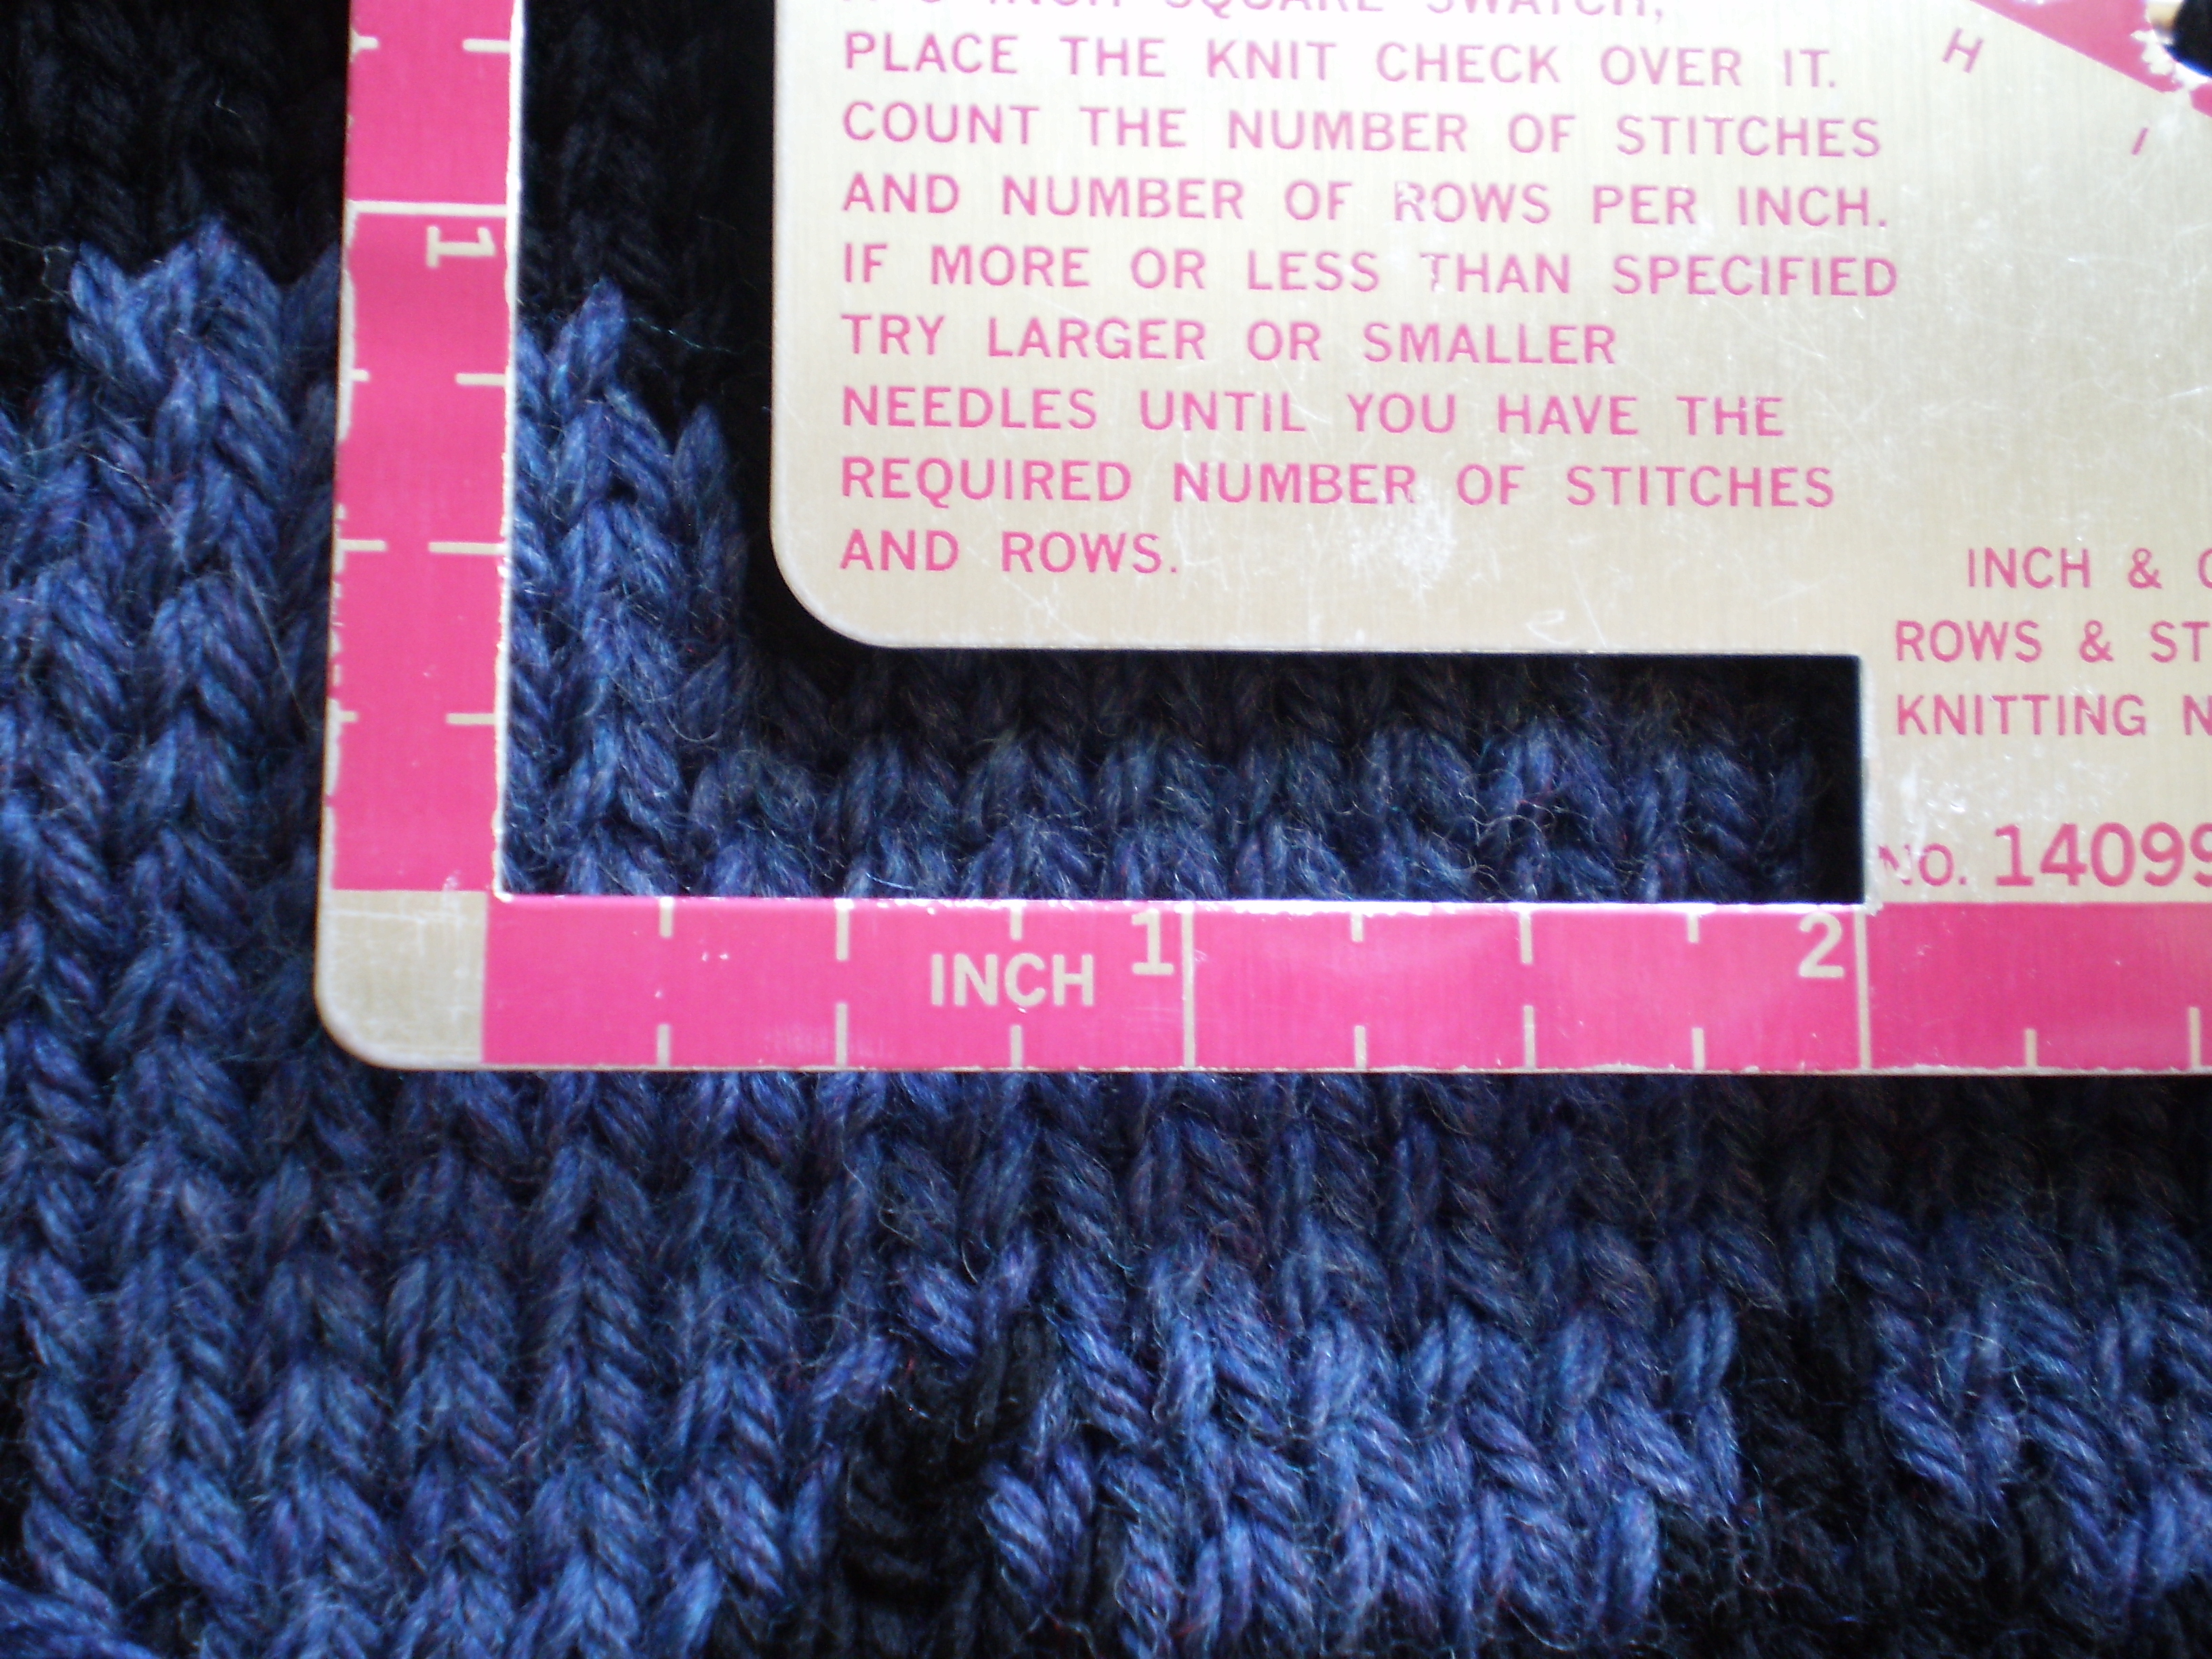
I pulled out my gauge meter (you could just use a ruler or tape measure) and measured out my gauge. I got 5 sts per inch and 7 rows per inch in stockinet stitch on size 8 needles.

OLYMPUS DIGITAL CAMERASo, now that I know my gauge, and the general design I want to use (bottom up pullover), I do a little math and sketch out my pattern. I’m basing this one on Elizabeth Zimmerman’s Percentage System, to give me the bones of the sweater, but I’m tweaking it a bit to deal with an all-over stripes pattern, instead of only a yoke pattern.

OLYMPUS DIGITAL CAMERABelieve it or not, those chicken scratches make sense to me. I usually sketch out my pattern like this (on a drawing), before I start knitting. Then, as I knit up the pattern, I’ll make notes into a notebook or on my computer in more standard knitting lingo. But, for now, this will do nicely for me.

Now I get to go cast on! Woo!