Category Archives: Tutorial

VOTE!!!

Hi everybody!

Or, at least: Hi everybody in the US over the age of 18 who is eligible to vote!

Guess what tomorrow is!  That’s right, it’s election day! (You can tell I’m excited by all the exclamation points!)

I try to keep this blog pretty low-key, politics-free, and full of knitting.  But, sometimes I have to bend the rules.

Like today.  (Get ready, I’m getting up on my “You should vote” soapbox.)

So, unless you live in a vote-by-mail state (Hello, Washington), you’re probably aware that voting is tomorrow.  You should know where to find your polling place.  You know that you should vote, too.  You know that voting is important.  You already know that every member of the House of Representatives is up for reelection, not to mention a third of the Senate, three dozen Governors and more local officials than you can shake a stick at.  Plus, if you live somewhere like Seattle, you’ve probably got a handful of ballot initiatives up for a vote that could directly influence your lives in the coming months and years.

You already know that less than half of eligible Americans usually turn out for midterm elections, and you already know that those voters that do turn out are overwhelmingly older, richer, and whiter than the average American.

And, of course you know that if you’re unhappy with how this country is being run (and  there’s plenty to be unhappy about), you’ve got to go out and vote to tell those in charge to change the way things are going.

You already know all that.  So I won’t tell you about it.

I will, however, bribe you with a silly little craft project.

IMG_0637.JPGI voted last week (yay for Washington’s vote-by-mail system!), but Washington doesn’t give out “I voted” stickers.  So I made one myself.  (Well, I cross-stitched a little pin.)

And you can make one, too.

Once you’ve voted, download the instructions to make yourself an “I Voted” pin:

I Voted Cross Stitch Pin Instructions

(But only if you’ve already voted… trust me.  I’ll know.)

Are you going to vote this year?

Tutorial: Closing Up

As you guys all know, I’ve been going to town on some Christmas Balls. (I think my last count stood above 20, but I could be wrong.  There’s so many it’s getting hard to keep track of them all these days.)

Knitting these bad boys is fun and (fairly) easy, though some of the colorwork is a little bit challenging to knit up without making the balls pucker too much.  The finishing isn’t too bad, either, just a little bit of a pain when you have to repeat it so many times.  You stuff the balls, weave in all the ends, close up the top and the bottom, and add a loop to hang  the balls from. Easy, right?

Well, closing up the top of the balls is easy enough- you just pass your tail through the remaining active loops and pull, just like the top of a hat.

But the bottom is a different matter- one that took me a couple tries to figure out how to do neatly.

Because you cast on at the bottom of the ball, you have a big old hole down there, waiting for you.  And, there’s no obvious way to get rid of that hole, since you can’t just pull a string and have it disappear (believe me, I tried).

Here’s what I’ve been doing, and I think it works pretty well.

So, you see the long-tail cast-on edge? There are little slanted “stitches” all the way around the edge.  I use a yarn needle to carefully pass my needle through those stitches, counter-clockwise, starting right next to the spot where my tail yarn comes out of the ball.And I keep going…Until I get all the way around the hole.Then, I pull the tail snug,And voila!  A lovely finished ball bottom that looks just as good as the top!  You could use this technique on top-down hats, fingers-to-cuffs mittens, or really any time you need to close up an opening created by a long-tail cast on.

Now, all I’ve got to do is repeat this on the rest of my Christmas Balls. Oof.

Do you have any favorite techniques you’ve been using lately?

OK… We’re Back On Track

Guys.  I’ll be honest.  That shawl sat on the coffee table all weekend.  Un-ripped, and un-fixed.

Until last night, when I took a good hour (AN HOUR) to undo all the bound-off stitches, as well as a whole row of knitting.  One word: Heartbreaking.

But, I’m back this morning, ready to go.  This time I’m sure I’ve got enough yarn, and I’ve got a cool new plan.

Instead of a plain-old smooth bind off, I’m gonna go fancy.  I’m making a picot edge on this bad boy.  Because why not!?

To start, I knit 2 stitches, and bound off 1 (so just 1 stitch remained on my needle).  (Also, I’m using a larger sized needle to do the binding off, that way I don’t have to worry about my tension getting too tight.)Then I slipped that stitch back over to the left hand needle.Then I used a Knitted Cast On to cast on two more stitches.Then I bound off 7 stitches (the 2 that I just cast on will form the little picot bump, and the other 5 are the space between bumps- if you want your bumps closer or farther apart, change the number of stitches you bind off each time).Then I kept going, slipping the 7th stitch to the left hand needle, casting on 2 stitches, and binding off 7…Until a super-cute picot edge started to form.Now I just have to make it all the way across this danged shawl!  I need a good podcast and a big cup of coffee.

Wish me luck!

Have you ever added a picot edge to any of your projects?

Tutorial: Reading Charts- Repeats

Now we all are experts in reading a chart while knitting back and forth, and we’re experts in using charts in the round.  But charts aren’t always that simple.  Sometimes your project has more stitches in a row than there are on your chart.  You can imagine that this could happen with projects that have a wide, repeating pattern (like a dish cloth, a blanket, or sweater).

If you have to repeat the whole chart, that’s easy enough- knit across the chart row, then work it again (and again), until you get to the end of your row of your knitting.  Simple.

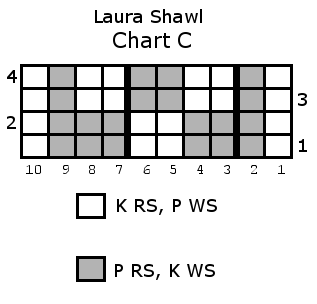
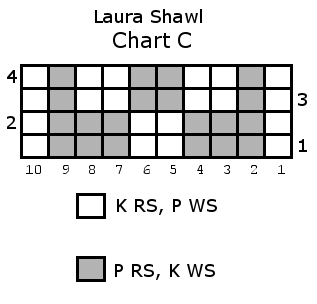
But sometimes you have to repeat only some of the stitches in a row.  When you need to do that, your chart will look like this:laura-chart-c-repeatsDo you see the change?  (It’s subtle, so I’ll help you.)laura-chart-c-repeats-highlightSee those highlighted vertical lines?  Those are your repeat marks.  OK, honestly, I’m not sure what they’re technically called, but they mark out the stitches that you have to repeat.

So, let’s make an imaginary project- a scarf maybe?  We’ll cast on 18 sts, and use this chart, repeating the 4 sts in-between the repeat marks 3 times.

Start at row 1 st 1, and knit straight through to st 6 (just before the second repeat mark).  (You’ve worked 6 sts)

laura-chart-c-repeats-order-1Then, go back to st 3 (just after the first repeat mark), and work back through st 6.  (10 sts total)laura-chart-c-repeats-order-2Then, you’ll repeat sts 3-6 once more, and continue on to the end of the row.  (18 sts total)laura-chart-c-repeats-order-3On the next row you do the same thing, but reverse the way you read the chart (because we’re pretending to knit back and forth).

So, start at row 2, st 10, and work across to st 3 (just before the second repeat mark).  (8 sts)laura-chart-c-repeats-order-4Then repeat the middle 4 sts.  (12 sts)laura-chart-c-repeats-order-5And finish by working sts 6-1 once more.  (18 sts)

laura-chart-c-repeats-order-6Make sense?  Of course, for a wider project, you might be required to repeat the middle section more times, but the concept is the same.  Just keep going across the row, looping back as needed when you get to a repeat mark.  Simple!

Any more questions?  Let me know if anything else is confusing to you, I’m happy to help!

Tutorial: Reading a Chart in the Round

Last week, I talked about the basics of reading a chart.  Today, I’m going to talk about reading a chart while knitting in the round.

*Gasp* What?!  Charts!?  And circular needles?! That’s just too much!  I can’t even!  (Sorry… I’m feeling a little dramatic this morning)

No, it’s not difficult!  It’s actually pretty simple.

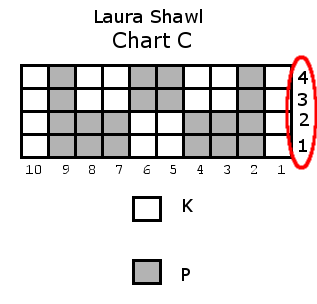
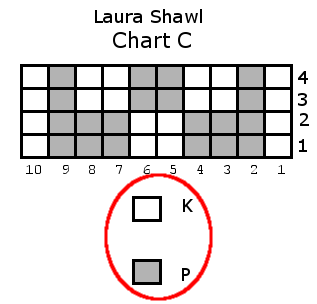
So remember this chart from last week?  This is a chart that’s been written so that you can work it flat (ie, back and forth).laura-chart-c-plainI’ve modified it to now be read in the round.  Can you spot the differences (It’s like a sad, grown-up version of the puzzles in the back of Highlights magazine)?laura-chart-c-in-the-roundThe first big difference (that I’m sure you spotted), is that all the row numbers are lined up along the right side of the chart.  laura-chart-c-in-the-round-detailsThat’s because when you knit in the round, you’re always traveling in the same direction (from right to left).  When you knit flat, you knit back and forth, so the row numbers are arranged on alternate sides.  But, the same rule applies no matter how you’re knitting- you start knitting from the side of the row with the number, and work away.laura-chart-c-in-the-round-knitting-directionThe second big difference is in they key:laura-chart-c-in-the-round-details-2It looks like there’s a whole bunch of information missing, when you compare this chart to the “knit flat” chart.  But, in fact, you’re not missing any information!  This is because when you knit in the round, every row is a RS row!  So, it’s just implied that (in this case) a white square is a knit stitch on the RS and a gray square is a purl.

Simple!

What’s your favorite kind of pattern?

Tutorial: Reading a Chart

I’ve had a rash of people emailing me lately who don’t know how to read a chart- and that blows my mind!  Not only are charts the best way (in my mind) to understand a complicated pattern, but I think they’re head-and-shoulders easier to read than a 100% written-out pattern.  So, without further ado- let’s look at a chart.

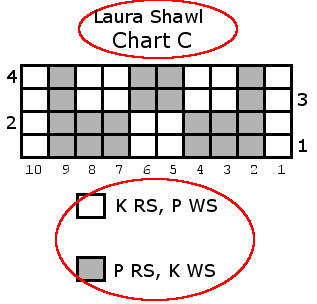
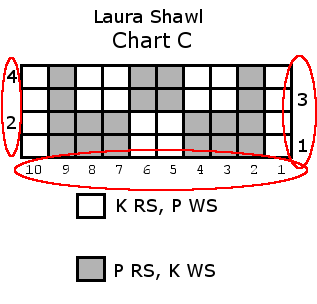
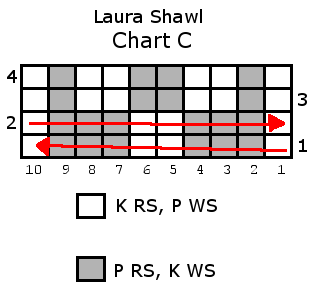
laura-chart-c-plainThis is a little chart from my new pattern, the Laura Shawl!  (It’s the narrow, textured stripe, in-between the big cables.)52162220_21Let’s look at the main parts of this chart.  At the top, you’ll see the chart name- this is important if you’re working a project that uses several charts.  For example, the Laura Shawl uses 5 separate charts, this is the third (C) one.  And, at the bottom (or sometimes to the side), you’ll find a key which explains what the symbols mean (I’ll explain that in more detail later).laura-chart-c-title-and-keyThen, along the left and right sides, you’ll find row numbers.  And, on the bottom, you’ll see the stitch numbers.laura-chart-c-rows-and-stsYou’ll notice that the row numbers go from bottom to top (ie.  1 is on the bottom).  This is because you’re going to knit from the bottom to the top.  That way, when you finish knitting the chart, you’ll be able to hold up your knitting next to the chart and you should see something that looks similar to the chart (in other words, it shouldn’t be upside-down or mirrored).laura-chart-c-knitting-directionThis chart is meant to be knit flat, and I can tell that because the row numbers alternate sides.  (1 is on the right, 2 is on the left, etc.)  laura-chart-c-rowsThe beginning of your row is marked by the row number.  So, Row 1 starts at the right and goes to the left.  Row 2 starts at the left and goes right.  (Just like your knitting!)laura-chart-c-row-directionNow you’ve got your bearings, it’s time to start knitting.  But what do all those little squares mean?  Each square is a stitch, and the symbol (or in this case, the color of the square) tells you how to work that square.  Do you see down in the key?  Each symbol has instructions, which include what to do on the Right Side and the Wrong side.  On odd-numbered rows (unless your pattern says otherwise), you’ll work the RS instructions.  So, for Row 1, you’ll K1, P3, K2, P3, K1.laura-chart-c-rsThen, on the even rows, you’ll use the Wrong Side instructions.  So, Row 2, you’ll P1, K3, P2, K3, P1.laura-chart-c-wsAnd, that’s basically it!  See?  It’s not so bad!  You can totally use a chart!

Next week I’ll walk you through knitting in the round using a chart (Spoiler- it’s even easier!), and how to work charted repeats.

Do you like using charts, or do you prefer written-out patterns?  Why?

Tutorial: Three-Needle Bind Off

I’m still jazzed about the three-needle bind off I did on my cabled sweater this week.  It’s just such a neat (in both senses of the word) technique that doesn’t get used enough.  It’s a great way to join shoulders on a pieced sweater, or pieces of a scarf, or squares of an afghan.  Is it kind of weird that I want to design something that uses the three-needle bind off, just so I can do it some more?  Possibly.

Anyhoo, if you haven’t done it before, it might feel a bit tricky- after all, you have to wrangle two pieces of knitting and three needles.  But, trust me!  It’s super simple.OLYMPUS DIGITAL CAMERAFirst, hold your knitting with good sides together in your left hand.OLYMPUS DIGITAL CAMERAThen, insert your third needle (in your right hand) into the first stitch of each piece of knitting.  OLYMPUS DIGITAL CAMERAWrap your yarn, and pull it through, dropping the two stitches off the left needles, just like you’re doing a k2tog.OLYMPUS DIGITAL CAMERAThen, do it again. (Work a K2tog using one stitch from each needle.)OLYMPUS DIGITAL CAMERAYou’ll have two stitches on your right needle.  So, now it’s time to do a plain ‘ol bind off, pulling the first stitch over the second.

OLYMPUS DIGITAL CAMERAJust keep going!  Work a K2tog using one stitch from each left hand needle, then pull the old stitch over the new.

When you’re finished, you’ll end up with a lovely neat row of bound-off stitches.  OLYMPUS DIGITAL CAMERAAnd, when you open up the piece and look at the right side- Ooh!  So pretty!OLYMPUS DIGITAL CAMERAHave you ever used a three-needle bind off?

The Library is Open- Part 2: Cables

Let’s talk about cables!  They’re some of my favorite things to knit, and they look super impressive.  But here’s the secret- they’re actually pretty easy!  (Especially if you can read your knitting as you go, instead of relying on a row counter to keep track of your pattern.)

Here’s the little sample I’m going to talk about today.  (These cables are both pretty simple, but the concepts I talk about here could totally be applied to more complicated cables.)

OLYMPUS DIGITAL CAMERAHere’s a cool thing about cables- 90% of them are done with knit stitches, and 90% of them only work crossover rows on the right-side.  That totally simplifies it, right off the bat!

First off, let’s figure out how wide these cables are.  This is super easy!  Just look at the widest part of the cable and count the knit stitches across, just like we did last week.OLYMPUS DIGITAL CAMERAThe cable on the left is 3 stitches across, and the cable on the right is 4 stitches across.

Next, we’ll determine how the crossover is worked for our cable.  Look at the narrowest part of the cable (where the two parts of the cable actually cross), and count how many stitches are on top.OLYMPUS DIGITAL CAMERAThe cable on the left has 1 stitch on top, and the cable on the right has 2 stitches.  This, combined with the width means that the left cable is a 1×2 cable, and the right cable is a 2×2 cable.

That’s all there is to figuring out the stitch count for a cable!  Next, we need to figure out how many rows each repeat takes.

Start by identifying the crossover row.  It should be the row where the stitches are all slanted sideways, instead of being nice, upright “v’s.”OLYMPUS DIGITAL CAMERAThen count the rows from one slanty v up to the next one.  I like to count the outside edge stitches- I think they’re easier to see.OLYMPUS DIGITAL CAMERAThe left cable has 3 rows in-between each crossover row, so it’s a 4-row repeat.  The right cable has 5 rows between each crossover row, so it’s a 6-row repeat.

If we combine all the information we learned, we can come up with the pattern:  The left cable is a 3-stitch cable, with a 1×2 crossover worked every 4th row.  The right cable is a 4-stitch cable, with a 2×2 crossover worked ever 6th row.

So, now that we know the pattern, what’s should we do next to continue the swatch?

Look down the cable to the most recent crossover row, then count rows up to the needle.OLYMPUS DIGITAL CAMERAThe left cable has been worked 1 row past the last crossover, so we need to work 2 more rows even before we make the next crossover.  The right cable has been worked 5 rows past the last crossover, so we can work the crossover on the next row.

Does that make sense?  Do you have any favorite tips for working cables?


The Library is Open-Part 1

The other day, I was kitting with a friend, drinking coffee and working on my cabled sweater, when I noticed her watching what I was doing with a look of vague concern and puzzlement.

“What’s up?” I asked her.

She responded, “How do you to that?”

“Do what?”

“How can you make such a complicated project without making a million notes and keeping track of all your rows and looking at a pattern constantly?”

I replied,  “Well, it’s mostly just knitting the knits and purling the purls, and keeping track of my rows.”

She looked at me like I was crazy, and I realized that no one had ever taught her how to read her knitting.

I am here to fix that today, in case anyone else out there in internet-land hasn’t been reading their knitting, either.  Because, there is nothing so useful as being able to look at your knitting and figure out where you are in your pattern and what you need to do next (or, to be able to look at your knitting and figure out where you went wrong).

We’ll start with a very simple example, just knits and purls.  OLYMPUS DIGITAL CAMERAAt minimum, reading your knitting will let you know the stitches you need to work next to remain “in pattern,” and will tell you how many rows you’ve already worked.

To look at your stitches, look at the row directly underneath your needle.  There, you’ll see either little V’s (knits), or little bumps (purls).  If you want to stay “in pattern” (for example, if you’re doing ribbing), you’ll knit when you come across a knit in the row below, and you’ll purl when you come across a purl in the row below.  (This is what people refer to as “knitting the knits and purling the purls.”)

In our example, I’ve highlighted the stitches in the example below:sts(Note:  I’ve worked the first and last 2 sts in garter stitch, which means that you just knit every row, so I don’t have to worry about reading those 4 sts!)

The other basic skill in reading your knitting is figuring out how many rows you’ve worked.  Of course, you can use a stitch counter or paper and pencil to keep track of your rows, but you’ll inevitably get caught up in the episode of Law and Order you’re watching and lose track of your count.  (What?  That’s just me?)

Rows are easiest to count in stockinette.  This sample is ribbed, but you can think of the knit portion of ribbing as just a skinny little section of stockinette.  You’ll again look for the V-shaped stitches, and then count down the whole column (don’t count the stitch that’s on your needle).  Like this:

rowsSo, I can tell that this swatch has been worked for 8 rows, because there are 8 little V’s.

See, not so bad!  I use these techniques all the time, and I bet they’ll totally help you, too.

Next time, I’ll talk about reading your knitting while making cables!

Shrinky Dinks!

Every year for Christmas, my mom and I do a craft together (don’t judge- Christmas Crafts are the best).  One year we got a bunch of teeny MochiMochi Land patterns and spent Christmas week knitting up an army of little dudes.  Another year we broke out all of Mom’s papercrafting things and made dozens of little notebooks.

This year, Mom got a big pack of Shrinky Dinks!sq-bright-bulkI love Shrinky Dinks.  They’re so easy to do, and always delightful (I use them with one of the kids’ classes I teach- they’re always a hit).

If you haven’t played with them before, Shrinky Dinks are sheets of plastic that you draw/color on/stamp/decorate, then cut out, and put in the oven.  As they bake, they get all wiggly, and when they settle down, they’ve shrunk to about half their original size.

It’s fun!  (Despite the boring way I’ve explained it.)

Anyway, this year, a pile of pristine Shrinky Dink material and a box of my mom’s fancy art pens in front of me, I tried to come up with a project that would end up being useful- after all, most things made with Shrinky Dinks are pretty silly- lots of ornaments and pendants.

Because I’m a knitter, my mind jumped to stitch markers!

I cut out a stitch marker (a circle about 2 inches in diameter, and about a quarter-inch wide, decorated it, and popped it in the toaster oven.  And would you believe, it worked!

Needless to say, I spent the rest of the afternoon manufacturing as many stitch markers as I could.

OLYMPUS DIGITAL CAMERANow, they ended up a little large- the smallest one could probably fit on a US13, but I bet you could totally come up with the dimensions for tinier stitch markers.   I should probably go get some more Dink material, and start experimenting some more.  For science.  Yeah…

I’m definitely not just looking for an excuse to play with Shrinky Dinks.

Have you ever made your own stitch markers?  What did you use?