Monthly Archives: May 2013

Sock week: Sock Block Rock

There’s been a heck of a lot of sock talk around here lately.  So, I have some more!

Once you’ve finished your second sock, you could just say “Hey!  I’ve got some socks.  Yay!”

OR, you could guild the lily and go one more step and block the suckers.  Your socks will fit just fine without blocking them, so if I’m just making socks for myself, I won’t do it.  But, if I’m making the socks as a gift, I’ll block them.  Blocking just makes the toes and heels lay nicely and fixes all those little weirdnesses that happen during knitting.

Here’s what you need:

1 pair of socks.

A clean bowl (or a clean sink) filled with bathwater-warm water.

A couple clean towels

Sock blockers (optional)

OLYMPUS DIGITAL CAMERA
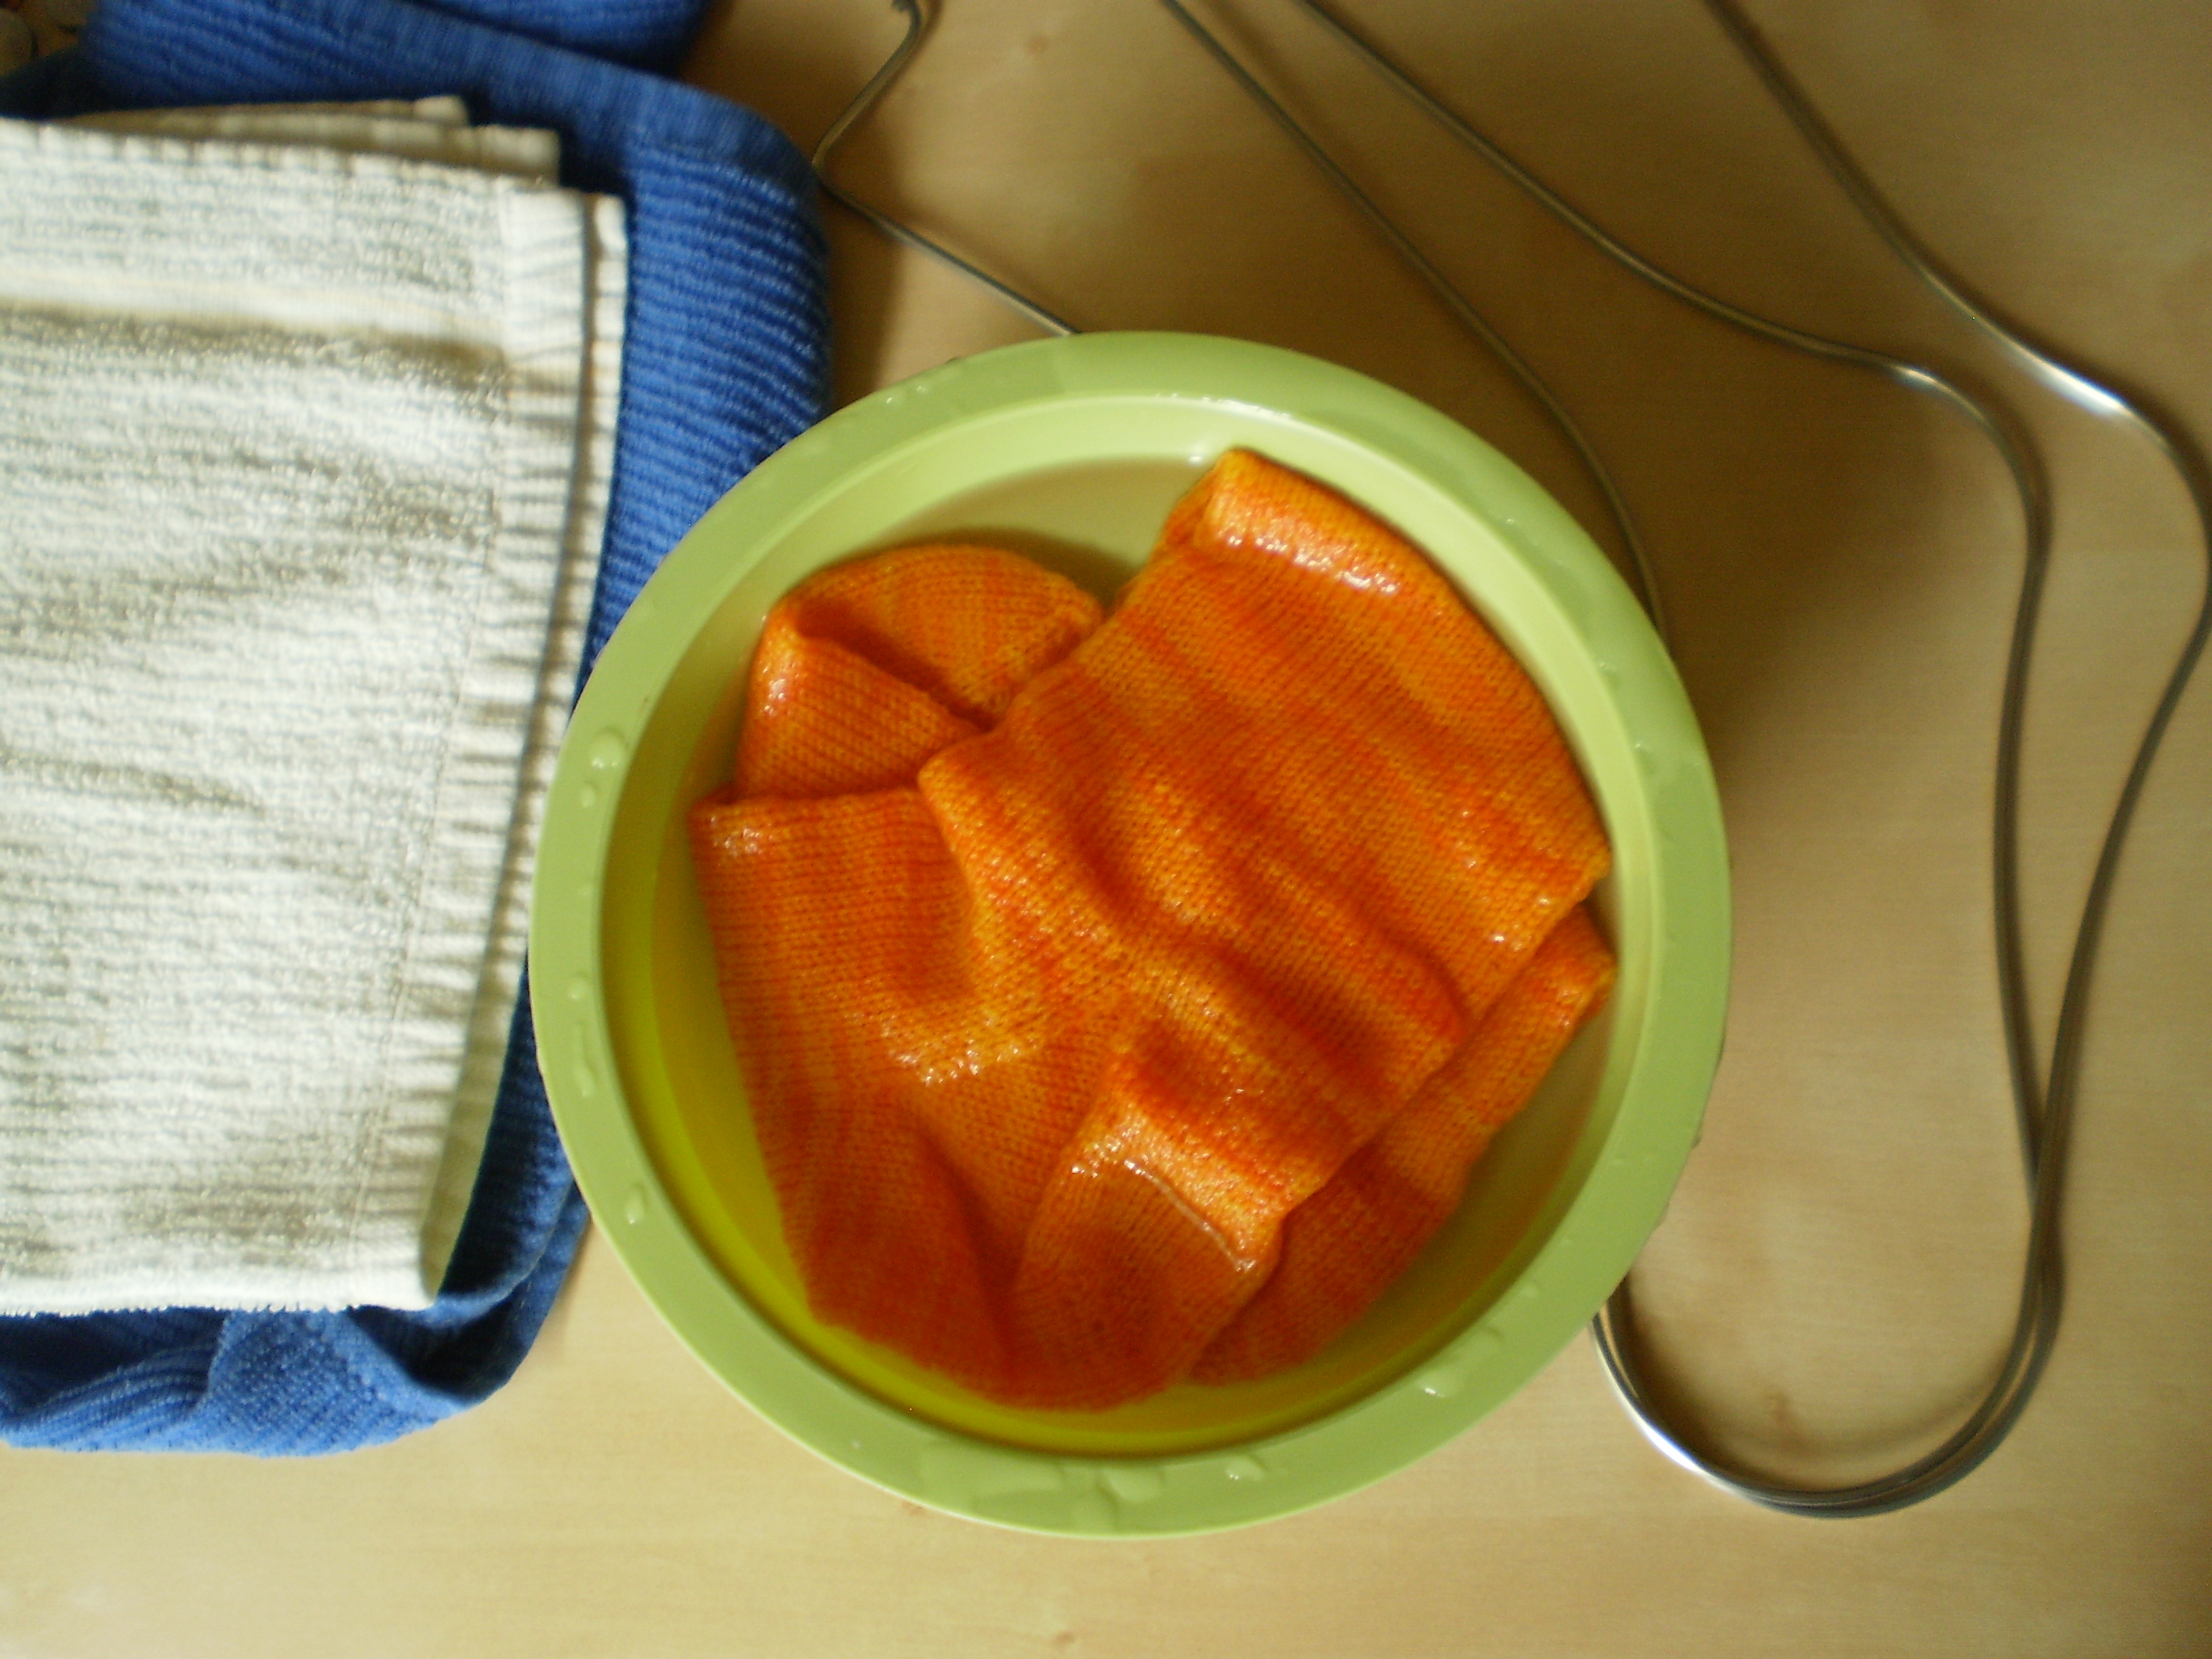
Drop your socks into the bowl of water, and let them soak for about 20 minutes. They need to be completely saturated.  Don’t scrub or squeeze them or anything, just lay them nicely in the bowl of water.  If you mess with them too much, they’ll start to felt, which is not ideal.  You can poke them a bit until they go underwater, if you feel it’s necessary.

After your socks are thoroughly saturated, take them out of the bowl and squeeze them gently to get rid of a good portion of the water.  They should still be wet, but not drippy.

OLYMPUS DIGITAL CAMERA

Then, lay out the towel (or towels) and arrange your socks nicely on top.  Roll the whole mess into a damp towel-and-sock burrito.  Squeeze it as much as you can, to get out most of the water.  (I know, first I tell you to get them wet, then I tell you to dry them out… I can’t make up my mind.  I’m terrible.)

OLYMPUS DIGITAL CAMERA

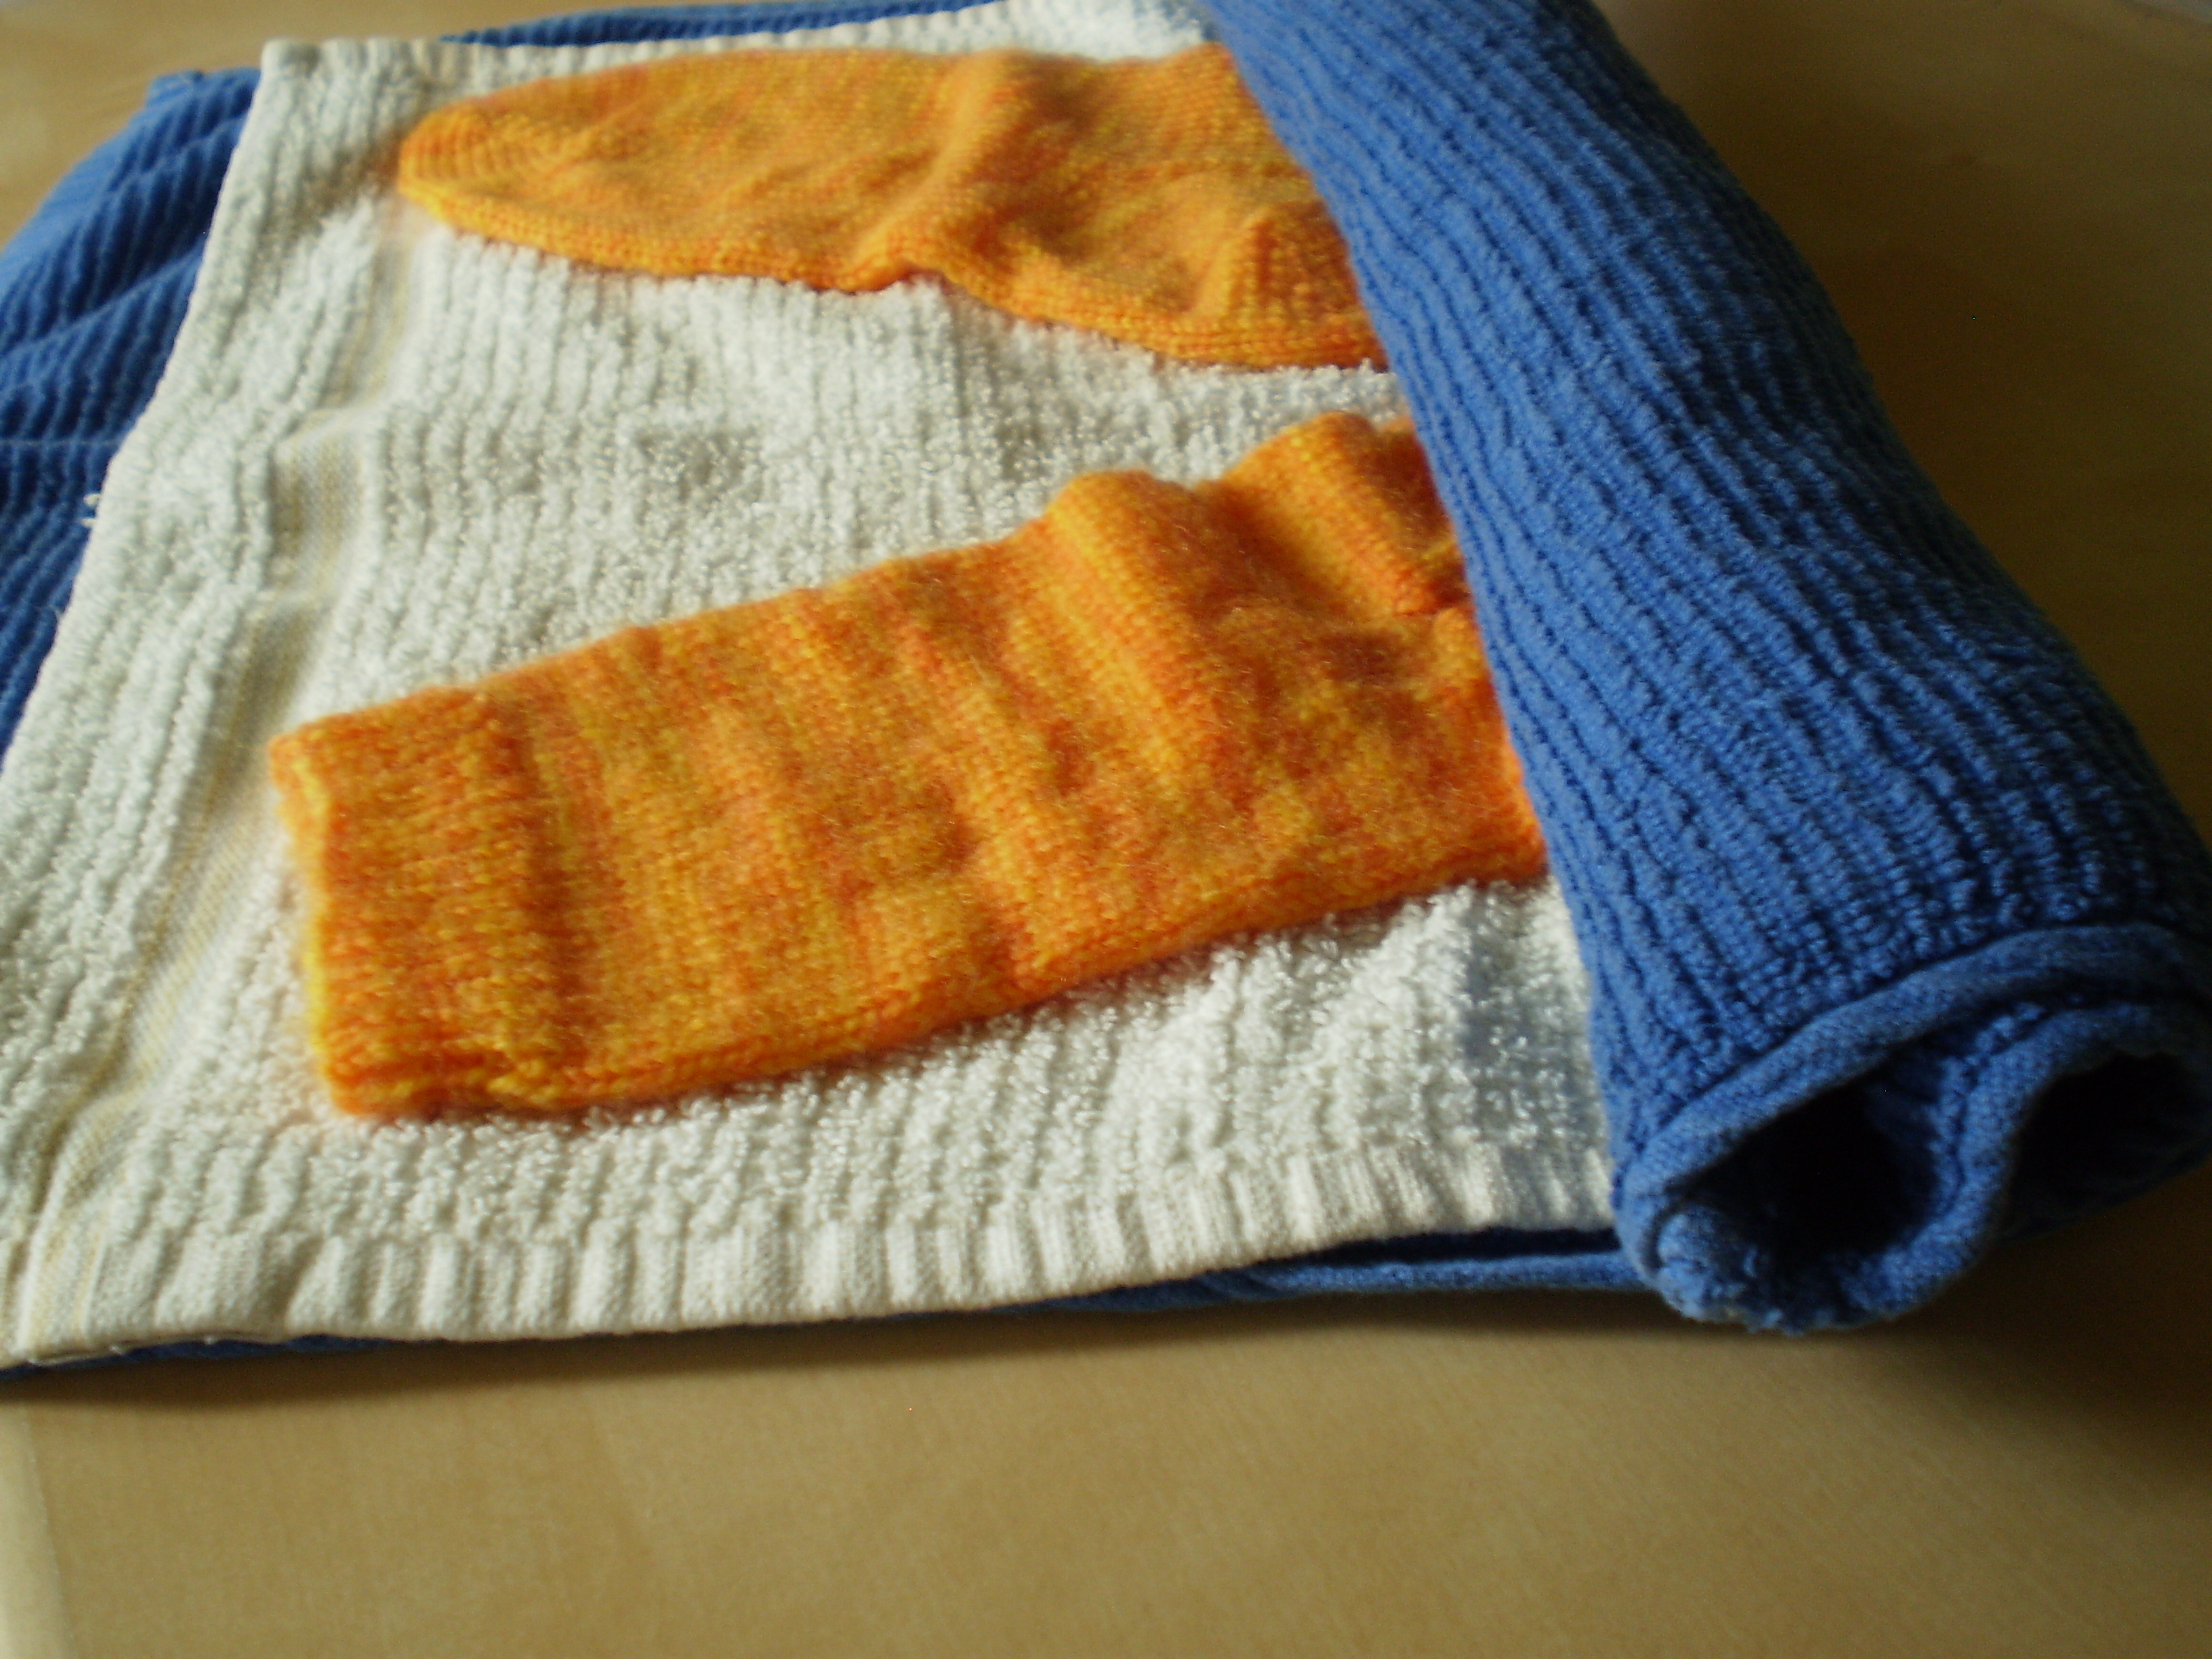
Now you have two options.  The easiest way to block socks is to use sock blockers (duh).  Sock blockers are sock-shaped forms that you put your wet socks on to dry after you’re done knitting them.  You can find them at your local knitting store, or you can buy them here.  Basically, you put the damp socks on the sock blockers, and let them hang to dry.  (My socks are a skotch too big for my blockers, so I use clothespins to keep them on the blockers.)  If you don’t own blockers, not to worry.  You can get out another clean, dry towel and lay your socks out nicely on the towel and leave them out to dry.

OLYMPUS DIGITAL CAMERA

Now, your beautiful socks are completely, totally and 100% DONE!  How exciting.  And, just in time for summer (because nothing says summer, like wool socks).

Sock Week: Second Sock Syndrome

It’s one of the most feared maladies in the fiber arts community.  It strikes suddenly and without consideration for age, experience, or the general health of the knitter.  It’s sent many a project bag to the back of the closet.  It’s the cause of countless cold feet.  It’s the one, the only,

Second Sock Syndrome-The silent killer (or rather, the cause of people getting bored with their socks and not making the second one of the pair)

Don’t fall pray to Second Sock Syndrome.  Knit your second sock, and make sure your feet get the love that they truly deserve.

Here’s my pair of socks:

OLYMPUS DIGITAL CAMERA

I made sure to follow the exact same pattern that I used to make my first sock, so that they match perfectly.  Count your rows in the leg and instep, so that one sock doesn’t end up longer or shorter than the other one.

OLYMPUS DIGITAL CAMERA

Also, in case you were wondering, I didn’t make a whole sock in two days.  I’m fast, but not that fast.

Sock Week: Closing Time

We’re in the final stretch!  All we have to do today is to close up the toe and weave in the ends.  Then you’ll have a beautiful new sock!

OK, when we left off on Friday, you had finished with needle 4 (your active yarn was at the bottom of the sole).

OLYMPUS DIGITAL CAMERA

Knit needle 1, so that your active yarn is coming from the side of the foot (by where your big toe/pinky toe would sit if you put on the sock).

OLYMPUS DIGITAL CAMERA

You’re now officially done with knitting the sock!  Yay! No more knitting.  Just grafting the toe closed.

To set up for grafting (also called the Kitchener Stitch), combine the stitches on needle 1 with the stitches on needle 4.  And, combine the stitches on needle 2 with the stitches on needle 3.  Cut your yarn, leaving a couple feet of tail, and get out your tapestry needle.  Your toe should look like this:

OLYMPUS DIGITAL CAMERA

Now, using the Kitchener Stitch, graft these stitches together.  This is a great video tutorial, if you haven’t done it before.

When you’re done, your toe should look like this:

OLYMPUS DIGITAL CAMERA

See how the knitting flows nicely from the top of the foot to the bottom of the foot?  Very pretty.

Now, all that’s left is to weave in your ends, and your sock is done!

OLYMPUS DIGITAL CAMERA

Congratulations!  You’ve now completed your first sock!

Sock Week: Tootsies

We’re so close, I can taste it!  Only a few short rows until you get to be done!  (And then you get to make another one… unless you’re an amputee.  In which case I’m jealous that you don’t have to make two socks, but I’m also sorry for your loss.)

So, there are a bunch of ways to do toes, just like there are a bunch of ways to do heels.  You’re welcome to use whatever method you like, but here’s what I do.  It’s easy, and gives me a nice result.

Starting at the middle of the sole of the foot (between needles 4 and 1), work the toe in the round by repeating the following two rows:

Row 1:  Needle 1: knit to 2 stitches before the end of the needle.  K2tog (right leaning decrease).  Needle 2: ssk (left leaning decrease), then knit to the end of the needle.  Needle 3: knit to 2 stitches before the end, k2tog.  Needle 4: ssk, knit to end of needle.

Row 2: Knit evenly (no decreases).

Repeat these two rows until you only have 5 stitches left on each needle, finishing with Row 1.  (Note: if you’re using this recipe to make tiny kids’ socks or doll socks, you’ll want to keep decreasing until there are 2 or 3 stitches left on each needle.)  You should have 20 stitches total.

Here’s what your toe should look like.  See how the decreases end up lining up nicely?

OLYMPUS DIGITAL CAMERA

Have a fantastic weekend!  We’ll finish the sock on Monday!!

Sock Week: Instep

So, I’m kind of running out of funny ideas for sock post titles.  Also, I now realize that this has taken WAAAY more than a week.  So perhaps I should have called it Sock Month.

But, I suppose it’s too late for all that.

Anyway.  Today’s step is stupid easy.  We’re going to make this “instep” of the sock.  The folks that write books about knitting call this the instep.  But I think it should more accurately be called the “foot-part.”  Basically, it’s the part of the sock between the gusset and the toe decreases.  And it’s really simple to do.

You knit.   That’s all.  No fancy decreases or increases, no picking up stitches, no dropping stitches, no short rows, no ribbing (unless you really want to for decorative reasons) or anything else.  Just knit a tube until your sock is 1 1/2 inches shorter than you want your finished sock to be.

How long do you want your sock to be?  As long as your foot (see, I told you this step was easy).  Measure your foot from the back of your heel to the tip of your big toe (or whatever toe is longest).  Subtract 1 1/2 inches.  Knit your sock instep until the sock measures that length from the back of the heel to the needles.  For example, my bare foot is 10 1/2 inches long.  So I knit my instep until the sock measured 9 inches long from needles to the back of the heel when laid out flat.  In my opinion, it’s better to err on the side of making your sock a smidge too big.  No one wants socks that are too small.

OLYMPUS DIGITAL CAMERA

See?  I realize I forgot to include a ruler in this photo, so you’ll have to take my word on the length of my sock.

If you don’t have a ruler hanging around, just keep trying on your sock until only 1 1/2 inches of toe poke out the end.  If you’re knitting socks for someone whose feet you don’t have access to, this website has some good sizing charts.

And, because I feel like this is a rather short post today, and because I’m getting a little sock-crazy, here’s a weird video I found on the internet today.  You’re welcome.

(Warning.  He swears a tiny bit, so don’t watch if you’re not into that.)

http://www.youtube.com/watch?v=r_A71jVpGSQ

Sock Week: Gussett

Today we’re going to do the sock gusset.  I don’t know why, but I always feel like “gusset” is a vaguely dirty word.  I don’t know why though.  I  guess I’m just being weird.

Anyway, the sock gusset is the part of the foot right next to the heel.  To make the gusset, you’ll decrease two stitches every other row, until you’re back down to your Sock Number of stitches.  It’s super easy, and kind of fun watching your little decreases line up nicely.

So, remember how your needles were numbered last week?  Starting at the back of the heel/bottom of the foot, and working your way around in the knitting direction like this:

OLYMPUS DIGITAL CAMERASo, needles 1 and 4 are the bottom of the foot, and needles 2 and 3 are the top of the foot.

See how there are approximately a billion stitches on needles 1 and 4?  And see how there are only stitches equal to 1/4 of your Sock Number on needles 2 and 3?  We want to decrease stitches on needles 1 and 4 until they have the same number of stitches as needles 2 and 3.  Does that make sense? (I can’t actually see your response, since this is the internet, but I’m going to assume you are nodding or at least giving me a blank look.)

OK, so here’s what we’re going to do:

Row 1: Knit to two stitches before the end of needle 1.  Knit these two stitches together (k2tog).  Knit needles 2 and 3 with no decreases.  On needle 4, slip, slip knit (ssk) to work the first two stitches together, then knit to the end of the row.  You will have decreased 2 stitches on this row.  If you need a reminder about the difference between k2tog and ssk, try this video.

Row 2: Knit even (no decreases).

Repeat Rows 1 and 2 until all of your needles have the same number of stitches.  See how the decreases line up nicely, and make cool triangle-y shapes on both sides of your sock?  That’s your gusset.

OLYMPUS DIGITAL CAMERA

Next time:  Instep (the stupid-easy part…. yay!)

Sock Week: Pick-up artist

So, sorry dear readers, but today’s episode of sock week is going to be short and sweet.  I have to go make some emergency cakes*, so my knitting and blogging time is going to be cut short today.  (I know… woe is me, I have to go bake cakes.)

Anyway, today we’re going to do the set-up row for the foot part of the sock.  It’s a little fiddly, but not too difficult.  Much like the rest of making socks.

So, after turning the heel, your sock should look like this:

OLYMPUS DIGITAL CAMERA

I’ve numbered the needles again, for your reference.

Knit to the end of needle 1

OLYMPUS DIGITAL CAMERA

Then, still using needle 1, pick up and knit stitches equal to one quarter of your Sock Number from the side of your heel flap.  My Sock Number is 60, so I will pick up 15 stitches.  If you were careful with slipping the first stitch of each of your heel flap rows, you should actually have the proper number of spaces in which to pick up stitches.  (It’s hard to explain, but once you try it, it will make sense.)

Picking up stitches is just like knitting, only you don’t need live stitches to start with.

OLYMPUS DIGITAL CAMERA

Insert your needle where you want the stitch to go.

OLYMPUS DIGITAL CAMERA

Wrap the yarn around your needle, just like you do when you knit.

OLYMPUS DIGITAL CAMERA

And pull the stitch through.

If you haven’t done tried picking up stitches, this is a pretty good video.

When you get to the last picked-up stitch, pick up both the usual slipped stitch as well as the stitch below, then knit it as normal.  This will prevent your sock from having a little hole on the side.  If you skip this step, it’s not a big deal, but it makes a nicer finished product.

OLYMPUS DIGITAL CAMERA

Knit needles 2 and 3 normally:OLYMPUS DIGITAL CAMERA

Then, using your fifth needle, and continuing in the same direction around your sock, pick up and knit the same number of stitches up the other side of the heel flap.  If you want to do the fancy-pants no-holes pick-up, like on needle 1, do it at the beginning of this needle.

OLYMPUS DIGITAL CAMERA

Then, using the same needle, knit the stitches from needle 4 as normal.

So, what you should end up with is:

Needles 1 and 4: A bunch of stitches, but both should have the same number of stitches.

Needles 2 and 3: Both of these should have stitches equal to a quarter of your Sock Number.

OLYMPUS DIGITAL CAMERA

If you fold your sock in half, it should look kind of like this (quite sock-like, I think):

OLYMPUS DIGITAL CAMERA

Next time, the gusset!

*Emergency Cakes-Cakes that one has to make at the last minute when your friend begs you to bring desserts for a fund raiser that is happening this evening.  Stressful, but tasty.

Sock Week: The Turn of the Heel

So, I don’t know about you, but my heel isn’t square-shaped, so we probably shouldn’t make our socks square-shaped, too.  To do this we’re going to “Turn the Heel.”  I got completely confused the first time I did this, so I’m going to do my best to help you through.  We can do it together!  Solidarity!

Anyway, “turning the heel” involves making short rows across the heel flap and throwing in some decreases as we go, to make the heel… well… heel-shaped.  The goal is to end up with a little round, cup-shaped heel.  “Short rows” are rows that are knit only partway across.  This lets you start building up 3-D structures, instead of just flat pieces.  Some people use short rows for things like puffy sleeves or fitted bust lines on sweaters, or faces on teddy bears etc.

OK, so get out your sock and follow along.  You’ll be starting from the marker at the back of the sock.

First, do this:  Knit 2, K2tog (left leaning decrease), knit 1, wrap and turn. (This video is a good tutorial for wrap and turn.  Ignore the part where she talks about hiding your wraps, though.  That’s more for sleeves or other things.  That doesn’t matter so much with heels.)

Your first row should look like this:

OLYMPUS DIGITAL CAMERA

Turn the work and Purl to the marker.  Purl 2, P2tog, Purl 1, wrap and turn.

It should look like this:

OLYMPUS DIGITAL CAMERA

Turn the work back to the knit side.  See where there is a gap from where you wrap and turned?  Knit until one stitch before the gap.  Knit the two stitches on either side of the gap together.  Knit 1, wrap and turn.

OLYMPUS DIGITAL CAMERA

See how the k2tog closes up the gap so nicely?  (I haven’t done the last k1 or the wrap and turn yet):

OLYMPUS DIGITAL CAMERA

Then, do the same thing on the purl side.  Purl until one stitch before the gap and purl the two stitches on either side together.  Purl 1, wrap and turn.

OLYMPUS DIGITAL CAMERA

Keep on repeating these two rows:

-Knit to 1 before the gap, k2tog, k1, w&t

-Purl to 1 before the gap, p2tog, k1, w&t

You’ll work more and more stitches each row that you work.

When you get to a point where you can’t do another full repeat of the pattern, stop when you’re back at the marker, on the knit side.  Your heel should look like this:

OLYMPUS DIGITAL CAMERA

We’re getting there!  Your sock is looking sockier and sockier!  (sockier [sok-EE-er]: adj. more like a sock)

On Friday we’ll pick up stitches to get set up for the gusset.

Sock Week: Getting Flappy

How’s your sock looking? Pretty tubular?  Now, you could just make a big tube and close it up at one end and say “Hey, It’s a sock!”  But I think foot-shaped socks are much better than tube-shaped socks.  They are more comfortable and more interesting to knit.

Here’s what you should have so far (I’ve numbered the needles for ease of discussion later):

OLYMPUS DIGITAL CAMERA

Needles 1 and 4 are the back of the leg/heel/sole of the foot.  Needles 2 and 3 are the shin and the top of the foot.  The end of the row is between needles 1 and 4.

Set aside your fifth needle for now (don’t loose it, we’ll need it later).  Using needle 4, place a marker, and knit across needle 1.  You’ll have half your stitches on one needle, which you’ll work back and forth to create your heel flap.  It will look like this:

OLYMPUS DIGITAL CAMERA

Using just this needle, work the heel flap back and forth, following the following rules:

  1. Work the heel flap back and forth, not in the round.  Do not knit any of the stitches on needles 2 or 3.
  2. Since we’re doing stockinet stitch back and forth, make sure to knit one row and purl one row.
  3. Every time you start a new row, slip the first stitch.  This makes a nice edge that will make it easier for us to pick up stitches later on.
  4. Your heel flap is done when you’ve worked rows equal to half your Sock Number. (My sock number is 60, so I’ll work 30 rows for my heel flap).

When you’re done, work back to the beginning of the round (in the middle of the row/where you put the stitch marker).  It should look like this:

OLYMPUS DIGITAL CAMERA

Wednesday, we’ll turn the heel!

Sock Week: Starting at the top


ARE! YOU! READY!

I am.  And apparently overexcited.  Or possibly over-caffeinated.  Which is often the same thing.  Without further ado, let’s get started.

So, these are “top-down” socks, meaning that we cast on at the cuff, and work down to the toe.  Some patterns are worked “toe-up,” but it’s really just a personal preference if you like top-down socks or toe-up socks.

Since these are top-down socks, you’ll cast on your Sock Number of stitches (I hope you remember it from Wednesday).  I cast on 60 stitches, because that was my sock number.

Divide your stitches evenly among four of your  needles (15 stitches on each needles, in my case).

Then…. knit the leg of your sock.OLYMPUS DIGITAL CAMERA


For my basic basic socks, I like to do 1 inch of k1p1 ribbing, then stockinet stitch (all knits, since we’re working this sock in the round) until the leg measures about 6 inches.  BUT, you can do anything you like.  Think about this sock leg as a canvas for you to play on.  The rest of the sock is pretty standard, but you can add all sorts of fun stuff to the leg, if you like.

How about:

Ribbing?

Stripes?

Lace?

Colorwork?

Tall socks?

Short socks?

Take a look through pattern books and at pictures of socks and find something you like.  As long as the pattern you choose (ribbing, lace, colorwork etc) uses a number of stitches that divides nicely into your Sock Number, you are free to do whatever you like.   So, work on your leg over the weekend, and we’ll move on to the heel flap on Monday.