Monthly Archives: October 2013

Inspiration: Halloween

I absolutely love Halloween.  It’s one of my favorite holidays.  I love just about everything about it.  Making my own costume is always my favorite part (and always has been.  Once, when I was a kid, I was a fly.  Because why not?).   On this most spooky of holidays, let’s get some spooky knitting going!

How about some adorable (yet terrifying) little monsters?

Adopt a Blob Monster/Ghost by Jenna Kruparblob15_medium2[1]Or what about some evil little witches?  They’re clearly up to no good!

Tiny Halloween Witch by Mrs Lettice Weasel

DSCF0706_medium2[1]Halloween night can get a little bit chilly, so bundle up in this awesome spider sweater.  (I wish that the pattern went up to adult sizes, because I totally would wear this sweater.  Not even kidding.)

Halloween Sweaters – Spiderwebbed, Ghostly and Pumpkinhead by Jessica Henshaw

2877023912_68d0280c57_z[1]And, of course.  What would Halloween be without that most excellent source of high fructose corn syrup?  I love me some candy corn.

Candy Corn Stranded Mittens by emilyelizabeth

candycorn_mittens_002_medium2[1]

Sit Up Straight!

My back has been a little achy lately.  It’s possible that it’s from work (where I’ve been schlepping around 40-pound bags of clay), or it’s possible that it’s from my terrible, terrible posture.

So, this is just a little PSA (mostly to myself, because if I don’t write something down, I immediately forget it) to remember proper posture while you knit.  Sit up straight, with your feet firmly planted on the ground, elbows in and comfortable.  Your back and shoulders will thank you.

Although, who am I kidding?  This is how I usually knit:

bad-posture-cat[1]

Pattern: the n00b Hat

OLYMPUS DIGITAL CAMERAThanks for playing along with me and my hat-making shenanigans!  I’ve compiled the last month’s-worth of n00b hat-ness into one easy-to-find .pdf pattern.  Feel free to download it, use it, or share it, whatever you like.  Maybe your friend/mom/dad/kid sister/weird guy down the street wants to learn how to knit.  I’d be delighted if folks started using this pattern more and more.  And I’d love to see everyone’s first n00b hats!  That would totally make my day!

The nOOb Hat


Pattern Spotlight: Turkish Bed Socks

I love knitting gifts for other people, but there are only so many hours in the day, and so many yards of yarn in my stash.  So what’s a girl to do?  How about making Turkish Bed Socks for all your friends.  These ankle socks are a great compromise between being a quick little project, and producing something beautiful and useful.

OLYMPUS DIGITAL CAMERAThey make great gifts, since they’re one-size-fits-most (even I, with my big man feet, can fit into them if I add a few extra rows in the foot part, but that’s easy to do).   They’re nice for bumming around the house and keeping your tootsies warm, and they look really cute peeking out of clogs or Converse sneakers.

OLYMPUS DIGITAL CAMERAAnd, a pair of these socks takes only a fraction of the amount of yarn that regular socks take to work up.  I managed three pairs of these from one 100g skein of sock yarn.  A bargain, if you have to manufacture a bazillion of these.

OLYMPUS DIGITAL CAMERAAlso, while the pattern is written as a simple stockinet stitch sock, they suggest that you work your favorite cable, rib, textured, or lace pattern on the top of the foot, which can make each pair unique, and will keep you interested while you knit them up.

So, if you’re looking for a stocking stuffer, try making up some Turkish Bed Socks.

Inspiration: Tiny Stuff!

I’m a fiend for tiny things.  It’s been that way since I was a little kid.  (Mom loves tiny stuff, too.  So maybe it’s genetic?)  But, basically, the smaller, the better, and the more useless the better.

Here are a couple fun (and tiny) little projects for you to try out.  They’re great for using up little bits of extra yarn you might have laying around.

Adorable!

Teeny Tiny Knitted Toys by Little Cotton Rabbits

2456725646_6de7080305_z[1]

Chichester the Pig by Helen Apocalypse (FYI, this little piglet is knit in the round
with no seaming!  No arms or legs to sew on!  That means you have
time to make a whole drift (Drift is the technical term for a group of pigs.  Now you know!).)

IMG_8632_medium2[1]

Mini Christmas Stocking Ornaments by Little Cotton Rabbits

IMG_8107_medium[1]Wee Twee Tiny Acorn Tutorial by Pamela Wynne

4177653240_0a5bbc77e0_b

n00b Hat, Part 5: Finishing

You’re so close to finishing your hat, I can smell it.  (Or maybe that’s the spiced apple cider heating up on my stove…mmm, I love fall.) In fact, you are totally done with your knitting, and all that’s left is to do your finishing.  In this case, that means sewing up the seam along the back of the hat, so that it ends up… well… hat-shaped.

Start out by cutting your working yarn, leaving a good 18-inch tail on your project.  Thread this tail onto your tapestry needle.

OLYMPUS DIGITAL CAMERAThen, turn your hat over, so that you can see the purl side facing up.  Carefully use your tapestry needle to thread your tail from the left, through  the 8 remaining stitches.

OLYMPUS DIGITAL CAMERAOnce you have your last stitches safely contained on your tail, you can remove your knitting needle (So long, knitting needle!) and pull the tail snug.  This makes a nice little rosette-dealy at the top of your hat. See?

OLYMPUS DIGITAL CAMERANow, sew the two edges of your knitting together, using your yarn tail.  I like to use a mattress stitch, but feel free to use whatever you are most comfortable with (whip stitch will also work well).  Try to make your seam as neat as possible, but don’t worry too much (since the seam is worked with the same yarn as the rest of the hat, even messy stitching won’t show up too much).

OLYMPUS DIGITAL CAMERAWhen you’ve finished sewing up the hat, it should look like this.  Very hat-like.  (Hattish? Hat-esque?)

OLYMPUS DIGITAL CAMERASee how you still have those two pesky ends?  We have to do something with them (unless you like big hunks of yarn hanging down off your hat, I suppose).  So, turn your hat inside-out.  See the seam allowance that you made by sewing the two sides of your hat together?  Sew your yarn up through that for a couple inches.  (Throw in a knot or a securing stitch, if you want.) Then, cut your tails, leaving a 1-2 inches dangling inside the hat.

OLYMPUS DIGITAL CAMERAAnd that’s it!  You’re done!  You have a great knitted cap!  Congratulations!

If you have questions, please let me know, and I’ll be happy to help!

Getting to the Point, Part 2

(Can I just say how ridiculous this title is?  I didn’t come up with the title until I had written out this whole post as well as the last post.  Anyway.  Dorky me and my wordiness.)

Even once you have decided on the kind of needle material you want, you still have to figure out the type of needle you are going to use.  Here, again, you pretty much have three choices.

straight-needles[1]“Straights” or “straight needles” are your grandmother’s knitting needles.  They’re they kind that you imagine when you hear the words “knitting needles.”  They’re straight (obviously), usually longish (12+ inches), and have a point on one end and a nubbin on the other.  The nubbin stops your stitches from falling off the end.  They are great for learning on, and are good for knitting flat things.  However, if you knit big projects (like blankets or sweaters), you might want to avoid using straights, because the weight can cause wrist/hand problems.

OLYMPUS DIGITAL CAMERAThe second type of needle are Double Point Needles (or DPNs).  DPNs are usually shortish (in the 5-8 inch range), and, as the name implies, have points on each end.  They’re sold in sets of 5 or so (depending on the brand).  They’re used to knit up small projects in the round.  If you’re making mittens, socks or sleeves, you might make the whole project on DPNs.  Or, you could make the top of a hat on DPNs.  They’re a little scary to use the first time, since you use so many at the same time, but they’re really the best/only way to make certain projects.

circular-needles[1]The last type of needle is the circular needle.  These are two short needles (usually about 3-8 inches, depending on the brand) connected by a long cord.  These are my absolute favorites.  They’re versatile, allowing you to knit flat (like with straight needles) or work large projects in the round.  The fact that the project hangs more or less evenly between your hands means that there is less chance of arm/hand fatigue.  Also, if you knit in public/on the bus/on a couch next to people, circulars are nice and compact so you won’t keep poking your neighbors. But, one drawback of circular needles is that they are fairly specific to the project you want to make.  For example, even though they’re both knit on size 8 needles, you will need a long circular needle to make a sweater in the round, but a short circular needle to make a hat.  (But, that’s a pretty minor complaint in my biased opinion.)  Also, poorly made circular needles can snag where the needle joins the cord, which can be a huge pain in the butt when you are cruising along a project.  This means that when I buy circular knitting needles, I almost always go for the super fancy ones (like Addi Turbos), which cost way too much.  But, I think it’s worth it to not hate my knitting.

They type of needle you use is pretty much determined by the project you’re making, but still you’ll develop preferences.  If you hate DPNs, you could end up buying a whole bunch of tiny little circular needles, so you never have to break out the DPNs on a sleeve.  Maybe you love circulars, so you end up knitting everything on circulars and never touch straights again.  It’s really all up to you and your personal preference.  What do you prefer?

Getting to the Point, Part 1

knitting-needlesTechnically, all you need to knit is a skein of yarn and a couple sticks.  That’s it.  We talk about yarn weight, fiber content, dying, blah, blah, blah, all the time.  Often we forget about the knitting needles.  They’re probably feeling all left out.  So, let’s talk needles.

Historically, knitting needles have been made from just about anything you can think of (bone, horn, wood, metal etc.), but most needles you can find at your local knitting store are made from one of three materials, metal, wood (or bamboo), or plastic.  Whatever your needles are made of, they all perform essentially the same function, i.e. they hold your stitches as you knit.  But, as with everything in knitting, there are just about as many opinions on needles as there are knitters.

Metal needles are very rigid (because they’re made from metal… duh), but are really slippery and can be made with really pointy points, which makes them good for fuzzy or snaggy yarns or for really complex projects (like lace, or other textured patterns).

Wood and bamboo needles are much lighter than metal needles and slightly bendy, which makes them more comfortable if you have hand or wrist pain issues.  But, because  wood and bamboo are softer than metal (again… duh), the tips of these needles are usually more blunt than metal needles, which makes them a little harder to use when you’re doing fancy-pants lace work.  Supposedly, bamboo needles are supposed to be stronger, and more durable than wooden ones, but they seem about the same to me.

Most commercially available needles are metal or wood, but sometimes you’ll run across plastic ones, too.  They are usually somewhere between metal and wood on the bendiness/heaviness scale, and they come in fancy colors (sometimes with glitter!).  But (and maybe this is just my limited experience) they seem a little cheap to me.  I’ve had a couple pairs of plastic needles, one broke in half, and the tips of the other got beat up to the point where they looked like I had been chewing on them.  Not ideal, in my opinion.  But, if you love plastic needles, let me know! I like being proved wrong.

So, try knitting with different types of needles and see what you like the best.  I love me some metal needles when I’m using straights or circulars.  But, when I’m working with DPNs (making socks or mittens etc.), I like my bamboo needles.

What do you like best?

n00b Hat, Part 4: Decreasing

How’s your hat going?  Mine’s looking pretty good, and I bet yours it too.

OLYMPUS DIGITAL CAMERABut, you’ve probably noticed, that this hat is a big flatty-flat piece of knitting.  And, I don’t know about you, but my head is not flat.  It is big and round, like a melon.

So, we probably need to make our hats a little more head-shaped.  We’ll do that by adding some “shaping” to our knitting.  Shaping is a generic term for using special stitches to give your knitting a 3D shape.  I’ll show you how to do a simple knit two together decrease (which is usually shortened to ‘k2tog’).

We’re going to do 8 k2togs across each knit row of the hat for the rest of the project.  Make sure you are working on a knit row, and start following along.

Knit 8 stitches regularly.  Then, get ready for a k2tog.

OLYMPUS DIGITAL CAMERA
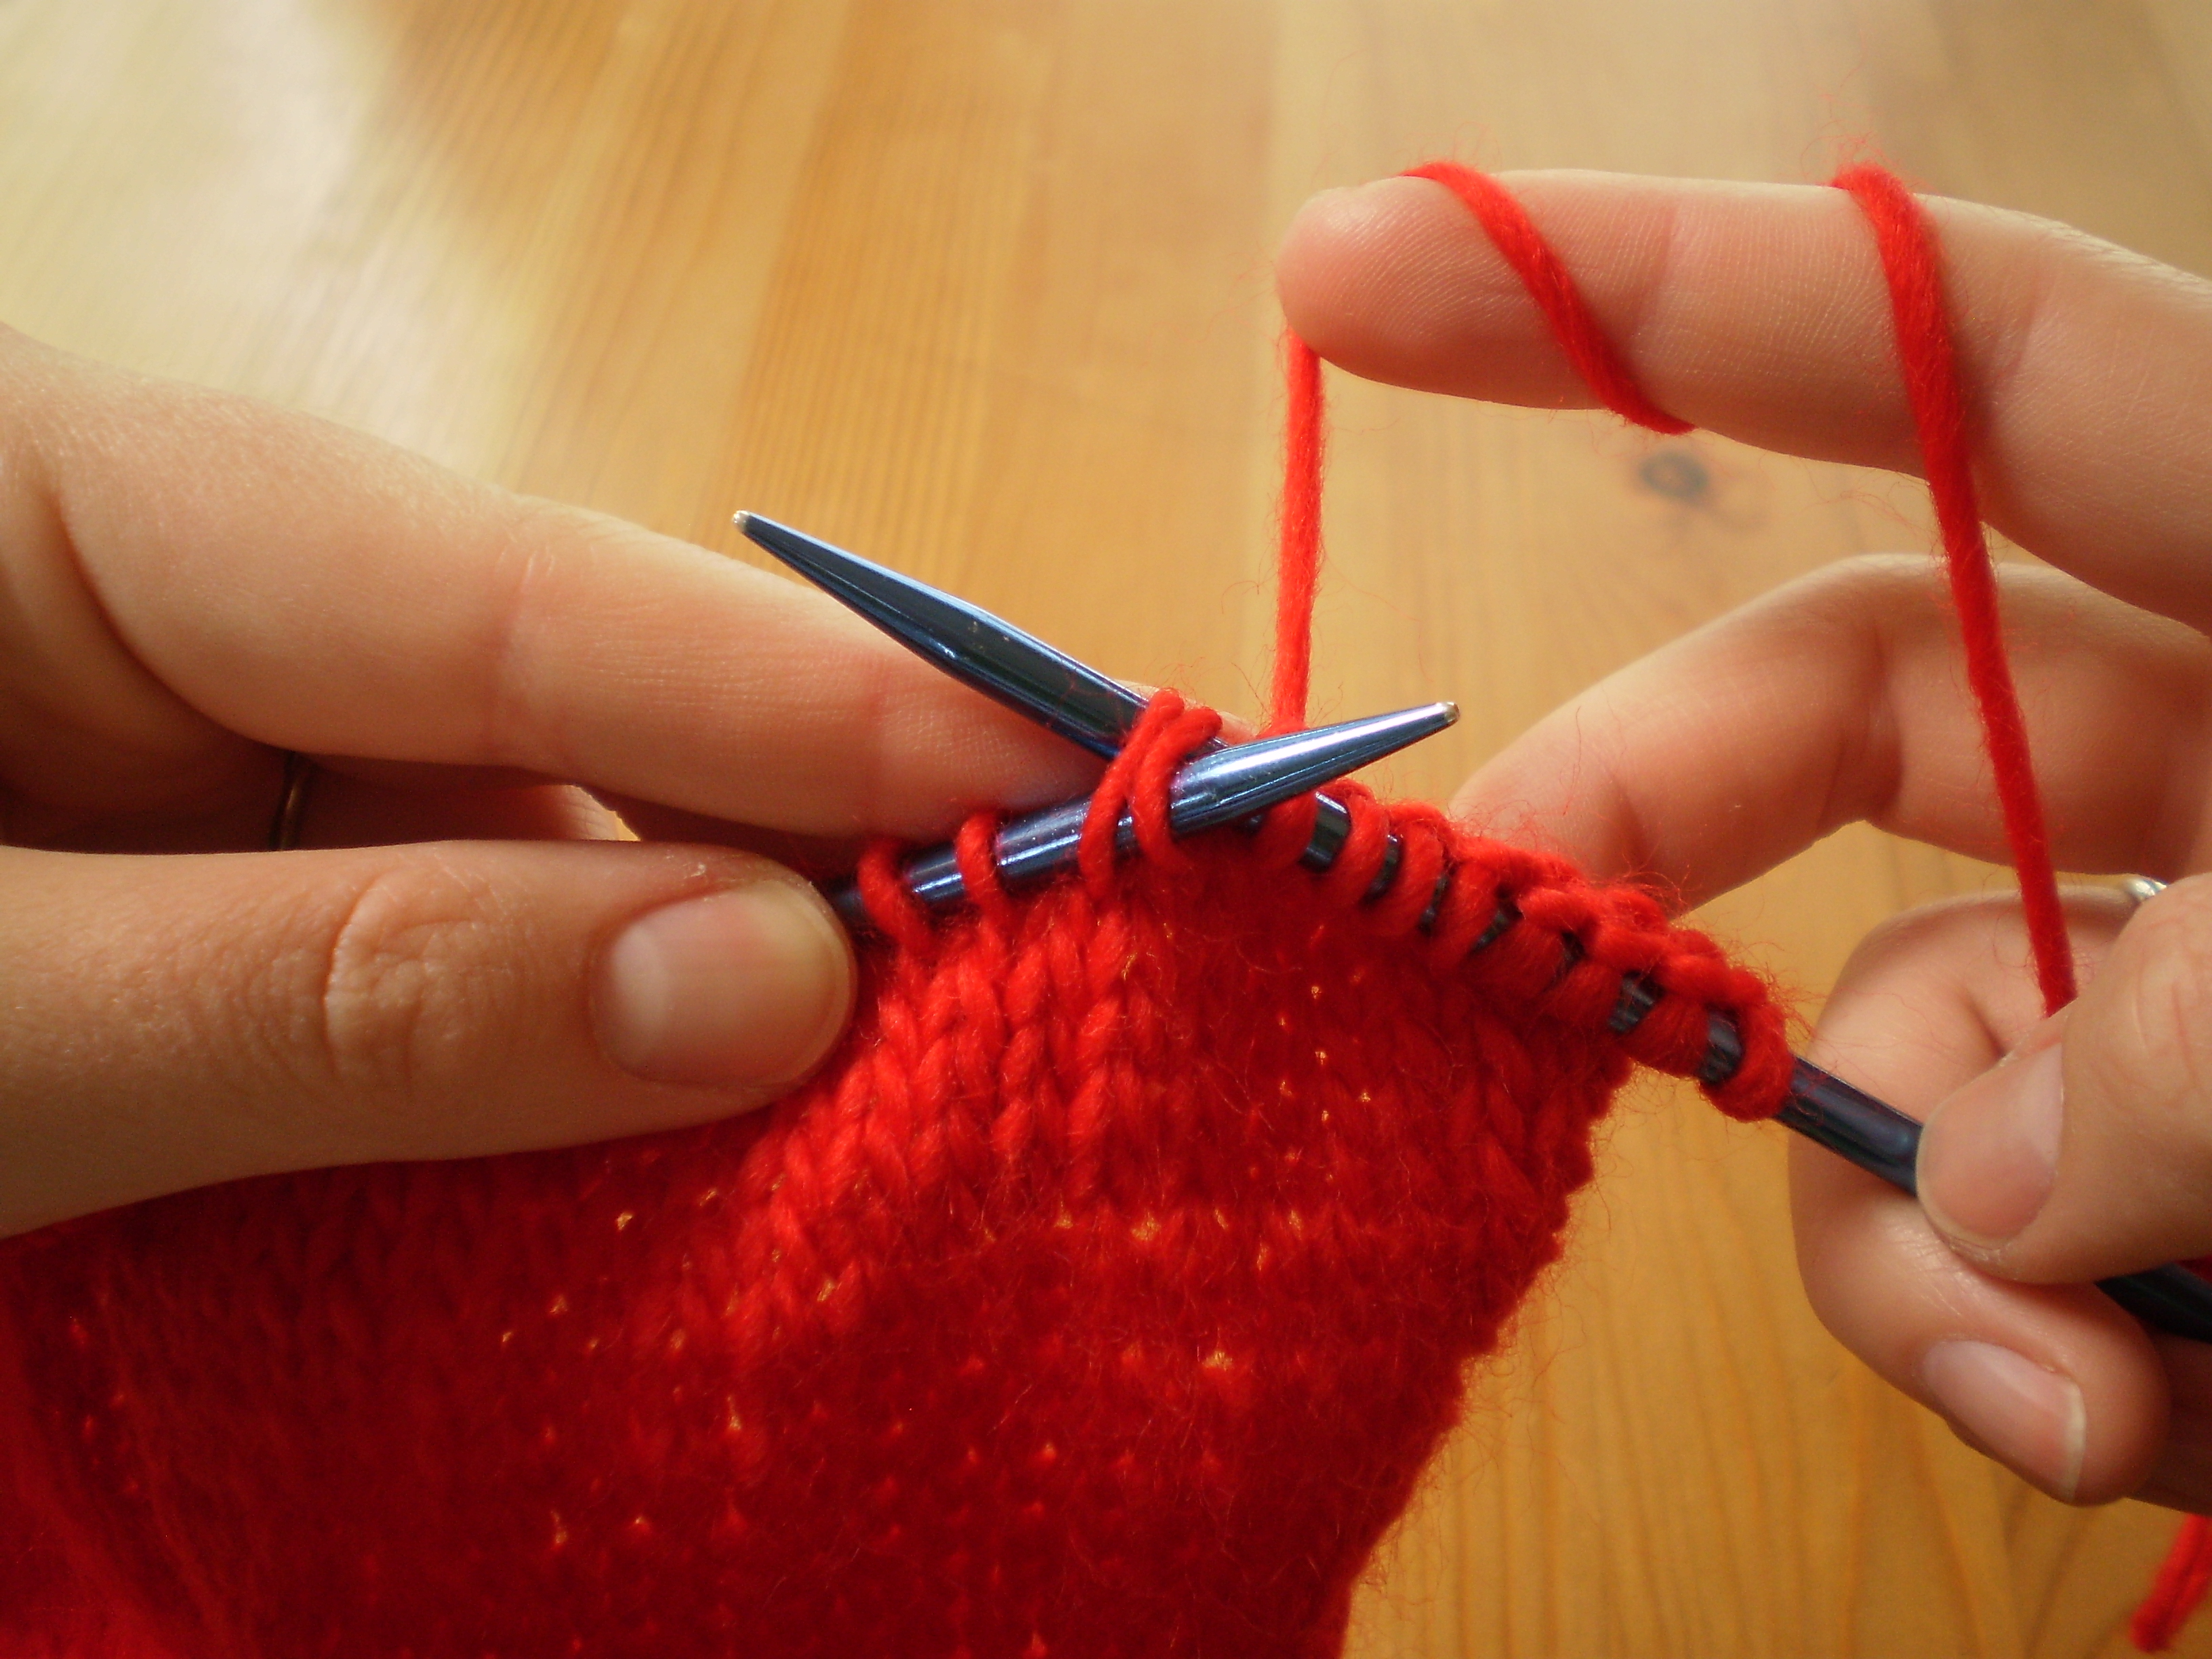
k2togs are super easy to do.  It’s exactly like doing a knit, but instead of poking your right needle through a single stitch, you poke it through two stitches.  Like this:

OLYMPUS DIGITAL CAMERAThen, wrap your yarn around the tip of your needle.

OLYMPUS DIGITAL CAMERA
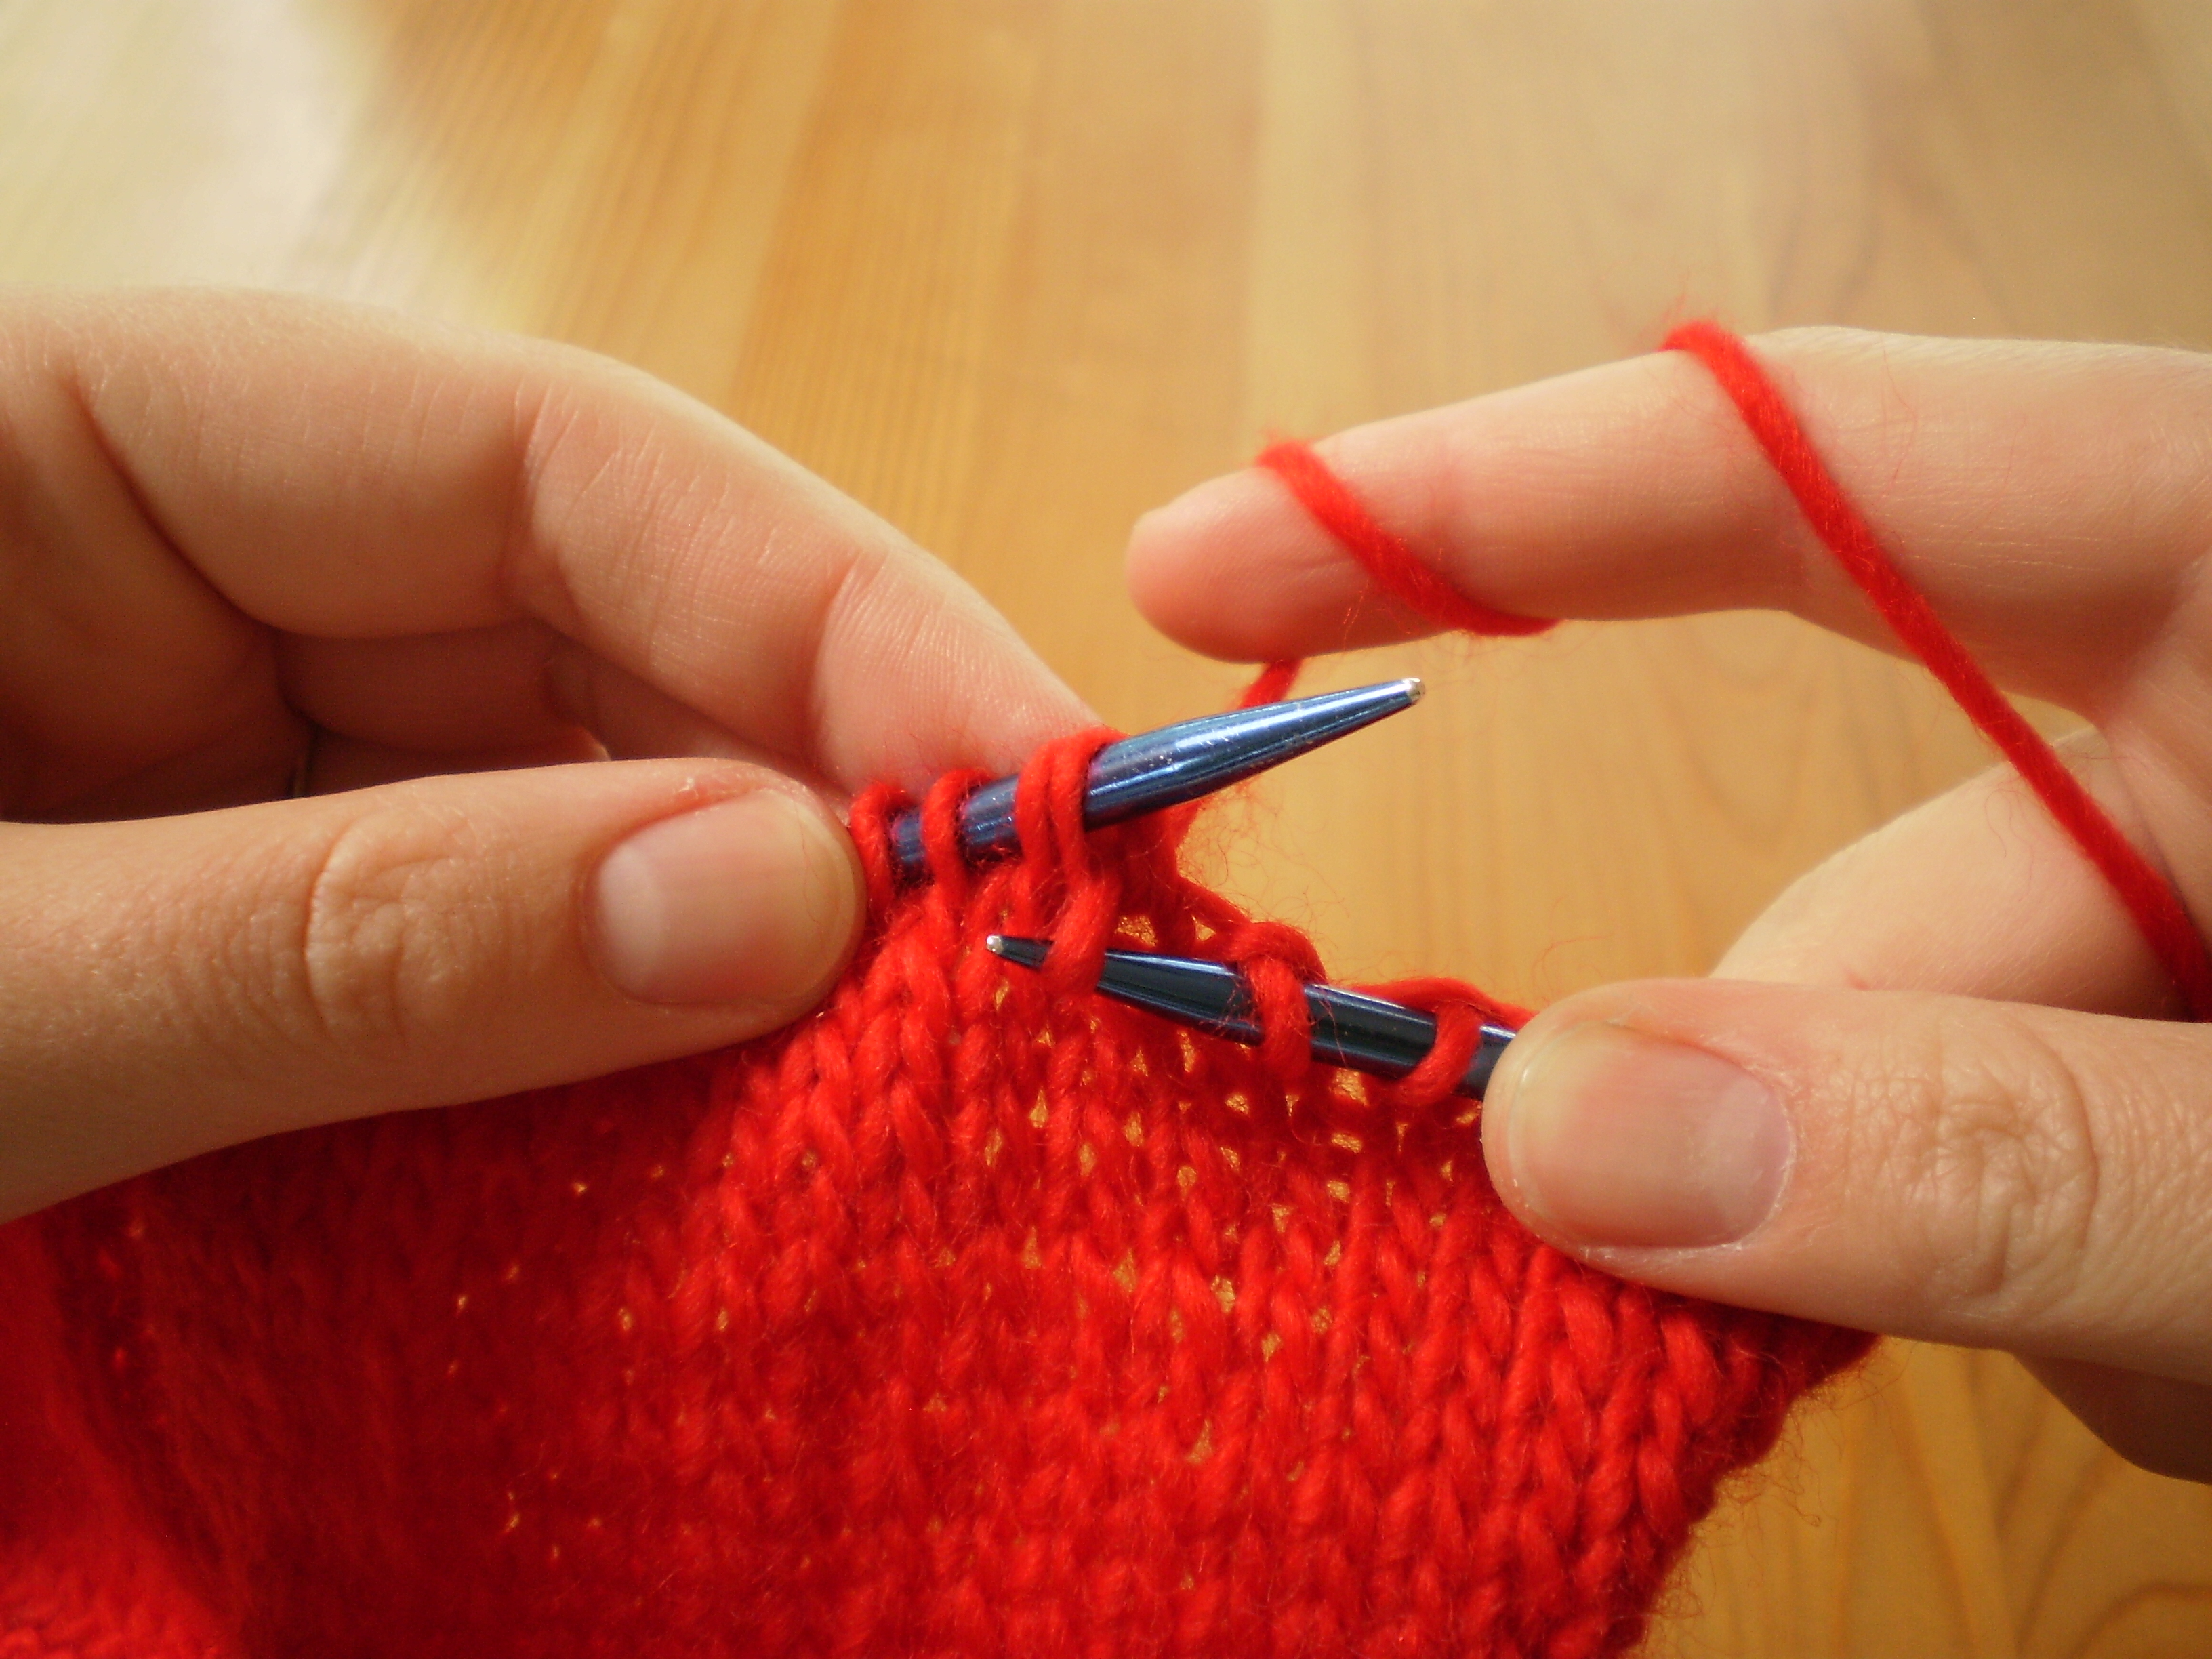
And pull your new stitch through both old stitches.

OLYMPUS DIGITAL CAMERAThen drop the old stitches off your left-hand needle.  See how you’ve decreased the number of stitches by one?  (2 old stitches = 1 new stitch)

OLYMPUS DIGITAL CAMERAKeep working in the established pattern: Knit 8 stitches, then k2tog. Knit 8, k2tog, knit 8, k2tog, over and over.  You should end the row with a k2tog.

The next row is a purl row, so purl all stitches (don’t do any decreases).

The next row is a knit row, so you’ll do decreases again.  This time, knit 7 stitches, k2tog, knit 7 stitches, k2tog, etc.

Then purl a row.

Then work a knit/decrease row.  Knit 6, k2tog, knit 6, k2tog, etc.

Then purl a row.

Then do another knit/decrease row.  Knit 5, k2tog, knit 5, k2tog, etc.

Then purl a row.

See how the pattern goes?  All purl rows are worked like normal.  All knit rows include decreases.  Each time you do a decrease row, you knit 1 fewer stitch between each decrease.  (If you find yourself getting confused, make notes on a post-it to help you keep track of where you are.) If you keep working in this pattern, your decreases will end up lining up nicely.  Kind of pretty, right?

OLYMPUS DIGITAL CAMERA
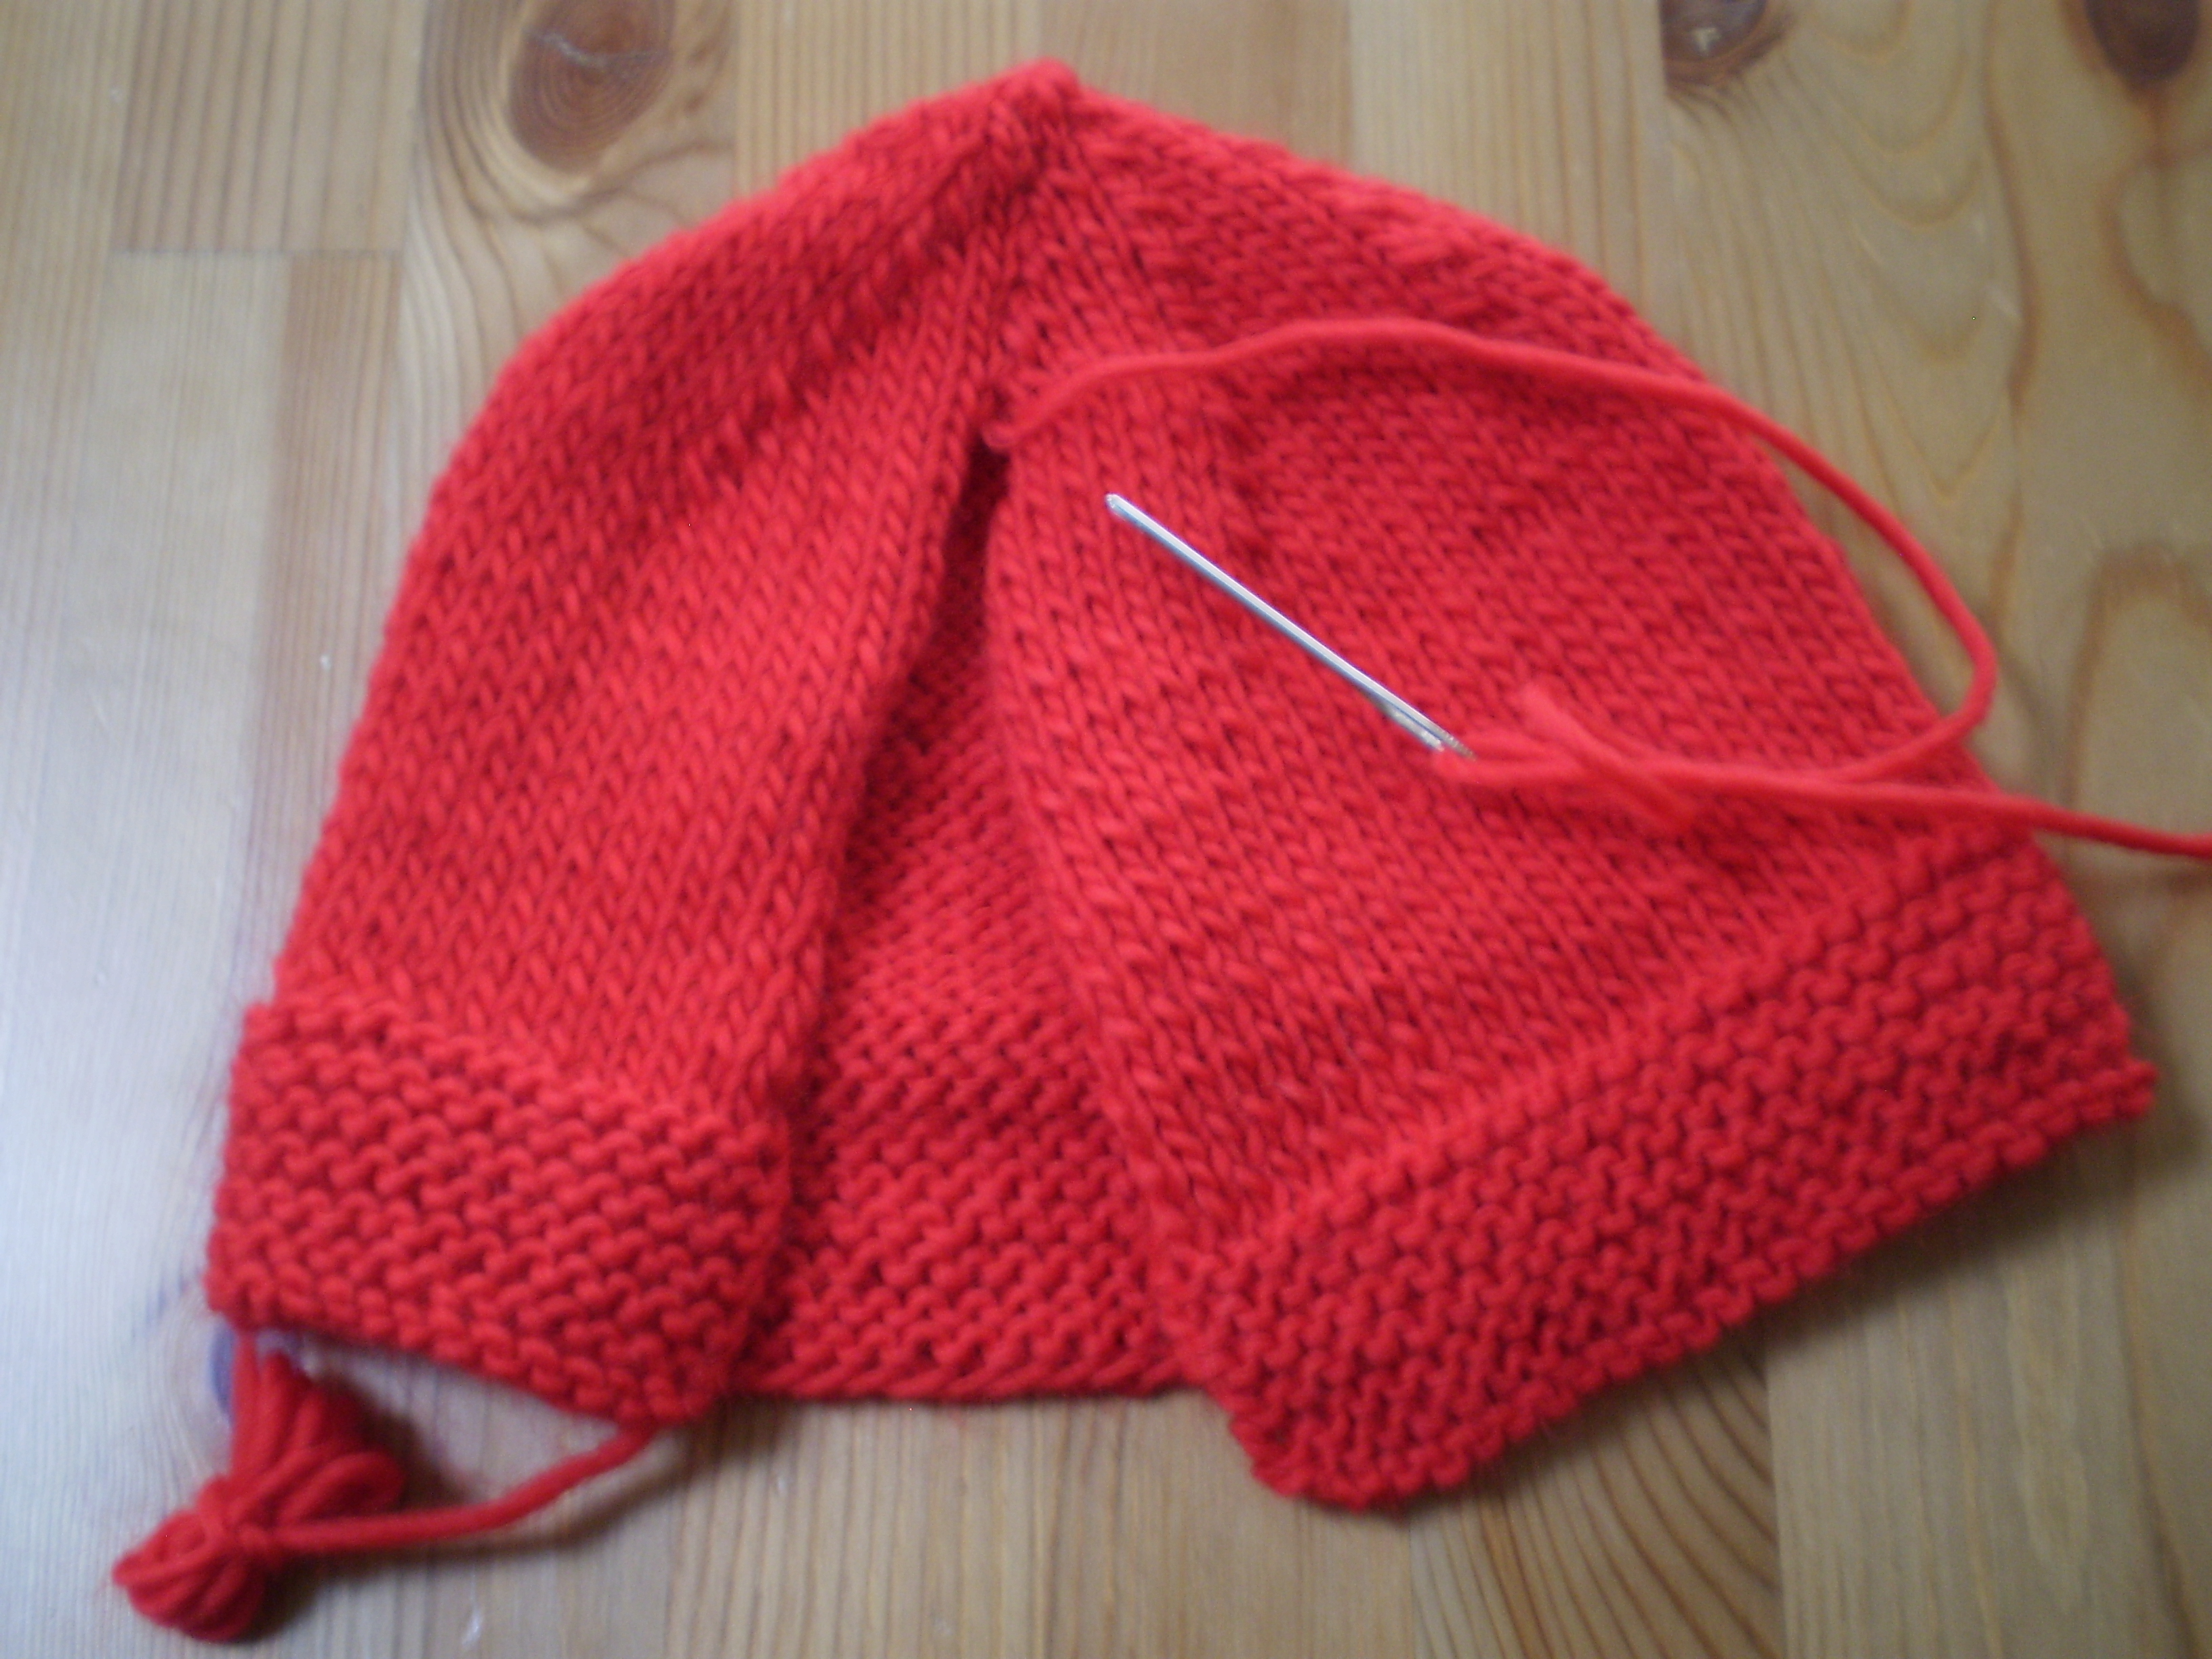
Keep going until you only have 8 stitches left on your needle, finishing with a knit row.   See how it actually kind of looks like a hat now?  Exciting!

OLYMPUS DIGITAL CAMERANext week, Finishing your hat!

Pattern Spotlight: Yarn ball push pins

I don’t usually do this, but I just saw this little project on the Mr. Handsomeface Blog, and I just had to show it to you guys.  It’s a quick little project to make mini-yarn ball pushpins for your bulletin board.  Unfortunately, I don’t have a bulletin board, so I won’t be making them.  But you should!

five-minute-diy[1]

And what if you stuck in little toothpicks with beads glued on the ends as “knitting needles?”  Cuteness Overload!

all-four-pins[1]