Tag Archives: knitalong

Olympics: The Final Leg

I’m in the final stretch of the marathon, the last straightaway of the 400 meter dash, the last push toward the wall in the 1500 meter freestyle.

Except I’m knitting, not doing any sort of actual physical sport.  (I am breaking a sweat, however.  But that’s more due to the fact that we don’t have air conditioning and I have a big wool sweater on my lap than any great athletic exertion.)

I’ve still got 3/4 of a sleeve left.  And blocking.IMG_3018This sweater feels like it’s taking forever, which is crazy, since I’ve only been working on it for two weeks.

It’s funny, I zoomed through the body of the sweater, which was the biggest part of the project- all that stockinette and all those eyelets.  It was fun, easy, uncomplicated.  But now that I’m doing the sleeves, it feels a bit like pulling teeth.  I don’t know why, it’s just plain old knitting in the round with a handful of decrease rows.  Nothing difficult.

It took me two whole days to finish the right sleeve!  Two days!  Hopefully it won’t take me two more to finish the left.

And now, here I am procrastinating on my sleeve by writing this post (which was only supposed to be about three sentences long).

Enough faffing around.  I’d better buckle down and finish up.  The closing ceremony is on Sunday, after all!

How are your Olympics going?

And have you watched any synchronized swimming?!  It’s amazing!

Mama Bear Check-In #2

I’m back and my bear pack (have we decided on what a group of bears is called?  Pack doesn’t seem right) has grown bigger!

My newest bear is an adorable little blue teddy with a little black dress on!OLYMPUS DIGITAL CAMERATo be honest, I decided on this color scheme when I looked in the bottom of my bag and found that I had nearly-full skeins of both blue and black, and thought “How can I use up these colors quickly?”  But, in the end, I kind of like her goth-chick vibe.  She just needs a red scarf and an anarchy symbol embroidered on her chest.  But that might be slightly inappropriate for this kind of project.

Have any of you made skirts or dresses for your bears yet?  This is my first beskirtted bear (beskirtted is a word because I say it is), and I’m not sure how much I liked making the skirt part.

Don’t get me wrong, I like the finished product- the little, slightly ruffly skirt is adorable.  But, the skirt felt like it took forever to knit up, and used up quite a bit of yarn, and if you’re using up odd bits and bobs of leftover yarn, I could see a skirt being fairly impractical.

Of course, we knitters aren’t known for being 100% practical.  I’ll probably do more beskirtted bears, maybe just not right away.

If you haven’t started making Mother Bears, take a minute to look at the project website, and consider giving it a go!

Have you done any skirts on your bears?  How did they go?  What’s your bear total so far?

Mama Bear Check-In

Oh boy, guys.

I’ve fallen, and I’ve fallen hard.

I have been completely neglecting my Christmas knitting and any design work I should be doing.  My yard is knee-high with dandilions and my sink is full of dirty dishes.  All I want to do is watch the Great British Bake Off and make teddy bears.

This pattern is so simple, knitting it is basically a practice of Zen meditation.  And, the bears are too stinking cute!

I finished my first bear in just under 24 hours (I told you I have a problem).  I couldn’t stop knitting!OLYMPUS DIGITAL CAMERAAnd the second one joined the pile less than a week later.OLYMPUS DIGITAL CAMERAI’ve got a bag half-full of Knit Picks Swish Worsted, leftover from a few projects.  It’s a lovely uber-soft merino wool that’s surprisingly hard-wearing (even if it pills a bit), so it’s perfect for kids toys.  I’m planning on knitting my way through all this yarn, then diving back into my stash to find more yarn to make more bears! OLYMPUS DIGITAL CAMERAI had planned on shooting for a goal of a half-dozen bears, but at this rate, I’ll have a whole pack (herd? gaggle?) before I know it!

(Also, did you notice-I haven’t stuffed my bears yet.  That’s because I don’t want to stop knitting them, even for the few minutes it would take to stuff one and sew it up.  I think I might have a problem.)

Has anyone else made progress on their bears?

Operation Mother Bear is Go!

It’s here! It’s here!  My pattern showed up in the mail, and I’m dropping all my Christmas knitting to start on my first bear!

OLYMPUS DIGITAL CAMERAFor my $5 donation, I received a beautiful (and heartbreaking) pamphlet on the Mother Bear project (can a pamphlet be heartbreaking?), my very own copy of the knit-in-the-round pattern, and an adorable tag for me to sign and tie around my finished teddy’s wrist.

Upon examination, the pattern looks well-written and straightforward, and I’m raring to get started!

I dug through my stash, and found some nice heathered merino (leftover from designing my Human Beans) in lovely mahogany, evergreen and grassy green shades.  It’s super soft, and pretty strong-perfect for a stuffed animal.

OLYMPUS DIGITAL CAMERAHave you gotten to start on your Mother Bears yet?  Did you order your pattern?  It’s not too late!

Mother Bears On the Needles!

I can’t get the Mother Bear Project out of my head.  The stories of little kids with next to nothing positive in their lives just break my heart, and I can’t stop thinking about them.Mother_Bear_in_Liberia_1_medium2[1]So, I took the plunge and ordered my pattern!  The patterns are available for $5 (proceeds go to running the charity and helping with shipping and handling), and is mailed to your house via snail mail.

size

I’m itching to pull out my scrap yarn and get to work on a whole army of bears!

But here’s the thing- I’m only one person, so even if I do nothing but knit teddy bears from now until the end of time, I won’t be able to make that much of a difference.

You guys, however, are more than one person!

So, I propose that this year for the holidays, everyone who reads On the Needles knits a teddy bear or two!  We can make it into a big On the Needles knitalong!  I’ll post updates about my bears, and whoever wants to play along at home can send in pictures of their bears, and we can all share our projects!

What do you say?  Want to join in?  How many bears do you think we can make before New Year’s?  20? 50? 100?!

Design Process Series: Twinkle Toes

We’re almost done!  These socks that we started talking about months and months ago, are almost finished!  Whee!!

(Can you tell I’m excited?)

OK.  Down to business.  We finished the main part of the foot last week, ending at the middle of the bottom of the foot.  We cut the MC yarn, and now we’ll work the toe.  This is my favorite, classic, simple toe.

Here’s what we’ll do:

Join the Contrast Color and work as follows:

  • Knit 1 round even.
  • *K to 2 before end of the needle, k2tog.  On the next needle, ssk, then knit to end. Repeat from * for the next two needles.  You will decrease 4 sts per decrease row.

Repeat these two rows, alternating even and decrease rows, until you have 20 stitches on your needles (5 stitches per needle).  Finish with a decrease row.  K 5 more stitches (your yarn will now be at the side of the toe, instead of at the bottom of the sole).

Then use the Kitchener stitch to close up the toe.  If you need more detailed instructions, this should help.

OLYMPUS DIGITAL CAMERAWeave in your ends, give yourself a pat on the back and make a second sock!

Design Series: Let’s go!

Guys.  It’s time.  Finally!

It’s time to cast on for our socks!

Just to recap, we decided to make simple, warm and cozy socks with a basic design.  We picked light gray and indigo blue for the colors, and we wanted them to be regular socks, not slipper socks.

Luckily, I had some lovely indigo blue and light gray sock yarn in my stash!

Knit Picks Stroll Sock yarn in Sapphire Heather and Dove Heather, about one skein of each.  (Which should hopefully be enough to make it through a whole pair of socks!)

24590[1] 25023[1]Pretty, right?  Of course, you’re more than welcome to use any color (or brand of yarn) that makes you happy, but I’ll be using this yarn.

Since we’re going for a nice warm and cozy design, I thought that using a lovely, squishy 2×2 rib would look really good.  (Not to mention that ribbed socks are super comfy.)

I’m going to be working this design in four sizes: Women’s Small (Medium, Large, Extra Large). (Don’t feel bad if you have to use the Extra-Large Size.  That’s the size I have to make for myself.  I have big man-feet.)

So, let’s start!

  • Materials:
  • 5 US2 double-pointed needles
  • Yarn needle
  • Scissors
  • 1 skein each, Gray (MC) and Blue (CC) sock yarn, such as Knit Picks Stroll Sock in Dove Heather and Indigo Heather.

Directions:

  • Using MC, cast on 48 (52, 56, 60) stitches using your favorite method.  Distribute the stitches evenly across 4 needles (12 (13, 14, 15) sts per needle) and join to work in the round.
  • Work around in a K2P2 rib for 15 rounds.  Break yarn and join CC.
  • Continue in ribbing for 10 rounds.  Break yarn and join MC.
  • Continue in ribbing for 10 rounds.  Break yarn and join CC.
  • Continue in ribbing for 10 rounds.  Break yarn and join MC.
  • Continue in ribbing for 30 rounds.
  • Work 1 round, knitting all stitches.
  • Knit 36 ( 39, 42, 45).  Break yarn and get ready to make the heel flap!

OLYMPUS DIGITAL CAMERANext time, we’ll turn the heel!  Woo Hoo!

n00b Hat, Part 3: the Purl Stitch

Have you got your garter stitch brim done?  Awesome!  Send me a photo, if you like.  I’d love to actually see it, instead of just pretending to see it.

So, your hat should look something like this:

OLYMPUS DIGITAL CAMERAIf it’s a little longer or shorter, no worries.  If it’s a little lumpier, also no worries.

Today we’re going to start working on the middle part of the hat, which we’ll work in stockinet stitch.  Stockinet stitch is a simple knitting pattern where you alternate knitting one row, and purling one row.  When you imagine a basic knit sweater, the smooth-looking parts are stockinet stitch.

You already know how to do knit stitches, so I guess it’s time to learn how to do purl stitches.  The purl stitch is worked very similarly to the knit stitch, except that it’s mirrored (don’t worry… it sounds worse than it is).

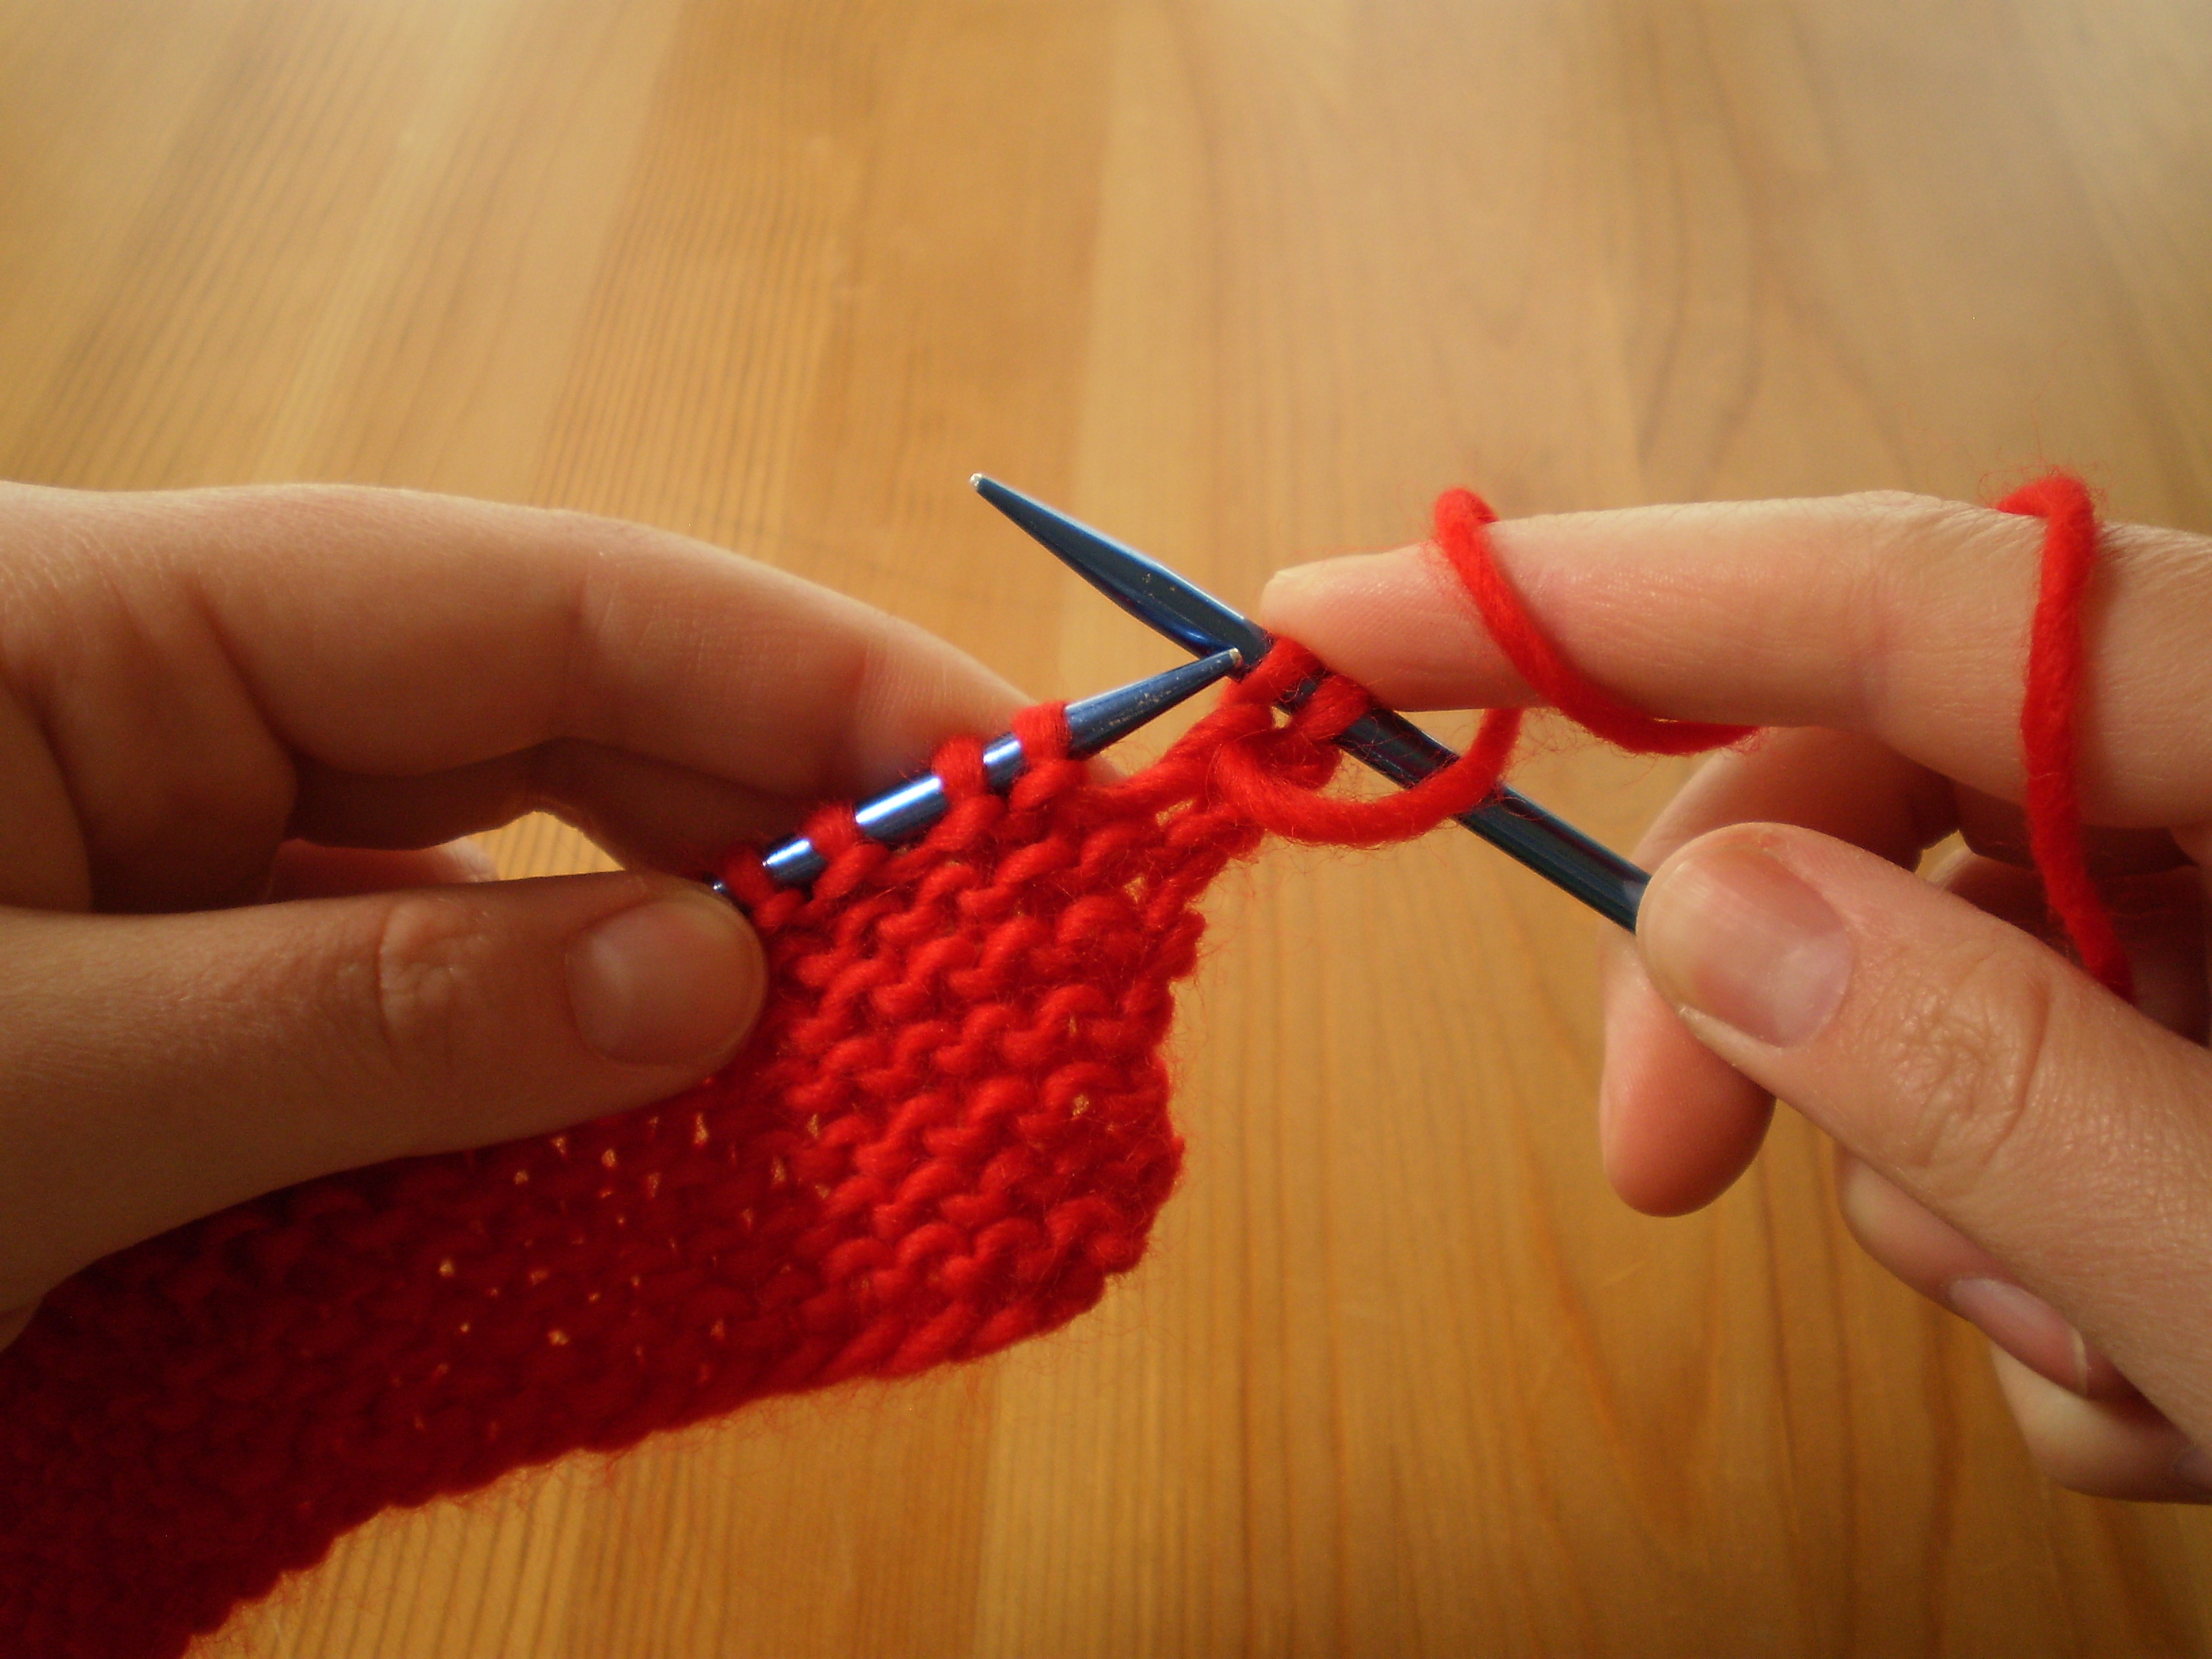
Just like before, you’re going to start with your knitting on your left side and your empty needle on your right.  Take the tip of your right-hand needle, and poke it through the back of the first stitch.  Keep your yarn in front of your knitting.  (See how it’s backwards from working a knit stitch?)

OLYMPUS DIGITAL CAMERAThen, wrap your yarn around the tip of your right-hand needle.

OLYMPUS DIGITAL CAMERAAnd pull the new stitch through the old stitch, from front to back.

OLYMPUS DIGITAL CAMERAOLYMPUS DIGITAL CAMERAAnd, just like before, you slip the old stitch off the left needle.

OLYMPUS DIGITAL CAMERA

Does that make sense?  Let’s try it again.

Keep your yarn in front of your knitting.  Insert the tip of your needle into the back of the stitch. Wrap your yarn around the tip of your needle, and pull the new stitch through.  Drop your old stitch off the left-hand needle.

OLYMPUS DIGITAL CAMERAOLYMPUS DIGITAL CAMERAOLYMPUS DIGITAL CAMERAOLYMPUS DIGITAL CAMERAKeep going!  Purl the whole row.

Now that you’ve purled a whole row, do you see how knitting and purling are very similar?  For both, you insert your right-hand needle, wrap your yarn around, pull the new stitch through, then drop the old stitch off.  Here’s a quick summary of the differences between knitting and purling:

Knitting: Insert your needle into the front of the stitch, keeping your yarn behind the knitting.  Wrap your yarn around the needle tip, and pull the new stitch through from back to front.

Purling: Insert your needle into the back of the stitch, keeping your yarn in front of the knitting.  Wrap your yarn around the needle tip, and pull the new stitch through from front to back.

OK, so, since we’re doing the stockinet stitch pattern, it’s time for another knit row.  (Remember, knit one row, purl one row.)  So, turn your knitting around and knit back.

Then purl a row.

Then knit a row.

Then purl a row.

Simple!

But, what if you have to (I don’t know) sleep or something?  How will you remember what to do next?  Easy; just “read” your knitting.  “Reading” your knitting means that you look at the stitches you’ve already worked to figure out what to do next.

After a few rows of stockinette stitch, you’ll see that your hat has two different textures.  The bumpy and squishy garter stitch at the bottom, and the smooth stockinet at the top.

OLYMPUS DIGITAL CAMERAStockinet has two different sides.  The “right side” is the side with the little V-shaped stitches.  When you see this side facing you, it’s time to knit.

OLYMPUS DIGITAL CAMERAThe “wrong side” is the side with little bumps.  When you see this side, it’s time to purl.  (You can think of the bumps as “pearls,” if that helps.  Get it? Pearls=purl.  Clever clever.)

OLYMPUS DIGITAL CAMERAKeep going, knitting one row and purling one row until your whole hat measures about 5 inches from the cast-on edge.  If you have a smaller head, you can make your hat a little shorter, if you have a bigger head (or lots of hair) you can make your hat a little longer.  I like to err on the too long side, since you can always roll up the brim, if it’s too big.

OLYMPUS DIGITAL CAMERANext week, we’ll make the crown of the hat, and I’ll show you how to do decreases.

I’m turning 50!

Actually, I’m not turning 50… not even close.  But this is my 50th post!  How exciting!

It seems like I just started this blog yesterday.  Is it too early for me to repost some of my earlier posts?  Probably, but I’ll do it anyway.

My first pattern, the Lace-Edged Shawl, is still by far my most favorited/knit pattern.  Here’s the link to Ravelry.

OLYMPUS DIGITAL CAMERA

People also seem to like my Call the Midwife posts (but that’s probably due more to the show being awesome, than me writing anything particularly genius).

blanket 2


People also seem to like my Call the Midwife posts (but that’s probably due more to the show being awesome, than me writing anything particularly genius).


MIDWIFE%202_l

Although, my most liked post so far was my critique of Clueless:

clueless_l

But despite all those, I think the series of posts I’m most proud of (wether or not you guys are into them, I’m not so sure), is my Sock Week posts.

OLYMPUS DIGITAL CAMERA

So, thanks for reading!  And here’s to 50 more posts.

Sock week: Sock Block Rock

There’s been a heck of a lot of sock talk around here lately.  So, I have some more!

Once you’ve finished your second sock, you could just say “Hey!  I’ve got some socks.  Yay!”

OR, you could guild the lily and go one more step and block the suckers.  Your socks will fit just fine without blocking them, so if I’m just making socks for myself, I won’t do it.  But, if I’m making the socks as a gift, I’ll block them.  Blocking just makes the toes and heels lay nicely and fixes all those little weirdnesses that happen during knitting.

Here’s what you need:

1 pair of socks.

A clean bowl (or a clean sink) filled with bathwater-warm water.

A couple clean towels

Sock blockers (optional)

OLYMPUS DIGITAL CAMERADrop your socks into the bowl of water, and let them soak for about 20 minutes. They need to be completely saturated.  Don’t scrub or squeeze them or anything, just lay them nicely in the bowl of water.  If you mess with them too much, they’ll start to felt, which is not ideal.  You can poke them a bit until they go underwater, if you feel it’s necessary.

After your socks are thoroughly saturated, take them out of the bowl and squeeze them gently to get rid of a good portion of the water.  They should still be wet, but not drippy.

OLYMPUS DIGITAL CAMERA

Then, lay out the towel (or towels) and arrange your socks nicely on top.  Roll the whole mess into a damp towel-and-sock burrito.  Squeeze it as much as you can, to get out most of the water.  (I know, first I tell you to get them wet, then I tell you to dry them out… I can’t make up my mind.  I’m terrible.)

OLYMPUS DIGITAL CAMERA

Now you have two options.  The easiest way to block socks is to use sock blockers (duh).  Sock blockers are sock-shaped forms that you put your wet socks on to dry after you’re done knitting them.  You can find them at your local knitting store, or you can buy them here.  Basically, you put the damp socks on the sock blockers, and let them hang to dry.  (My socks are a skotch too big for my blockers, so I use clothespins to keep them on the blockers.)  If you don’t own blockers, not to worry.  You can get out another clean, dry towel and lay your socks out nicely on the towel and leave them out to dry.

OLYMPUS DIGITAL CAMERA

Now, your beautiful socks are completely, totally and 100% DONE!  How exciting.  And, just in time for summer (because nothing says summer, like wool socks).