Tag Archives: husband

Husband Sweater- Buttons!

I love buttons, yes I do.  I love buttons, yow ’bout you?

I especially love shopping for buttons at all the cool, funky little yarn shops, fabric stores and craft shops in Seattle.  (OK, not all the shops, but we probably visited 3 or 4.)

Last weekend, my husband and I went on the Quest for the Perfect Button!  It was actually quite fun.  We started out with breakfast at our favorite brunch spot (If you’re in Seattle, be sure to visit The Dish, and get the SOB Spuds with eggs.  So good!), because everyone knows that shopping for buttons should not be done on an empty stomach.

Then we wound our way back toward our house and stopping here and to look for buttons.  I still maintained that pewter buttons would look good, but as you guys reminded me after my last sweater post, this is my husband’s sweater, and he’s the one who is going to wear it, so we ended up finding some pretty cool wooden buttons.

Ta da!

OLYMPUS DIGITAL CAMERAI’m actually pretty pleased with them.  They’re a lovely warm brown, and they’re stained in a way that makes them look vintage-y, but the cup-like shape is pretty modern-looking.  I think my husband did a good job picking out his buttons.  (I knew I kept him around for some reason.)

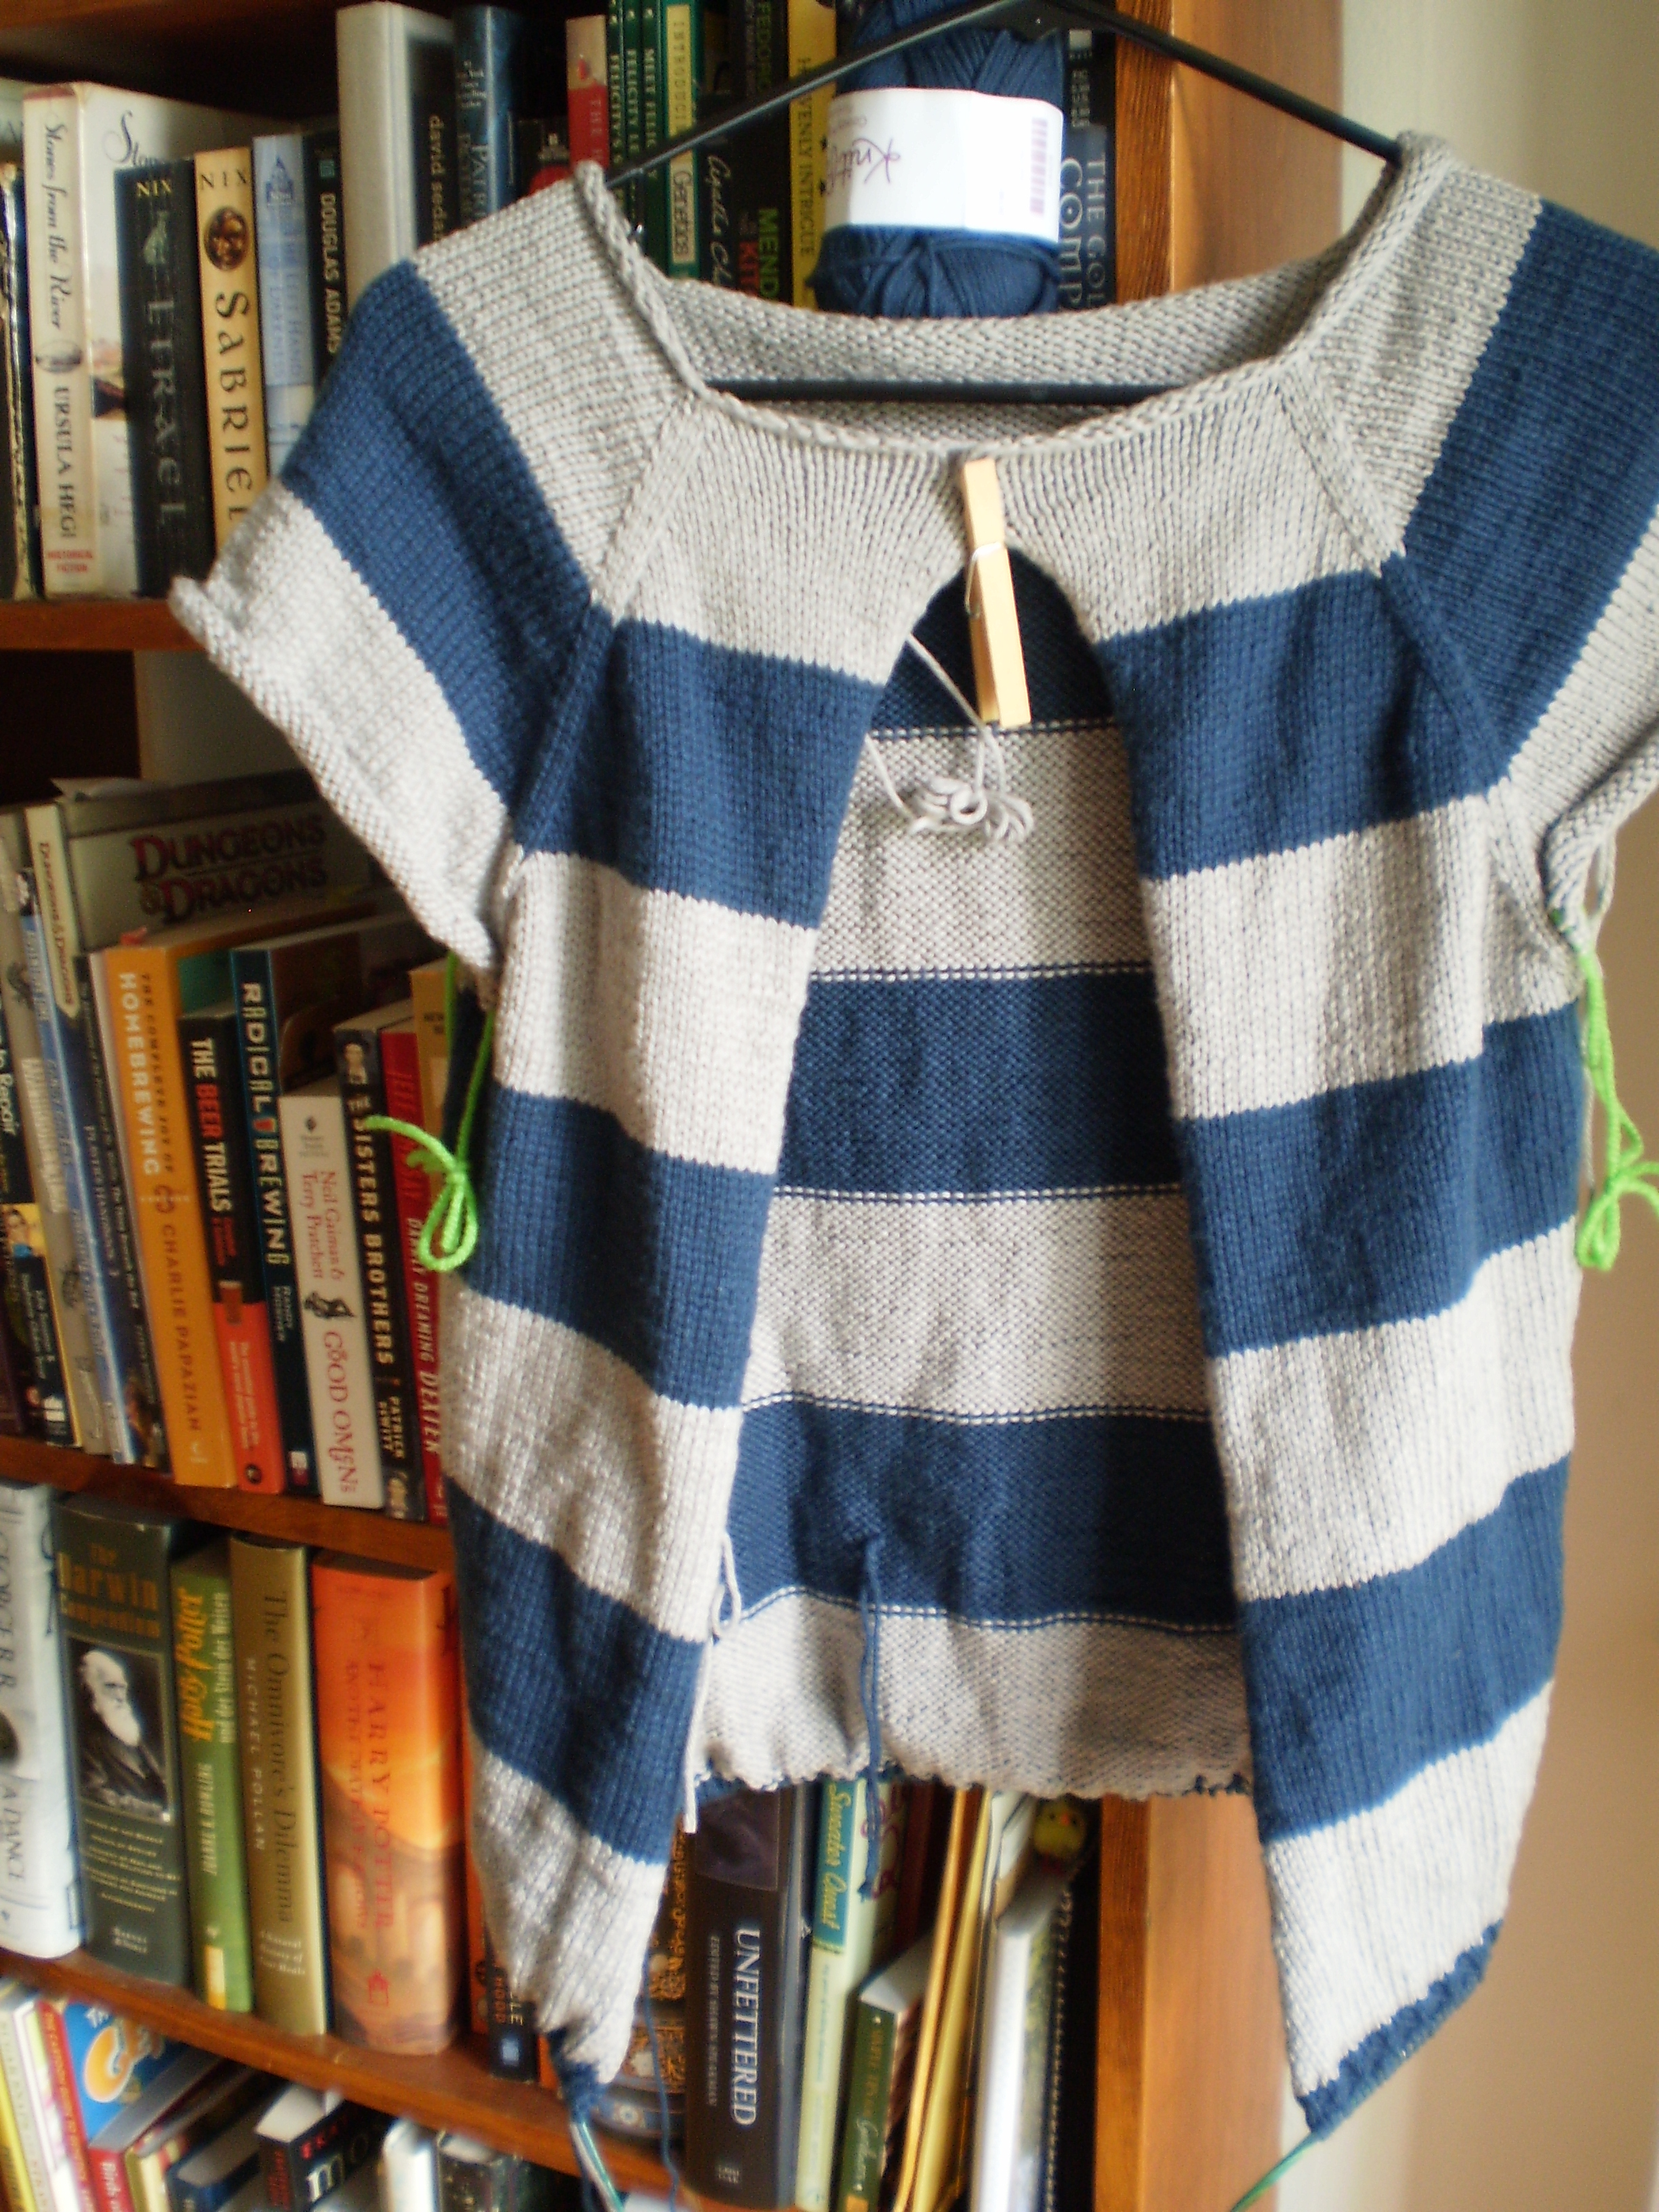
He’s actually been wearing the sweater around the house and out and about on weekends, but it still is a little short (which makes me cringe).  I was hoping that it would sag a bit, like the last sweater I made for him, but it looks like that isn’t going to happen.  I guess I’m going to have to try steam blocking it…

This scares me.  I’m fairly certain that I’ll end up melting the yarn. (I don’t know why I’m certain about this- must just be some manifestation of my general anxiety.)  So!  If you have suggestions, tips or tricks, please let me know!  I would love any advice you have for not completely messing up this sweater!

Husband’s Sweater Update

I’ve finished my husband’s sweater!  Woo!

(Sort of.)

It’s got a collar and a body, and two arms that end in nicely finished cuffs.

OLYMPUS DIGITAL CAMERAI really am quite pleased with how this sweater has turned out.  I like the moss stitch yoke, and it actually fits my husband pretty well.  Not bad for a quick, semi-improvised sweater project!

Now I’ve just got to actually finish it:

  1.  It need buttons.  I’m thinking pewter, but my husband is campaigning for wood.  What do you think?
  2. I think it’s still a half-inch too short.  (Even after ripping it back and re-knitting the waist.  I think it might have some sort of curse.) I’m going to try steam-blocking it, in the hopes that I can avoid re-knitting the hem for a third time.  Wish me luck!

Not bad, if I say so myself.

So, what are you working on?

Acrylic & Sweaters (or at least acrylic and my sweater)

I’m making great headway on my husband’s sweater!  It’s very exciting.  I’ve got the body done, and one sleeve. OLYMPUS DIGITAL CAMERAThe shoulders/sleeve situation looks great, if I say so my self, and I really like the ribbing on the hem and cuff.  (I added a row of purls along the top of the ribbing to make a defined line between the body and the hem.  I think it turned out well!)

OLYMPUS DIGITAL CAMERABut, I’m pretty sure I messed up.  I the body is maybe 2  inches too short.   And that’s really too much to let slide.   If this was a wool sweater, I’d at least try to block it out a little longer.  And if it was a cotton one, I’d hang it up for a while to see if it would sag down to a more reasonable length.

But, I’m knitting this bad boy in acrylic Brava Worsted, which means that neither of those tricks are really going to work.  (Unless there’s some other secret trick that I don’t know.  Tell me if there is!)

I think my only recourse is to rip out the hem and knit a couple extra inches to the body, then re-knit the ribbing.  Sigh.

But, maybe I’ll just wait for a while before ripping anything out, I don’t know if I have the heart to go to town on this sweater quite yet.

Remember, kids, always measure twice before binding off.   Sigh.

Do you have any tips on blocking acrylic?

Husband Sweater Update!

I’ve been cranking away at the sweater I’m making for my husband, and I’m making good progress!

The shoulders are done and I love the seed stitch and reverse stockinette, though they look a little narrow, but they should stretch out with wear/blocking.  I have to trust the pattern- Ann Budd hasn’t let me down before.  And, I’m almost to the bottom of the hem!  Just an inch or two more, and it’s on to the sleeves.

I’m really pleased with how the yoke and neckline have turned out.  I really wanted to make a Henley sweater for my husband.  I think Henley are very flattering, and fall nicely in-between a fancy-pants cardigan and comfy-casual pullover.  Also, we all know how much I like buttons.

OLYMPUS DIGITAL CAMERASo, I started the sweater following Ann Budd’s instructions for a cardigan leaving off 2 stitches from the mid-line on each side to accommodate the extra width of the button band.  I joined up the underarms and worked back and forth for a few inches.  Then, I began to work the sweater in the round, casting on 4 stitches at the center to get the full stitch count.

I kind of improvised the button band (do you know how lovely and relaxing this sweater has been?  I haven’t had to take one note the whole time!  And I only have to knit it in a single size!  Delightful!).  I picked up and knit stitches on either side for the button bands, working a 2×2 rib, and making “k2tog, yo, yo, k2tog” button holes on the left side (I had to check with my husband’s shirts- I can never remember which side buttons go on!).  After binding off each side, I picked up and knit the neckband, which went from the edge of one button band to the other.  I worked the neck in a 2×2 rib, too (except the ends, where I knit 3.  That’s a trick I picked up from an old knitting book to compensate for the curling that inevitably happens at the edge of your knitting) and worked a final button hole in line with the others I worked on the left side.

Then, I  sewed the bottom ends of the button bands into place, overlapping them and trying to make them as flush with the body of the sweater as possible.

I’m very pleased with how it’s turning out!  Now I just have to make the rest of the body, the sleeves, and pick out the buttons.  Almost done… right?

Oh!  And don’t forget to sign up for the 52 More Weeks of Dishcloths giveaway!

A New Sweater On My Needles

It’s time for a new sweater!  This one’s for my husband, and I’m not going to make it into a pattern or anything (which feels oddly luxurious- I guess I’ve been writing a too many patterns).

I actually ordered the yarn back in the fall, when the plan was to knit this sweater as a Christmas present.  Of course, things happened, and I ran out of time.  Isn’t that the way it goes?

Anyway, I ordered a bunch of skeins of KnitPicks Brava Worsted in Cobblestone Heather in their last big sale.

25697[1] Now, this is a 100% acrylic yarn, which is not something that I would normally use to make a sweater.  But my husband picked it out.  He tends to run warm, and Seattle basically never gets below 40 degrees, so he refuses to wear anything with wool.   (OK, maybe I’m being dramatic. But the point still stands, he won’t wear wool.)

Brava seems like a decent alternative to wool.  It’s nice and soft and squishy, and actually has a bit of wool-like spring.  Unfortunately, it has a bit of that “acrylic sheen” to it, so I think it looks a little cheap- but that’s probably something that only a knitter would notice.

I’m thinking of doing either a crew-neck or a heneley sweater, top down (because I love me a good top-down sweater.  Seriously, if you’re even thinking of improvising your own sweater, try Ann Budd’s book Top-Down Sweaters.  It’s the best!).

I want to keep the sweater fairly plain (because that’s what my husband likes), stockinette, but featuring some subtle texture across the shoulders and chest.  Something like this:OLYMPUS DIGITAL CAMERAThe top portion is a simple moss stitch, which I think would look good across the top part of a men’s sweater.  The bottom is just stockinette (so I can measure gauge).  In between, I tried a couple things to figure out the transition.  On the right, I just went straight from moss stitch to stockinette, and on the left, I added a couple rows of reverse stockinette.  I think I like the reverse stockinette stripe, I think it would add structure and a bit more visual interest to the sweater.

But I have a little time to figure it out before I get down to the transition point.

What do you think?

Thank You!

Hi everybody, I thought I’d take a moment to do the cheesy-yet-well-intentioned Thanksgiving tradition.  You know,  the one where we all go around the dinner table (or in this case, the knitting website) and tell everyone what we’re thankful for.

CornucopiaThanksgiving[1]I know it’s dorky, but I’m in a thankful mood (but maybe that’s just my endorphins building up in preparation for tomorrow’s feast), so let’s do this thing.

I am thankful for knitting!  It’s both therapy and entertainment.  It keeps me busy and keeps me warm.  There’s something almost alchemical about turning yarn into something as complex as a lace shawl or as practical as a thick wool socks.  It warms my heart (and feet), and challenges my brain, and I love it.

I am thankful for my husband (obviously).  He puts up with having an entire room dedicated to knitting and doesn’t mind when he finds project bags scattered across the house.  He ‘s been insanely supportive with my blog and pattern design work, as well as regular awesome husband-ness.

I am thankful for my pup.  Ollie’s been an amazing addition to our lives over the past half-year, and he makes me laugh every day.  I couldn’t be happier having him in my life (even if he has chewed up a knitting needle or two… *grumble, grumble*)

I am thankful for this blog- and it’s readers!  It’s been a really fun (sometimes difficult) and interesting exercise to write something (hopefully) interesting and (sometimes) funny every other day for almost three years, and I’m looking forward to keeping it going.  Being able to share my passion with all of you lovely people is fantastic!  You’re the best! (And, there’s so many of you!)

Happy Thanksgiving!  What are you thankful for?

Husband Sweater: The Sleeves

I think it’s high time that this dang sweater stops looking like a muscle shirt when my husband tries it on.  Don’t you agree?

The only problem is that he’s not a fan of the fairly over-sized sleeves that the original pattern calls for.  Ugh.  Nothing is ever simple.

So, it’s time to get out my scratch paper (or rather, the back of the pattern), my calculator and start figuring out what I need to do.

OLYMPUS DIGITAL CAMERAOK.  Before I even have to start doing math I know a few things:

1.  I have 82 stitches (about 20 inches) at the top of the sleeve, set aside from when I split the body for sleeves.

2.  I need to get down to about 40 stitches (about 10 inches) at the top of the cuff.

3.  My sleeve needs to be about 15 inches (about 105 rows) from where I’ll pick up my stitches to the top of the cuff.  (I based this on my husband’s arm length, and the length of the sleeves of his favorite sweater.)

Now it’s math time.

If I need to go from 82 to 40 stitches, I need to do 42 decreases somewhere on the sleeve.

(82 sts at the shoulder-40 sts at the cuff=42 decreases)

I’ll do two decreases per decrease row, so I’ll need to do 21 decrease rows.

(42 decreases/2 decreases per row=21 decrease rows)

And, I want to space those decreases out evenly over 105 rows, so I’ll work a decrease row every 5th row.

(105 rows/21 decrease rows=5 rows per decrease row)

OLYMPUS DIGITAL CAMERASo that means, I’ll knit four rows evenly (while still making sure the stripe pattern matches up with the body), then I’ll work a decrease row (knitting all stitches, except for working two decreases at the underarm).  Easy!

Hopefully, this’ll look good.  It’s a more extreme decrease than I usually use for sleeves, but it might work.  Luckily, I’ll be able to finish one sleeve, have the husband try it on, and get his approval for the next sleeve (or, heaven forbid, find out I have to redo the sleeve!  Cross your fingers for me).OLYMPUS DIGITAL CAMERAHave you ever had to rejigger part of a pattern?  How did it turn out for you?

Husband Sweater: The Hood

I admit, it’s been a while since I updated you on the sweater situation (almost a month-eek!).  I’ve been busy with some dog stuff, some quilting, and generally catching up with other projects around the house (I even tried my hand at some very simple woodworking- I made a slightly wobbly window seat for the dog!).

But, I’m back on track with my husband’s sweater, and have the hood all finished!

OLYMPUS DIGITAL CAMERATa-da!

I actually went off-pattern for this hood, because if you remember, the one outlined by the pattern was a little, well, big:

uploadedImage_medium2[1]Instead, I based the shape of the hood off of my husband’s favorite hoodie.  I measured the height of the hood from the neck to the crown.  This was the total height of my finished hood.  Then, I measured the hood from the neck to the start of the head-shaped curve.  This was how far I would knit before starting my decreases.

The hood ended up looking like this:

OLYMPUS DIGITAL CAMERAI picked up stitches from the neck, and knit even (in pattern) for about 8 inches.  Then, I marked the center back of the hood and started decreasing on either side of the mark.  At first I decreased every fourth round, then every other round, then right at the top of the head, I decreased every round.  Finally, I grafted the hood together  at the top of the head to make a seamless-looking hood that fits my husband (almost) perfectly.

Phew!

Next, I’ll start working on the button band, once I get up the energy to pick up all those stitches!

Have you ever changed a part of a pattern?  What did you change and why?


Husband Sweater: The Hem!

Woo!  I finally made it through the body of my Husband sweater!  Phew!  That was a slog, I tell you what.  The combination of cotton yarn and acres of stockinette at a slightly-smaller-than-usual gauge made the body seem like it took for-ev-er.  (I suppose the fact that I kept getting bored and making gnomes didn’t help it go faster, either.)

As I mentioned before, I decreased very slightly down the torso, to make the sweater a little bit fitted.  And, the row before I worked the ribbing, I used a trick I learned from Elizabeth Zimmerman.  I decreased every 10th stitch ([k8, k2tog] across).  It seems like a lot of stitches to get rid of at the end.  But, it’s actually the perfect amount to decrease to make a nice, tight-fitting hem, instead of one that flips and curls away from the body.

OLYMPUS DIGITAL CAMERANow, I’m on to the hood.  Which I might need to modify, too.  The hoods on all the projects on Ravelry are a little Assassin’s Creed-y.

uploadedImage_medium2[1]But, a big hood isn’t a big deal, I suppose. Most of the time it’ll be just hanging down my husband’s shoulders, anyway.  I’ll have to think about it, and how much effort I want to put into changing the hood.

Have you ever made a hooded sweater?  How did it turn out?

Husband Sweater: The Picard Maneuver

In case it hasn’t been perfectly clear in the last two years of blog posts, I am a big nerd.  My husband is also a big nerd.  A big exciting night with friends usually includes home-brew beer and a rousing game of Settlers of Catan.  I’ve read through the Harry Potter books  so many times that I can practically recite them.  And, even though it’s nearly 30 years old, you’ll still find us curled up on the couch watching Star Trek: TNG whenever it comes on.

So, when my husband asked me to be sure that his new sweater is long enough that he doesn’t have to preform the “Picard Maneuver,” I knew exactly what he meant.

What?  You’re not a weirdo nerd, too?  You don’t know what the Picard Maneuver is?  Let me explain.  Captain Picard, Starfleet officer and coolest bald man in the known universe, always keeps his ship and his uniform neat and tidy.  So, whenever he sat down, stood up, or otherwise mussed up his uniform, he would always tug down his uniform top to make it lay nicely.  For example:


Thus, the “Picard Maneuver.”

My husband has a couple sweaters he has to use the Picard Maneuver on.  You can understand why he is worried about the length of his new sweater.

I’ve decided not to measure the sweater.  I know, crazy.  Instead, I’m going to keep knitting and trying it on him until it is the absolute perfect length.  I’m hanging it up for a couple days to let the yarn sag naturally, especially since it’s cotton, which tends to droop more than wool.

OLYMPUS DIGITAL CAMERAThis weekend, I plan on knitting the rest of the waistband, based on how long it ends up looking on my husband.  Hopefully, all this elaborate hanging up, trying on, and re-trying on will make the Picard Maneuver unnecessary.

Do you have any clothes you have to do the Picard Maneuver on?  How do you prevent it?