Tag Archives: tutorial

Oh Yeah! Dying With Kool-Aid

IMG_5541_edited-1

Dying is super fun and rewarding (and surprisingly easy).   It’s a great way to play with yarn when it’s too hot to sit around with a big pile of sweater on your lap.

There are a million ways to dye yarn, but this is the easiest one I’ve found.    You probably have everything that you need in your kitchen right now. I’ll do further yarn dying posts about more complicated dying processes later, but this should get you started (and you end up with a whole bunch of fruity-smelling yarn).

Please note, this will only work with wool or animal fibers (cashmere, angora, silk, etc.).  Dying other fibers (cotton, linen, anything synthetic etc.) takes a lot more effort as well as some fairly toxic chemicals, so I don’t bother with that.  But doing this is super easy and fun.  It’s a little like making magic potions, and you can do it with kids, if you’ve got some around that want to help.

You’ll only need a couple things to dye your wool:

  • Wool.  Duh.  You can use a wool blend, but know that the wool fibers and the acrylic (or whatever) fibers will take up the dye differently, which can give you a heathered look.  Superwash wool works well, and you won’t have to worry about your yarn getting felted in the process.  You can dye colored yarn or white yarn, just know that if you start with dark yarn, you’ll never dye it so that it ends up lighter.  If you’re trying to get bright or pastel colors, start with white.
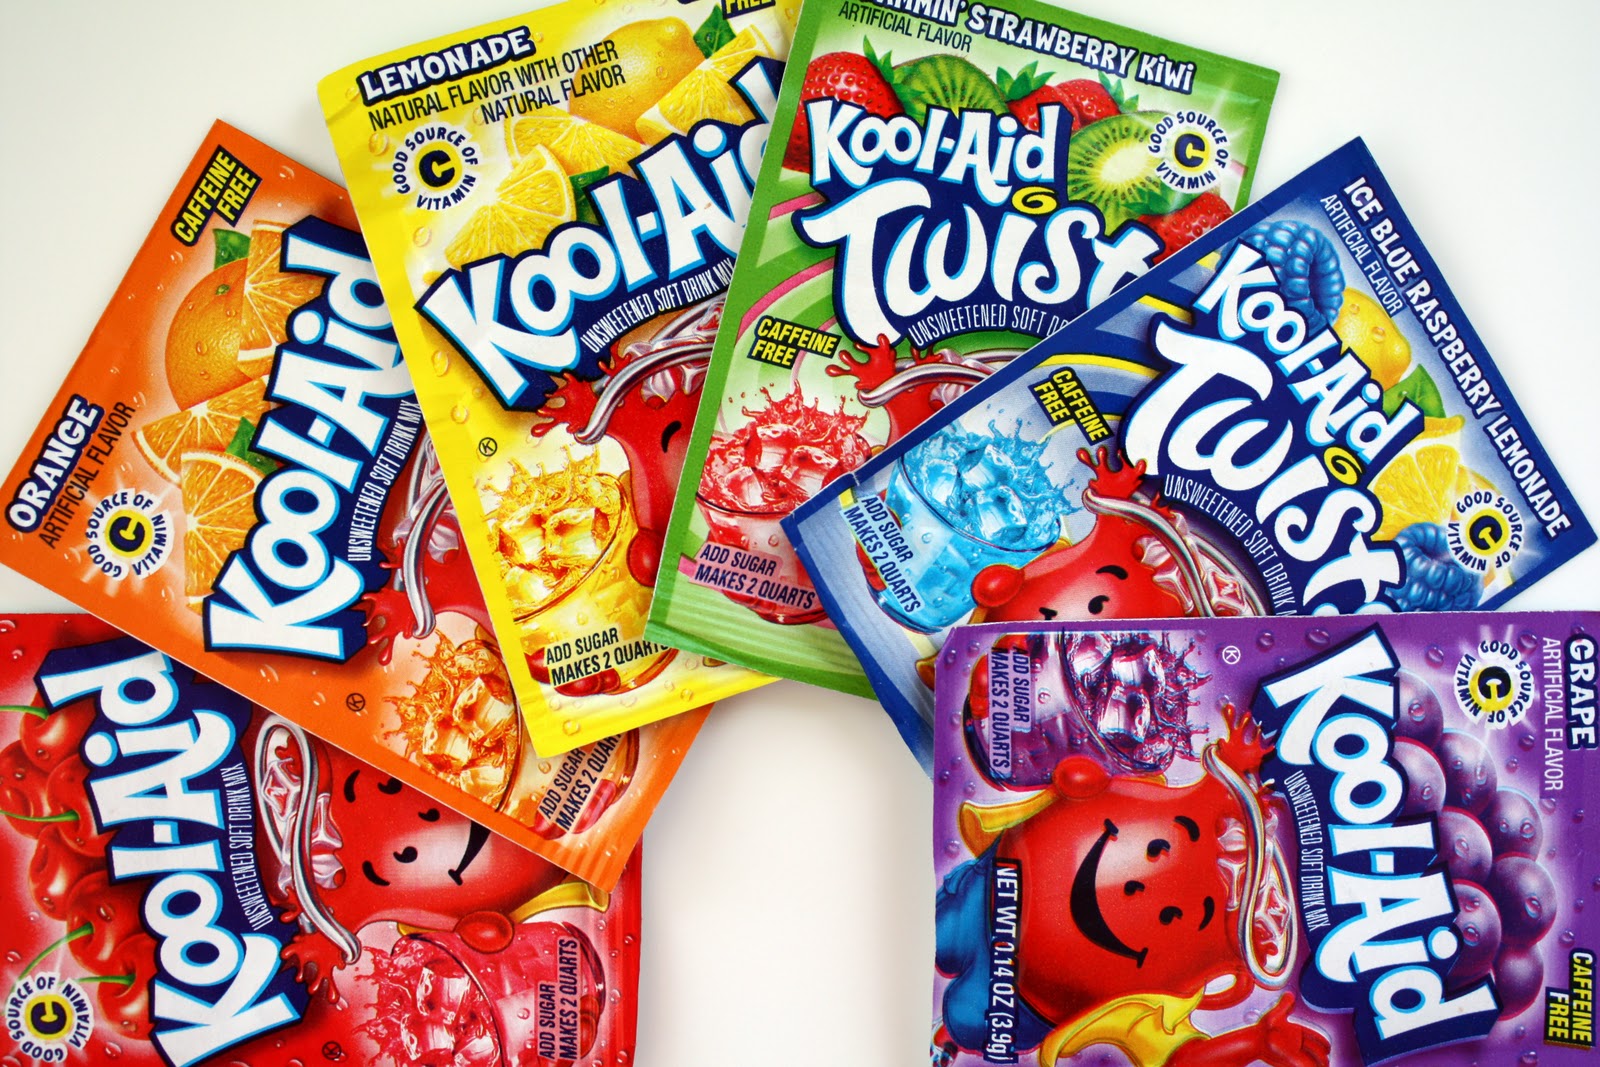
  • Kool-Aid (in the color of your choice) I’m using “Ice Blue Raspberry Lemonade”.  Get the kind in packets, not the kind in the big tubs with sugar pre-added.
  •  Water-From the tap.  Nothing fancy.
  • A non-reactive pot in which to do your dying. A stainless steel, enamel or non-stick pot works well if you’re trying to get a solid (or mostly solid) color.  Copper or cast iron pots can cause weirdness when you try to dye in them.

So how do you do it?

  1. Soak your yarn in warm water.  Make sure it’s nice and wet through.  If the yarn is wet to start with, it will take up color more evenly.OLYMPUS DIGITAL CAMERA
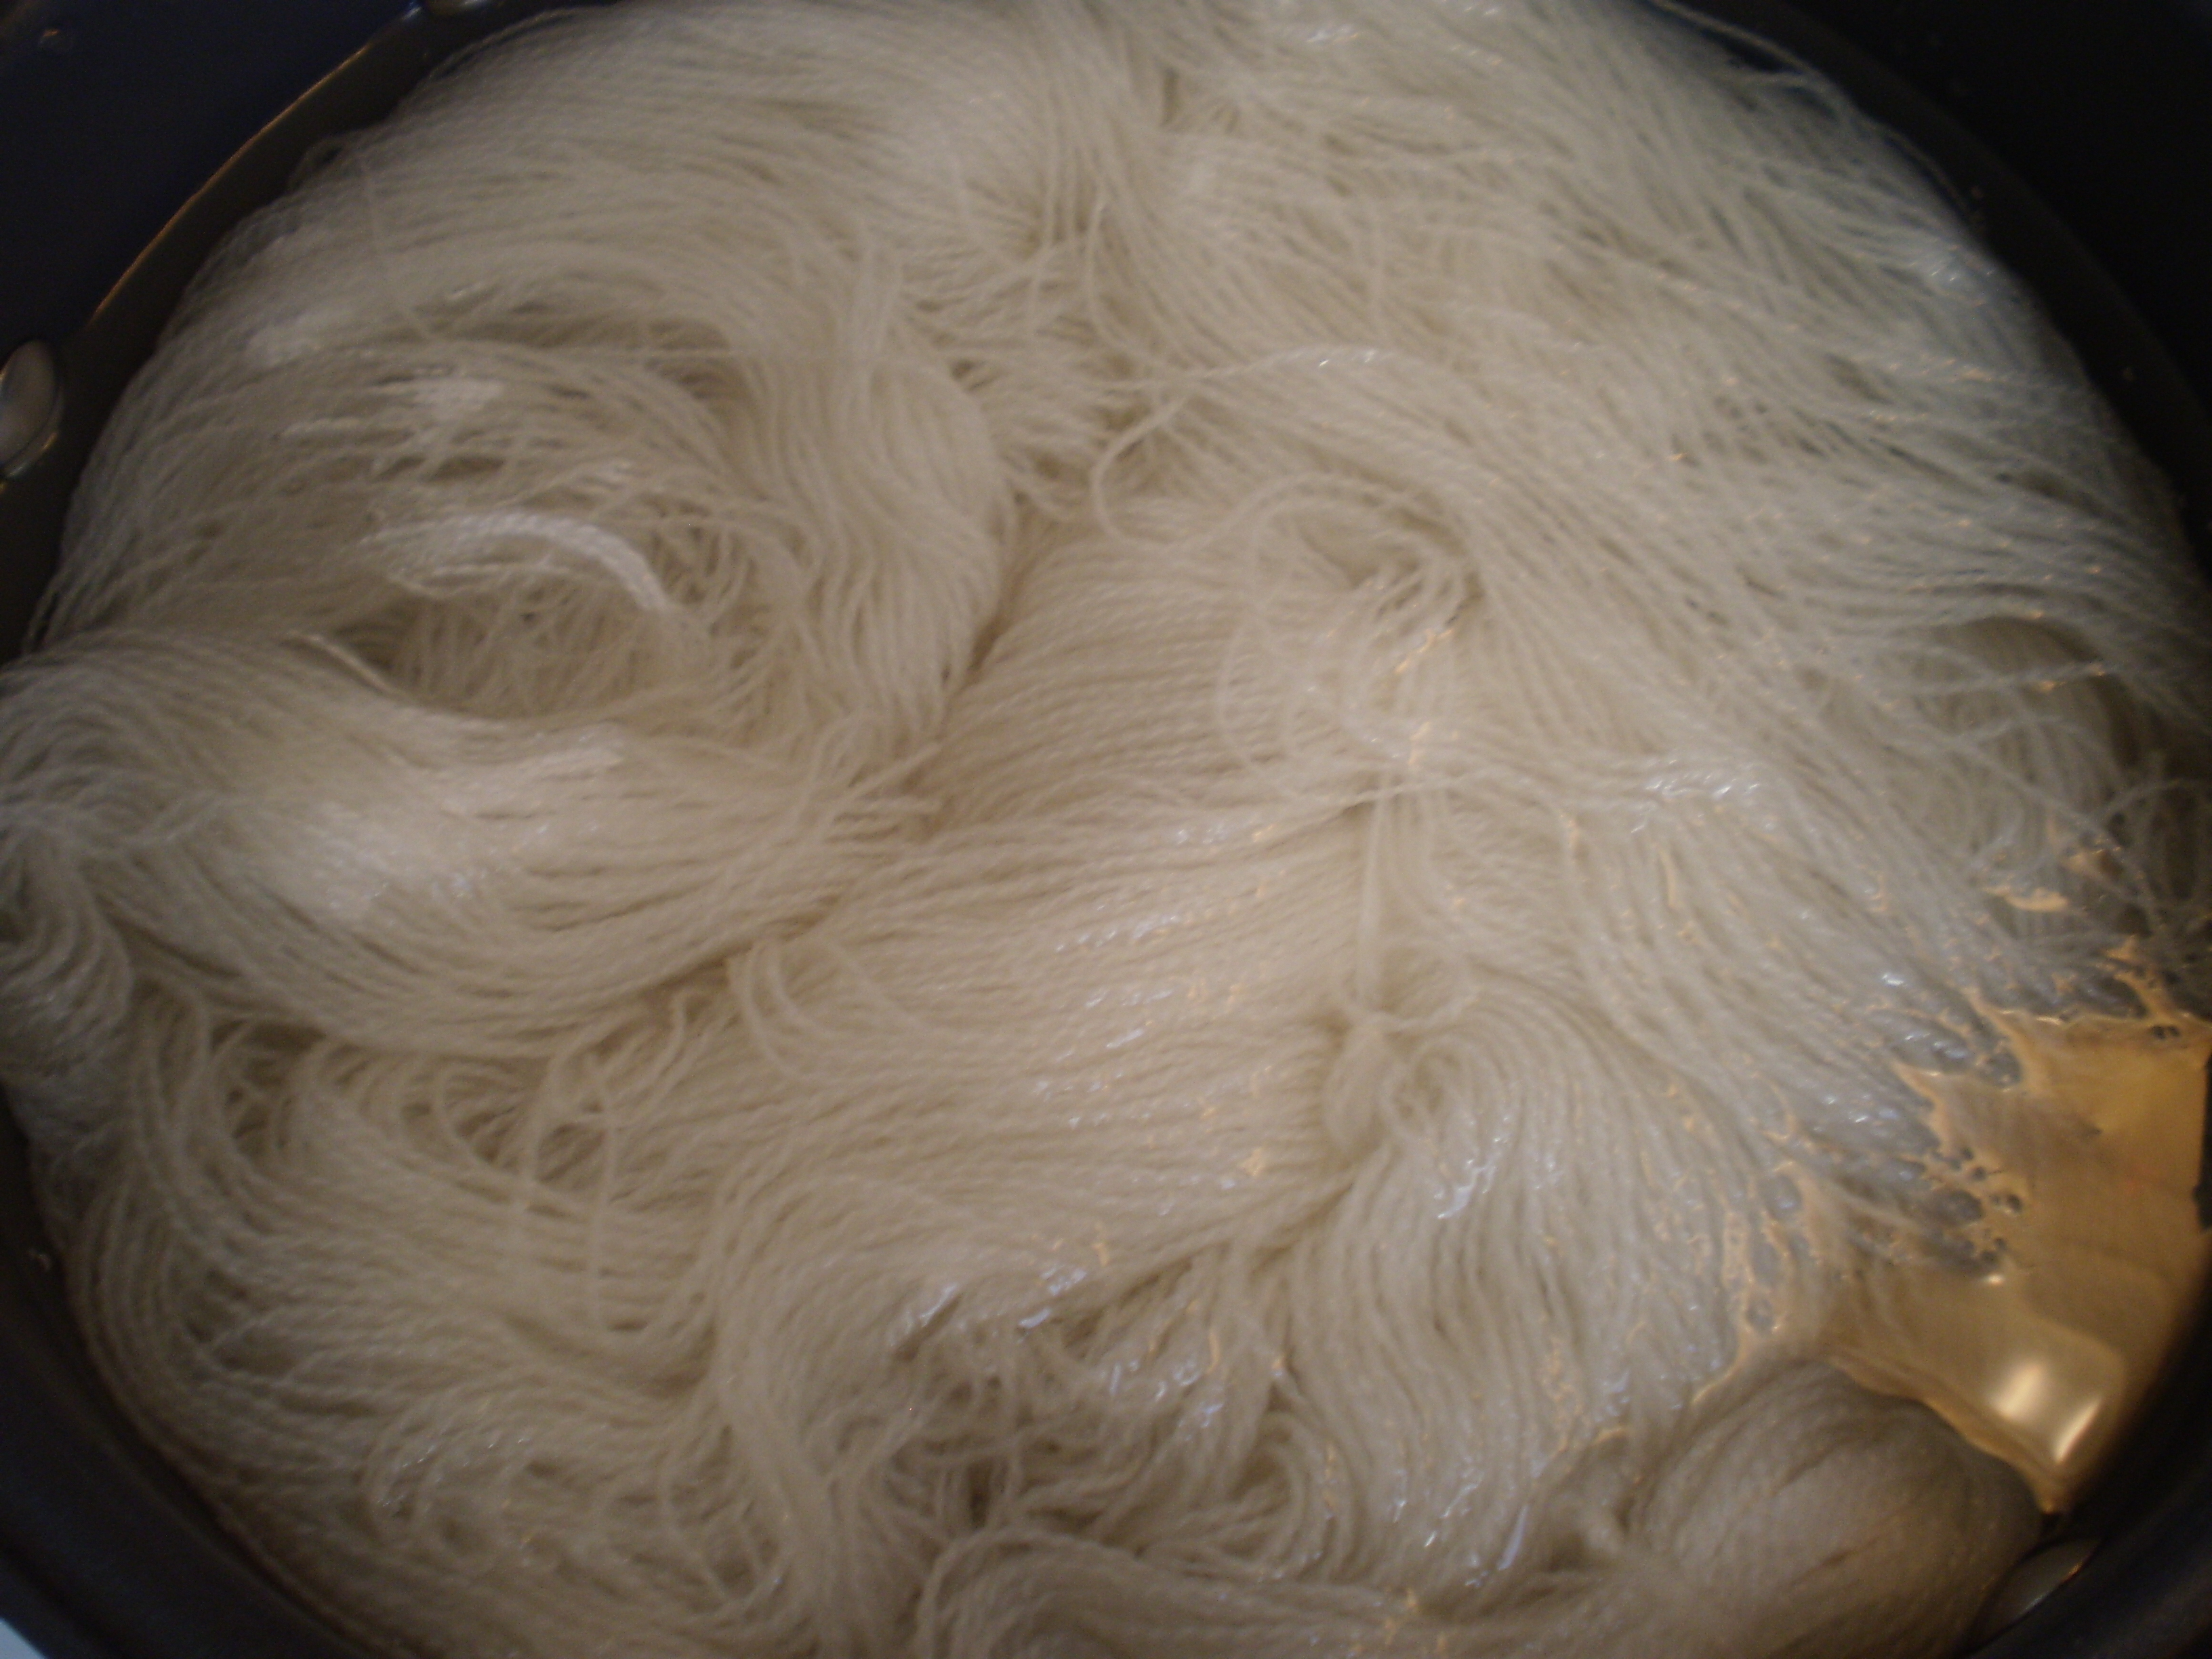
  2. Mix up your dye.  Just add a packet or two (or three or four) of Kool-Aid to a pot full of water.   It’s better to err on the too light side than the too dark side, since you can always add more color, but you can’t remove it.  I’m going for a pastel blue color, so I’m going with just one packet of color.  Heat up your dye until you just barely start to see little bubbles.  Don’t actually boil the water, but get it close.OLYMPUS DIGITAL CAMERA
  3. When your dye is steaming hot, and just about to start simmering, turn the heat way down and throw in your yarn.  Submerge all your yarn at once, and poke it around a little bit, so that each strand of yarn gets plenty of exposure to the dye.
  4. Set the color.  Keep your dyepot nice and hot, until the color transfers from the dye water to the yarn.  You know you’re done when the water is no longer colored.  Adjust the temperature to make sure that the dye stays nice and hot, but make sure not to burn or boil the yarn.  (Most Kool-Aid flavors will end up turning totally clear.  I picked one of their lemonade flavors, which they put something in to turn the water cloudy.  You’ll never get lemonade colors totally clear, but as long as the water turns white instead of blue (or yellow or whatever), you’re good to go.)OLYMPUS DIGITAL CAMERA
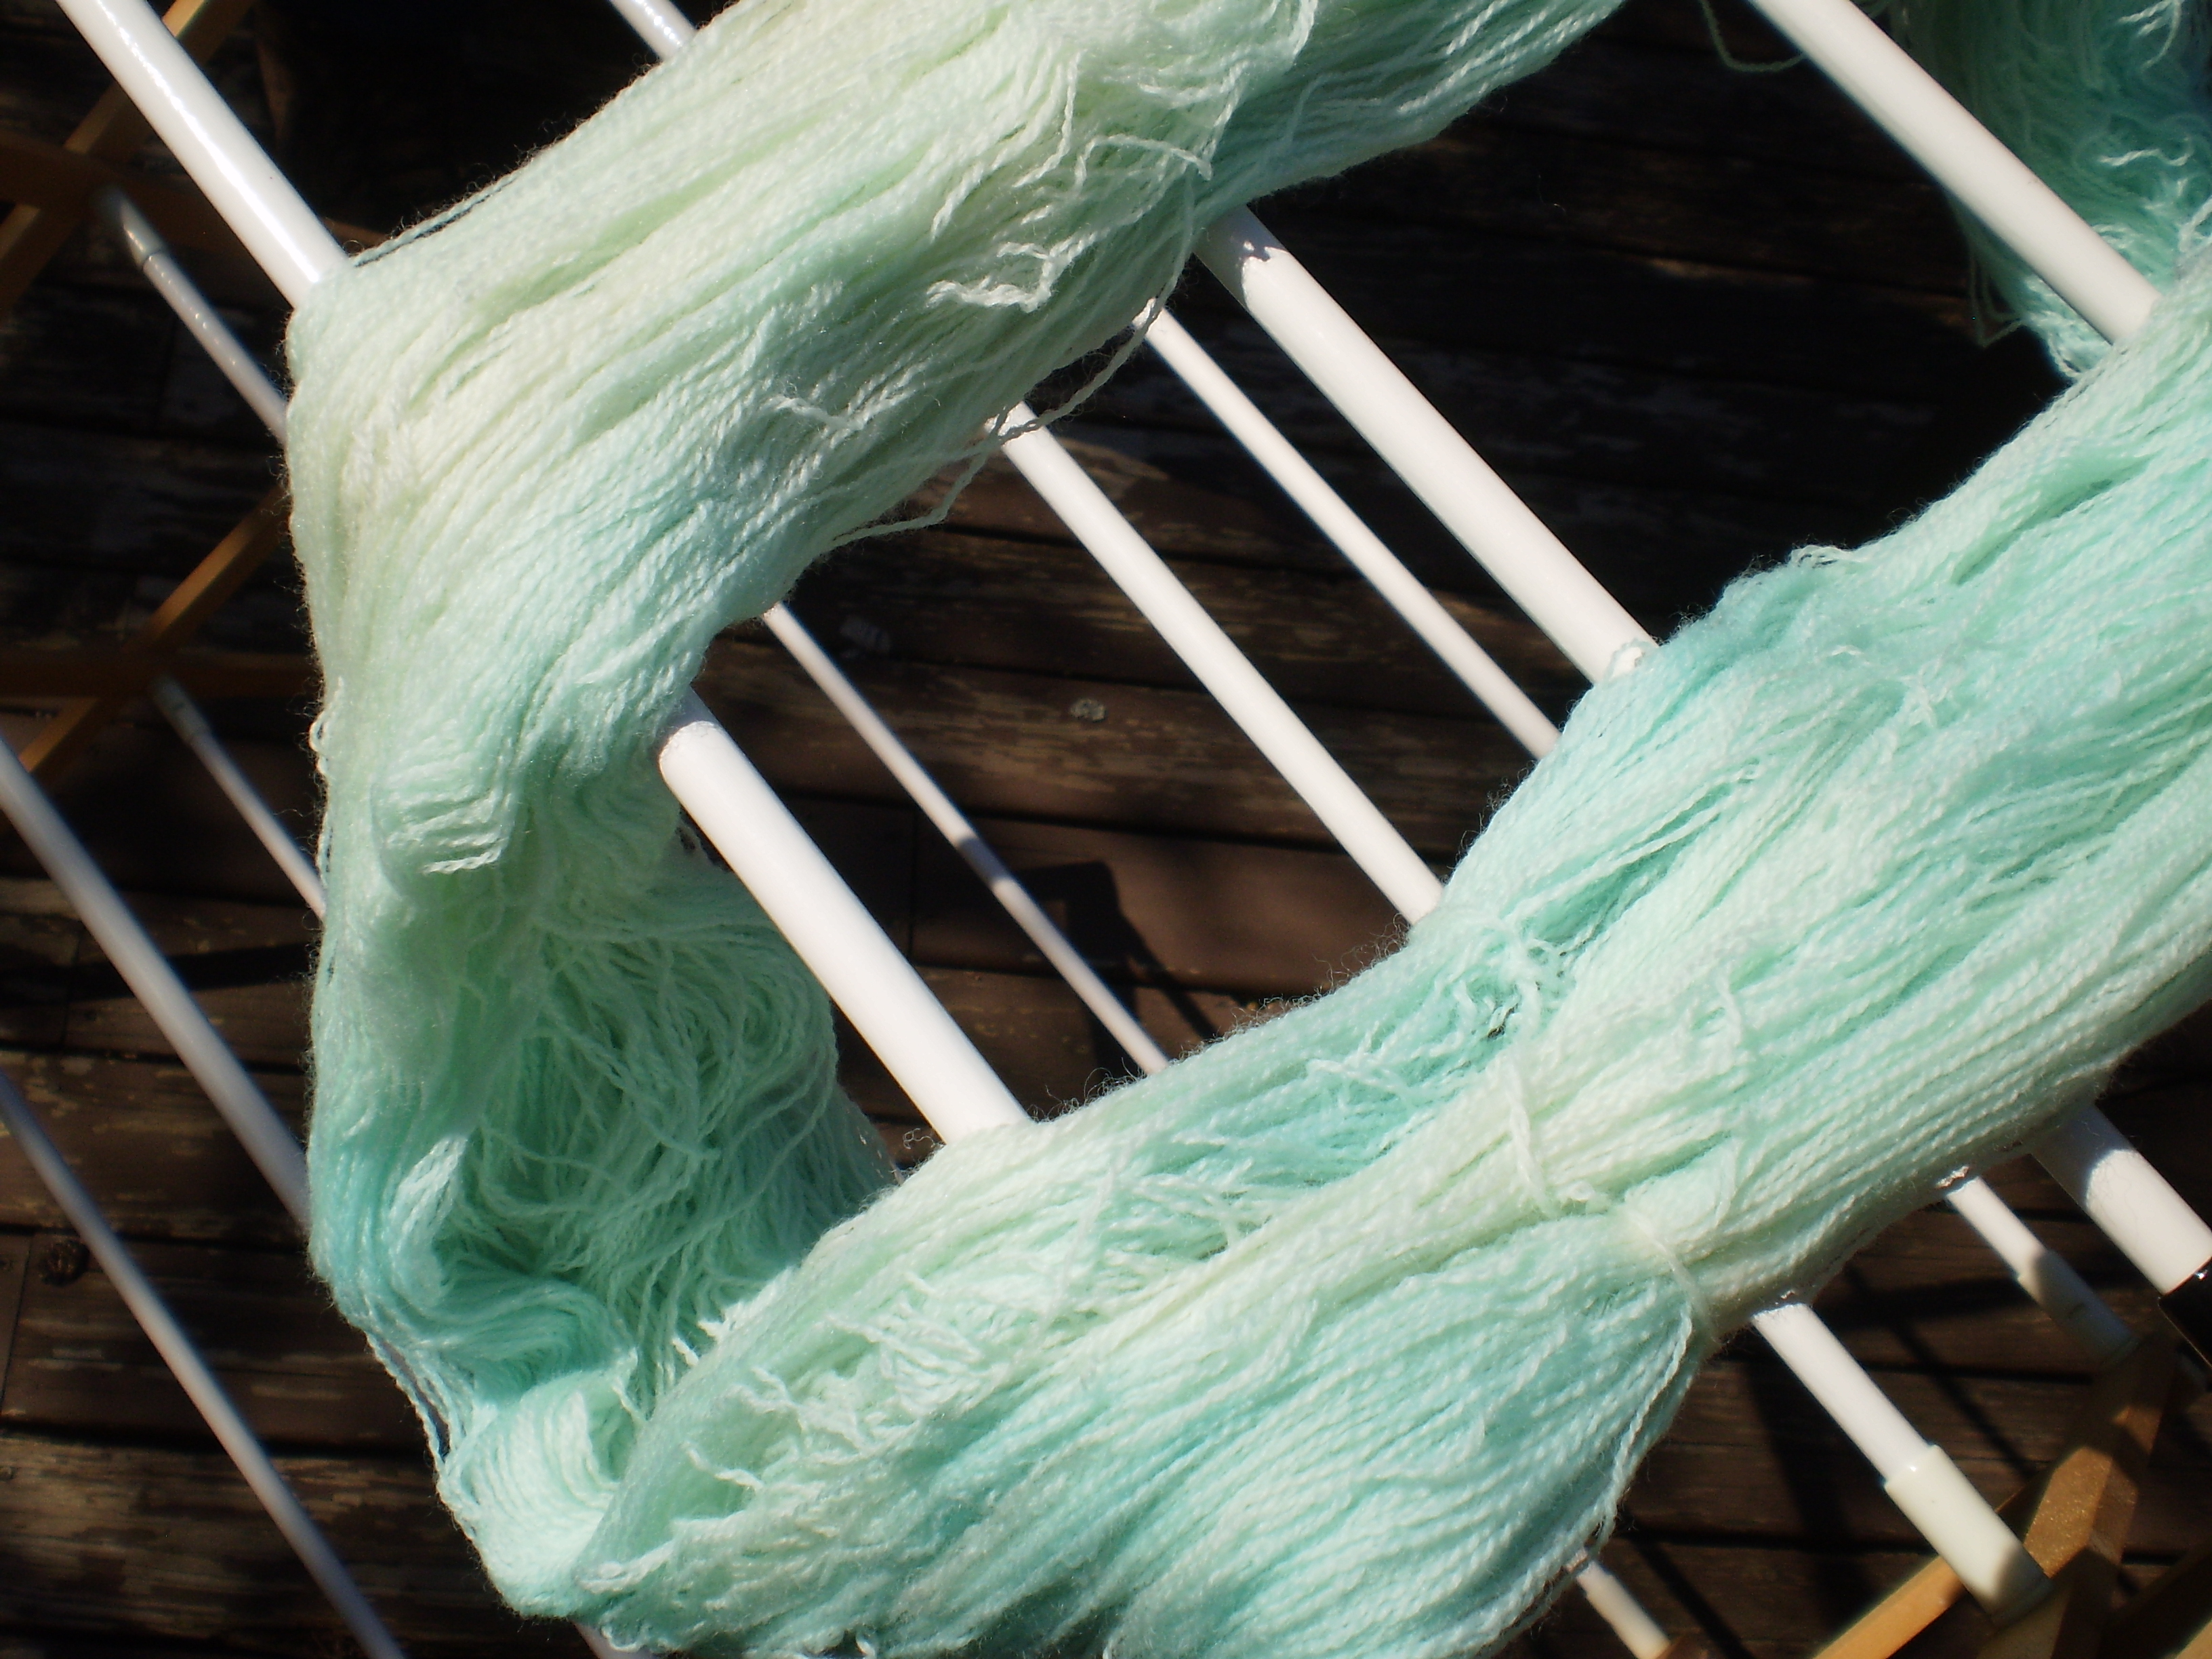
  5. Carefully (without burning yourself) move the yarn to a colander, and rinse the yarn under hot water from the tap.  Slowly lower the temperature of the rinse water until you can touch it without burning yourself.  Don’t immediately shock the yarn with cold water, because it can damage the yarn and cause felting.  Once you can touch the yarn without screaming in pain, keep rinsing out the yarn, gently flipping and turning it until no more color rinses out of the yarn.OLYMPUS DIGITAL CAMERA
  6. If you are happy with your color, hang up the yarn to dry.  If you want to add more color (this is called over-dying) go through the steps again with more dye.
  7. Knit something fabulous with your new hand-dyed yarn.OLYMPUS DIGITAL CAMERA

I’m So Lazy…

I’m totally lazy.  I love trying to find  shortcuts and easy ways to do things.  Unfortunately with knitting, there often isn’t an easy way.  (There’s no shortcut for knitting the acres of stockinet for a sweater… you just have to do it.)

Sure, knitting is an effort-heavy process, but don’t lose all hope!  I’ve got a great little trick for making color work super easy.  Let’s imagine that you want to put a nice little fair isle border on the cuffs of your new sweater, or maybe knitting an intarsia heart on a little girl’s hat.  Your project would end up really cute, but it would be a total pain to do.  I don’t know about you, but I like just making plain old stockinet stitch garments (easy!).  So, what’s a girl to do?

That’s where the duplicate stitch comes in.  The duplicate stitch is technically an embroidery technique that you can use to decorate knitted fabric after it has already been knitted so that it looks as if the decorative pattern was worked as the project was knit up.  I like using it for projects that have only a little bit of fair isle (which can be a pain to do for only a row or two at a time), or any pattern that wants you to do intarsia in the round (which is almost impossible).

And, I’ve even made a video for you.  Enjoy, and let me know if you have questions!

Socks II: The Resockening

I just realized that I hadn’t made an official pattern of my Sock Week  Month Tutorial.  Here it is, in a nice .pdf format for your printing pleasure.  I also have the pattern saved in my “Pattern Library” page along with all the other patterns I’ve posted here.  And, you can see all my patterns on Ravelry.

Socks by the Numbers

OLYMPUS DIGITAL CAMERA

It’s too pretty out for a real post

If the sun’s out in Seattle, you’re pretty much required by law to spend your day outside.  So, I decided to sit out in the yard with a nice iced coffee and a pile of granny squares and sew them together.  Not a bad afternoon.OLYMPUS DIGITAL CAMERA

After an hour or two of work and a few chapters of my most recent audiobook…

OLYMPUS DIGITAL CAMERA

And I’ve whip-stitched my squares together:

OLYMPUS DIGITAL CAMERA

They’re nowhere near an entire blanket yet, but they’re a start.  It’s going to end up being possibly the tackiest blanket ever (since I’m using up all my sock leftovers from over the years, and I tend to knit brightly colored socks), but I’m kind of OK with that.  It’ll be a nice project to work on a little at a time, whenever my bowl of sock yarn leftovers gets too full.

Granny Squares

Want to make your own blanket like Chummy’s?  It’s super easy (and satisfying) to make granny squares from your scrap yarn.

I made you a video!  (I even figured out how to and sound and a title!  I’m still not sure about editing and stuff yet.  Next time, I’m thinking special effects, background music and unicorns.   Some day, I will become the Steven Spielberg of knitting/crochet videos.)

Sock Week: Closing Time

We’re in the final stretch!  All we have to do today is to close up the toe and weave in the ends.  Then you’ll have a beautiful new sock!

OK, when we left off on Friday, you had finished with needle 4 (your active yarn was at the bottom of the sole).

OLYMPUS DIGITAL CAMERA

Knit needle 1, so that your active yarn is coming from the side of the foot (by where your big toe/pinky toe would sit if you put on the sock).

OLYMPUS DIGITAL CAMERA

You’re now officially done with knitting the sock!  Yay! No more knitting.  Just grafting the toe closed.

To set up for grafting (also called the Kitchener Stitch), combine the stitches on needle 1 with the stitches on needle 4.  And, combine the stitches on needle 2 with the stitches on needle 3.  Cut your yarn, leaving a couple feet of tail, and get out your tapestry needle.  Your toe should look like this:

OLYMPUS DIGITAL CAMERA

Now, using the Kitchener Stitch, graft these stitches together.  This is a great video tutorial, if you haven’t done it before.

When you’re done, your toe should look like this:

OLYMPUS DIGITAL CAMERA

See how the knitting flows nicely from the top of the foot to the bottom of the foot?  Very pretty.

Now, all that’s left is to weave in your ends, and your sock is done!

OLYMPUS DIGITAL CAMERA

Congratulations!  You’ve now completed your first sock!

Sock Week: Tootsies

We’re so close, I can taste it!  Only a few short rows until you get to be done!  (And then you get to make another one… unless you’re an amputee.  In which case I’m jealous that you don’t have to make two socks, but I’m also sorry for your loss.)

So, there are a bunch of ways to do toes, just like there are a bunch of ways to do heels.  You’re welcome to use whatever method you like, but here’s what I do.  It’s easy, and gives me a nice result.

Starting at the middle of the sole of the foot (between needles 4 and 1), work the toe in the round by repeating the following two rows:

Row 1:  Needle 1: knit to 2 stitches before the end of the needle.  K2tog (right leaning decrease).  Needle 2: ssk (left leaning decrease), then knit to the end of the needle.  Needle 3: knit to 2 stitches before the end, k2tog.  Needle 4: ssk, knit to end of needle.

Row 2: Knit evenly (no decreases).

Repeat these two rows until you only have 5 stitches left on each needle, finishing with Row 1.  (Note: if you’re using this recipe to make tiny kids’ socks or doll socks, you’ll want to keep decreasing until there are 2 or 3 stitches left on each needle.)  You should have 20 stitches total.

Here’s what your toe should look like.  See how the decreases end up lining up nicely?

OLYMPUS DIGITAL CAMERA

Have a fantastic weekend!  We’ll finish the sock on Monday!!

Sock Week: Instep

So, I’m kind of running out of funny ideas for sock post titles.  Also, I now realize that this has taken WAAAY more than a week.  So perhaps I should have called it Sock Month.

But, I suppose it’s too late for all that.

Anyway.  Today’s step is stupid easy.  We’re going to make this “instep” of the sock.  The folks that write books about knitting call this the instep.  But I think it should more accurately be called the “foot-part.”  Basically, it’s the part of the sock between the gusset and the toe decreases.  And it’s really simple to do.

You knit.   That’s all.  No fancy decreases or increases, no picking up stitches, no dropping stitches, no short rows, no ribbing (unless you really want to for decorative reasons) or anything else.  Just knit a tube until your sock is 1 1/2 inches shorter than you want your finished sock to be.

How long do you want your sock to be?  As long as your foot (see, I told you this step was easy).  Measure your foot from the back of your heel to the tip of your big toe (or whatever toe is longest).  Subtract 1 1/2 inches.  Knit your sock instep until the sock measures that length from the back of the heel to the needles.  For example, my bare foot is 10 1/2 inches long.  So I knit my instep until the sock measured 9 inches long from needles to the back of the heel when laid out flat.  In my opinion, it’s better to err on the side of making your sock a smidge too big.  No one wants socks that are too small.

OLYMPUS DIGITAL CAMERA

See?  I realize I forgot to include a ruler in this photo, so you’ll have to take my word on the length of my sock.

If you don’t have a ruler hanging around, just keep trying on your sock until only 1 1/2 inches of toe poke out the end.  If you’re knitting socks for someone whose feet you don’t have access to, this website has some good sizing charts.

And, because I feel like this is a rather short post today, and because I’m getting a little sock-crazy, here’s a weird video I found on the internet today.  You’re welcome.

(Warning.  He swears a tiny bit, so don’t watch if you’re not into that.)

http://www.youtube.com/watch?v=r_A71jVpGSQ

Sock Week: Gussett

Today we’re going to do the sock gusset.  I don’t know why, but I always feel like “gusset” is a vaguely dirty word.  I don’t know why though.  I  guess I’m just being weird.

Anyway, the sock gusset is the part of the foot right next to the heel.  To make the gusset, you’ll decrease two stitches every other row, until you’re back down to your Sock Number of stitches.  It’s super easy, and kind of fun watching your little decreases line up nicely.

So, remember how your needles were numbered last week?  Starting at the back of the heel/bottom of the foot, and working your way around in the knitting direction like this:

OLYMPUS DIGITAL CAMERASo, needles 1 and 4 are the bottom of the foot, and needles 2 and 3 are the top of the foot.

See how there are approximately a billion stitches on needles 1 and 4?  And see how there are only stitches equal to 1/4 of your Sock Number on needles 2 and 3?  We want to decrease stitches on needles 1 and 4 until they have the same number of stitches as needles 2 and 3.  Does that make sense? (I can’t actually see your response, since this is the internet, but I’m going to assume you are nodding or at least giving me a blank look.)

OK, so here’s what we’re going to do:

Row 1: Knit to two stitches before the end of needle 1.  Knit these two stitches together (k2tog).  Knit needles 2 and 3 with no decreases.  On needle 4, slip, slip knit (ssk) to work the first two stitches together, then knit to the end of the row.  You will have decreased 2 stitches on this row.  If you need a reminder about the difference between k2tog and ssk, try this video.

Row 2: Knit even (no decreases).

Repeat Rows 1 and 2 until all of your needles have the same number of stitches.  See how the decreases line up nicely, and make cool triangle-y shapes on both sides of your sock?  That’s your gusset.

OLYMPUS DIGITAL CAMERA

Next time:  Instep (the stupid-easy part…. yay!)

Sock Week: Pick-up artist

So, sorry dear readers, but today’s episode of sock week is going to be short and sweet.  I have to go make some emergency cakes*, so my knitting and blogging time is going to be cut short today.  (I know… woe is me, I have to go bake cakes.)

Anyway, today we’re going to do the set-up row for the foot part of the sock.  It’s a little fiddly, but not too difficult.  Much like the rest of making socks.

So, after turning the heel, your sock should look like this:

OLYMPUS DIGITAL CAMERA

I’ve numbered the needles again, for your reference.

Knit to the end of needle 1

OLYMPUS DIGITAL CAMERA

Then, still using needle 1, pick up and knit stitches equal to one quarter of your Sock Number from the side of your heel flap.  My Sock Number is 60, so I will pick up 15 stitches.  If you were careful with slipping the first stitch of each of your heel flap rows, you should actually have the proper number of spaces in which to pick up stitches.  (It’s hard to explain, but once you try it, it will make sense.)

Picking up stitches is just like knitting, only you don’t need live stitches to start with.

OLYMPUS DIGITAL CAMERA

Insert your needle where you want the stitch to go.

OLYMPUS DIGITAL CAMERA

Wrap the yarn around your needle, just like you do when you knit.

OLYMPUS DIGITAL CAMERA

And pull the stitch through.

If you haven’t done tried picking up stitches, this is a pretty good video.

When you get to the last picked-up stitch, pick up both the usual slipped stitch as well as the stitch below, then knit it as normal.  This will prevent your sock from having a little hole on the side.  If you skip this step, it’s not a big deal, but it makes a nicer finished product.

OLYMPUS DIGITAL CAMERA

Knit needles 2 and 3 normally:OLYMPUS DIGITAL CAMERA

Then, using your fifth needle, and continuing in the same direction around your sock, pick up and knit the same number of stitches up the other side of the heel flap.  If you want to do the fancy-pants no-holes pick-up, like on needle 1, do it at the beginning of this needle.

OLYMPUS DIGITAL CAMERA

Then, using the same needle, knit the stitches from needle 4 as normal.

So, what you should end up with is:

Needles 1 and 4: A bunch of stitches, but both should have the same number of stitches.

Needles 2 and 3: Both of these should have stitches equal to a quarter of your Sock Number.

OLYMPUS DIGITAL CAMERA

If you fold your sock in half, it should look kind of like this (quite sock-like, I think):

OLYMPUS DIGITAL CAMERA

Next time, the gusset!

*Emergency Cakes-Cakes that one has to make at the last minute when your friend begs you to bring desserts for a fund raiser that is happening this evening.  Stressful, but tasty.