Monthly Archives: August 2013

Inspiration: PAX

As you’re reading this, I’m probably at PAX Prime!  PAX is an annual gaming convention here in Seattle, and it’s absolutely a blast!  Thousands of people getting together to play and discuss games of all sorts.  Video games, board games, tabletop games… anyone who’s even remotely interested in gaming would have a fantastic time there.   I’m not even a hard core video gamer, but I enjoy myself there thoroughly. (They have rooms filled with board games for you to check out and try.  It’s pretty much the best.)

PAX-Prime-Logo

Anyway, in honor of PAX Prime this week, let’s get our geek on and look at some super cool videogame inspired knits:

From Zelda:

The Legend of Baby Link, by Joanna Rankin

1Finley_as_Robin_Hood_medium[1]From Minecraft:

Cute Creeper, by Krista Sodt

image

From Portal:

Knitted Companion Cube, by Wren Montgomery

6279582438_0e038740f6_bFrom Space Invaders:

bmp, bu Aija Goto

407924933_d28c695624_z[1]

Chummy’s Afghan Redux

This is a totally selfish post, with really very little value to you as a reader.  But I’m very excited about finishing my Call The Midwife-inspired afghan! (If you don’t remember what I am talking about, you can catch up here, here and here.)

OLYMPUS DIGITAL CAMERA

I used up almost all my leftover yarn from my many years of making socks.  It’s nothing more than a simple granny square blanket, whip stitched together.  I added a tiny single crochet edging to give the blanket a little more strength, since I plan on using it all the time as soon as the temperature drops out of the 60s (the 60s are “Summer Weather” out here in Seattle.  I was wearing shorts the other day, and my husband and I were going out to do some errands when he asked if I needed a jacket or something.  I said “No, I’m good.  It’s still plenty warm. It’s not supposed to get below 65 today.”  This is still weird to me, coming most recently from Austin, where if the temperature dropped to the 60s, you broke out the sweaters.  But I digress.)

Anyhoo, the blanket is kind of hideous, but I love it.  It’s mostly wool, so it’s really cozy, despite being fairly thin.  It’s just about the right size to fit over your lap when you’re sitting on the couch watching TV.  And I think it’s pretty delightful.

OLYMPUS DIGITAL CAMERA

The Long and the Short of It

Just a quick post today, with a really awkward photo.  Because that’s how I roll.

When you do a long-tail cast-on, like this, sometimes it’s yard to figure out how long to make your tail.  If the tail is too long, you end up wasting yarn.  If the tail is too short, you have to rip out your cast-on, and try again (which is a very inauspicious way to start a project).

So, here’s my rule of thumb:  Estimate the length of your finished knit object, and multiply that by four.  So, for example, imagine you’re making a wash cloth.  You want the wash cloth to be 9 inches across.  So, you multiply 9 inches x4, to get 36 inches.  So, you want a 36 inch tail for your long-tail cast-on.  Easy!

Or, if you want to do it the slacker way (which I totally do), just estimate.  If I’m making a hat, I’ll just wrap the yarn around my head a few times.

Here’s the awkward picture:

OLYMPUS DIGITAL CAMERA

You’re welcome.

So Twisted

So,  you’ve got your pretty yarn all died and dry.  It’s in a big skein, but the threat of tangles still looms.  What’s a girl to do?

OLYMPUS DIGITAL CAMERA

Here’s what to do to get your yarn into a pretty little twist.  It’s not terribly practical, but it’ll keep your yarn tangle-free until you get a chance to ball it up.  (Also, skeined yarn looks pretty, so if you’re giving your yarn away as a gift, this might be the way to go.)

Step 1:  Loop the yarn around your hands.OLYMPUS DIGITAL CAMERAStep 2: Twist, twist, twist.  Twist until you can’t any more.

OLYMPUS DIGITAL CAMERAStep 3: Fold the yarn in half.  I either hold the middle of the yarn in my mouth or under my chin. Don’t gag.  Ew.

OLYMPUS DIGITAL CAMERAStep 4: Tuck one end of the skein through loop at the other end.

OLYMPUS DIGITAL CAMERAStep 5: Futz with the skein to even out the twists.

OLYMPUS DIGITAL CAMERAStep 6: Success!

OLYMPUS DIGITAL CAMERA

Inspiration: Princess Bubblegum

Have you ever seen the cartoon “Adventure Time?”  No?  Well, if you’re not a 12 year old, that kind of doesn’t surprise me.

Adventure-time-logoIt’s a sometimes funny, sometimes touching, always surreal show about a boy (Finn the Human) and his magical, shape-shifting, talking dog/brother (Jake the Dog).  They go adventuring around the post-apocalyptic “World of Ooo” righting wrongs and getting into trouble.

One of my favorite characters on the show is Princess Bubblegum.  She’s the monarch of the Candy Kingdom (and literally made of bubblegum).  She’s sometimes a benevolent overlord to her subjects, and sometimes a semi-terrifying mad scientist.  But, she’s always an independent lady and quite a bit of a badass.

4820133598_c7f1752059_zLast week’s episode had PB going on a quest through a darkly mysterious wood, into a magic pond, and into a dark witch’s house.  And, being the practical gal she is, Ms. Bubblegum dressed appropriately:

PB1

PB2

PB3

The next time I go on an adventure, I know what I want to wear!  A sassy, long cozy pullover, comfy pink tights, and practical purple combat boots.  And, of course, my tiara.

Cozee, by Voolenvine

IMG_0241_medium2

Berwick, by Kristen Rengren

berwick_z_500

Dying With Food Coloring, Part 3

Now let’s really have some fun!  Variegated yarn is my favorite to make… it’s sort of like finger-painting, or tie dying.  But with yarn.  Fabulous!


Start out by soaking your yarn in some nice warm water (like usual).  When it’s thoroughly soaked, get out a big baking dish and line it with a piece of plastic wrap (mine is pink, because it’s left over from Christmas, when, apparently, you can buy pink plastic wrap).  Then, arrange your yarn neatly in the dish, so that it’s all nicely laid out.

OLYMPUS DIGITAL CAMERA

Set your yarn aside for a couple minutes while you put together your materials for your dye.  This is going to be a little different than how we’ve done it before, so it helps to have everything ready.

Here’s what you need to get out:

-A glass measuring cup with a spout.  If you don’t have one, that’s OK.  You can use a mug or something else heat-proof, but having a spout keeps everything neat.

-A bottle of vinegar

-Food coloring of your choice

-A spoon or butter knife for mixing

-A kettle (or pot) of boiling water (the boiling part is important)

OLYMPUS DIGITAL CAMERA

Ready to start?  You’ll have to work kind of fast, so you might want to read over the instructions before you begin.

Mix your dye.  The dye needs to be much more concentrated than the dye we used before, since we’re hardly using any water.  Here’s what I used (more or less.  You know me, I like to eyeball my measurements):

-1/2 cup of boiling water

-1/2-1 tsp of vinegar

-Food coloring to make the shade I want.  For this colorway, I probably used about a 1/4 teaspoon of each color… more or less.

Mix it together with your spoon.  If you’re using the gel food coloring, try to get rid of any lumps or chunks (but it’s not the end of the world if you miss some).

OLYMPUS DIGITAL CAMERA

While the dye is still super hot, dribble it artistically over your yarn.  (You want to move fast, so that the residual heat from the boiling water sets the color right away.  If you wait for the dye to cool, you’ll end up with muddier, mixed up colors.  Of course, if you want to go for a mushy, water-color look, then feel free to experiment.)  When you dye a section of the yarn, try to dye all the strands in the bundle.  This way your whole skein will end up with more or less the same color pattern.  But, again, feel free to experiment.

OLYMPUS DIGITAL CAMERA

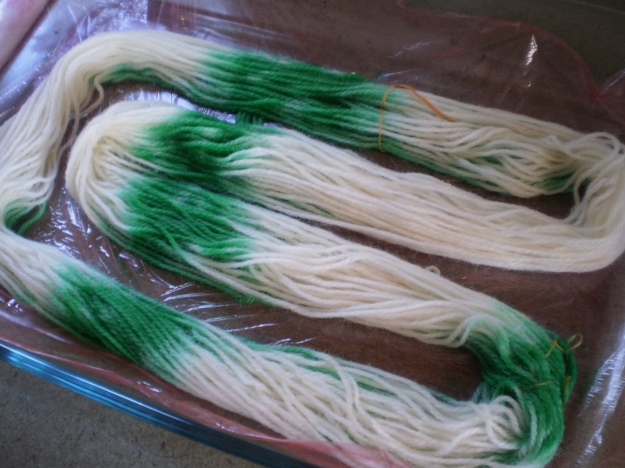
Add your other colors one by one:OLYMPUS DIGITAL CAMERA

And keep going until you like how the yarn looks (or until you run out of white spaces… whichever comes first):

OLYMPUS DIGITAL CAMERA

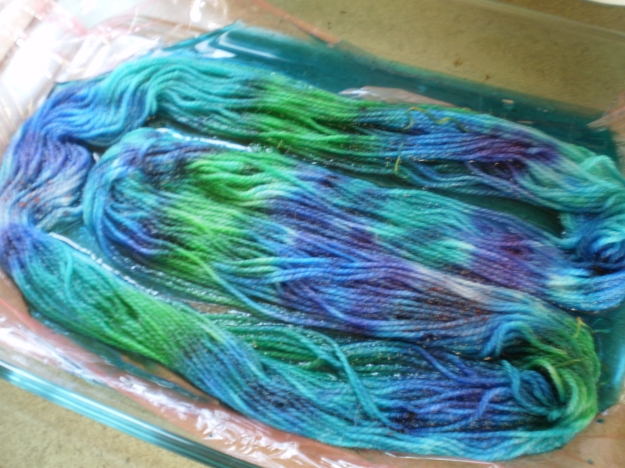
So, assuming you did everything right, most of the dye has already been taken up by the yarn.  But, as you can see above, some dye might still be hanging around in the liquid.  We can’t have that.  So, we’ll use the microwave to add a little more heat and finally set the colors.   Bundle the plastic wrap around the yarn, making a fiber-arts burrito:

OLYMPUS DIGITAL CAMERATransfer your burrito to a microwave-safe plate or bowl.  Pop the whole thing in the microwave, and zap it for 1 minute at a time.  Every time you pull it out of the microwave, let it sit for a minute or two, then check to see if the water has turned clear.  Once it has, rinse out the yarn with warm water, and hang it up to dry.

Fun, right?

OLYMPUS DIGITAL CAMERA

Dying With Food Coloring, Part 2

Let’s start at the beginning, and make us some semi-solid yarn.  I’m going to try to make some black yarn.  Now, when you shoot for black yarn, you usually end up with really really really really dark purple or blue, but I’m OK with that.

The process is really similar to dying yarn with Kool-Aid, with a few small differences.

OLYMPUS DIGITAL CAMERA

When you go to make up your dye bath, fill your non-reactive pot with plenty of water and a good glug of vinegar.  I’ve probably got about a half gallon of water, and about a tablespoon of vinegar.  You don’t really have to measure.

OLYMPUS DIGITAL CAMERAThen, add in your food coloring.  Add as much or as little as you want.  I’m trying for a really dark color, so I probably added just under a teaspoon.  If you’re going to try to get a couple skeins of the same color, you’ll want to measure carefully.  But, I’m just making the one, so I can play loosey-goosey.

OLYMPUS DIGITAL CAMERASoak your yarn in warm water.  When your dye bath is steaming and just on the verge of simmering, turn the temperature down to medium/medium-high.  Add the wet yarn all at once and give it a gentle stir with a spoon.

OLYMPUS DIGITAL CAMERALet your yarn hang out in the dye bath until all the color is taken up.  I used a TON of food coloring for this yarn, so it probably took a good half hour to take up the dye.  (Also, it’s almost impossible to take a good picture of yarn in a dye bath.  This was the best one of about 15 photos.  Frustrating.)

When the water turns clear, tip the yarn into a clean colander in the sink and rinse it out thoroughly with clean, warm water.  Make sure you get all the vinegar out.

OLYMPUS DIGITAL CAMERAHang your yarn up to dry!

Skein Rhymes With Pain

Before we get started dying your yarn, we need it in a skein.  A skein of yarn is basically a nice neat loop of yarn held together in a couple spots by scrap yarn.  It’s good for dying , since it lets your dye get to every little bit of your yarn, but prevents your yarn from becoming the world’s biggest knot.

Sometimes you can buy yarn already in a skein (usually from knitting specialty stores), but usually it comes in balls when you buy it from JoAnn’s or something like that.  Putting it in a skein is a bit of a pain, but it’s worth it.

So, how’s it done?

OLYMPUS DIGITAL CAMERAFirst, wrap your yarn around something.  I’m using the backs of two chairs sitting next to each other.  You could use a really big book, or the hands of a very patient friend.  Keep wrapping until you have it all wrapped up.  (I’m actually splitting my ball of yarn in half, and making two even-ish skeins of wool.  This way, I can dye them separately and have two different colors of yarn.)  Tie the ends of your yarn together to keep everything neat.

OLYMPUS DIGITAL CAMERAThen, using scrap yarn or embroidery floss, add a couple ties around your skein.  Hold the embroidery floss behind the yarn, while it’s still wrapped around the chair back (or whatever).  Split the yarn in half with your thumb.

OLYMPUS DIGITAL CAMERATake the bottom end of the floss, and loop it behind the middle of the floss, in between the two halves of the yarn.

OLYMPUS DIGITAL CAMERAKnot the ends of the floss together.  Make sure the tie is secure, but loose around the yarn.  If it’s too tight, you’ll end up with white spots in your dyed yarn.  And no one wants that.

Add a couple more ties around the skein.

Slip the skein of yarn off the chair back, and you’re ready to start dying.  (The yarn, that is.  Don’t actually die.  That would suck.)


Dying with Food Coloring, part 1

I’ve been getting requests to do a dying with food coloring tutorial for a while now (Hi Mom!), so let’s do it.  Dying with Kool-Aid is fun and all, and leaves your knitwear smelling fruity fresh, but there is a very limited color selection with it.  And, unless you’re six years old, you probably don’t want a “Blastin’ Berry Cherry” colored sweater.

Here’s what you need:


OLYMPUS DIGITAL CAMERA

-Food Coloring.  I like the gel concentrate stuff from Wilton.  It’s super concentrated, so you can use just a little bit and still get really bright colors.  And, it comes in approximately a million shades.  I bought this box of 12 colors for about $10 (with a coupon from JoAnn’s), and it’ll last me years.  You can use the regular liquid colors from the grocery store, but you’ll have to use a lot more volume to get brightly colored yarn.

-Vinegar.  To set the color into your yarn, you have to add an acid, and plain white vinegar works best.  It’s dirt cheap, and you probably have a bottle of it in the back of your cupboard.  (We didn’t use vinegar when dying with Kool-Aid, since it already has citric acid added to the powder, so you don’t have to add any more. Science!)

-Yarn.  Just like with the Kool-Aid, this kind of dying only works with animal fibers (wool, alpaca, angora, silk).  It has to do with the protein makeup of the yarn, but I don’t know all the science behind it.  I just know that if you try it with acrylic or cotton, it’ll never take up the color.  I’m using Paton’s Classic Worsted.  It’s a 100% wool yarn, and it’s easy to find at your local Jo-Ann’s/Michael’s/Hobby Lobby.

-Water.  Duh.  From the tap is fine.

-A non-reactive vessel.  (Just like with dying with Kool-Aid)  Stainless steel, enamel, glass or non-stick/Teflon work well.

Collect up your gear, and meet me back here next week when I’ll show you how to dye semi-solid and variegated yarn. And (if the time management gods smile upon me), I’ll give you a pattern to use your newly dyed yarn!

OLYMPUS DIGITAL CAMERA