Tag Archives: technique

Tutorial: Closing Up

As you guys all know, I’ve been going to town on some Christmas Balls. (I think my last count stood above 20, but I could be wrong.  There’s so many it’s getting hard to keep track of them all these days.)

Knitting these bad boys is fun and (fairly) easy, though some of the colorwork is a little bit challenging to knit up without making the balls pucker too much.  The finishing isn’t too bad, either, just a little bit of a pain when you have to repeat it so many times.  You stuff the balls, weave in all the ends, close up the top and the bottom, and add a loop to hang  the balls from. Easy, right?

Well, closing up the top of the balls is easy enough- you just pass your tail through the remaining active loops and pull, just like the top of a hat.

But the bottom is a different matter- one that took me a couple tries to figure out how to do neatly.

Because you cast on at the bottom of the ball, you have a big old hole down there, waiting for you.  And, there’s no obvious way to get rid of that hole, since you can’t just pull a string and have it disappear (believe me, I tried).

Here’s what I’ve been doing, and I think it works pretty well.

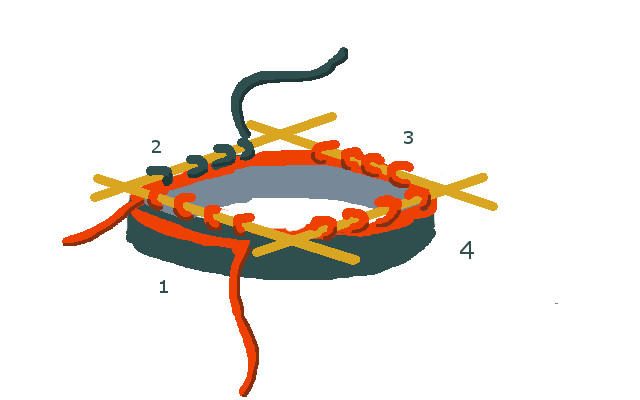
So, you see the long-tail cast-on edge? There are little slanted “stitches” all the way around the edge.  I use a yarn needle to carefully pass my needle through those stitches, counter-clockwise, starting right next to the spot where my tail yarn comes out of the ball.And I keep going…
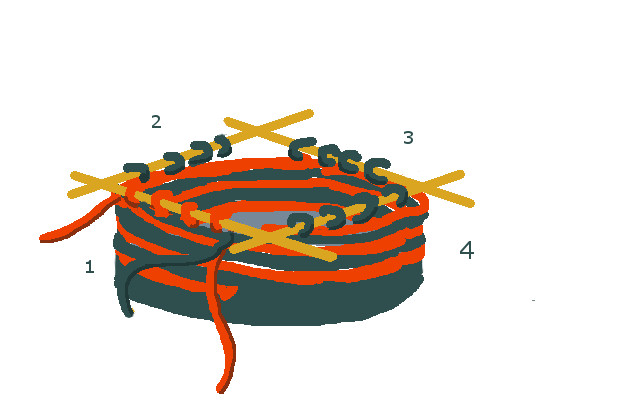
Until I get all the way around the hole.Then, I pull the tail snug,And voila!  A lovely finished ball bottom that looks just as good as the top!  You could use this technique on top-down hats, fingers-to-cuffs mittens, or really any time you need to close up an opening created by a long-tail cast on.

Now, all I’ve got to do is repeat this on the rest of my Christmas Balls. Oof.

Do you have any favorite techniques you’ve been using lately?

Portuguese Knitting

The other day, at Knit Fit, I took a class from Lisa Ellis (if you live in the PNW and get a chance to take one of her classes- do it!).  And in it, I learned two things:

  1.  How to spell Portuguese.  (Did you know it has two u’s in it?)
  2.  How to knit in the Portuguese style.

Have you ever seen someone knit like this before?  It’s crazy!  I’ll try to explain it, but I can’t promise it’ll make sense:

You have your ball of yarn on your right side, and kind of weave the yarn through the fingers of your right hand, then wrap the yarn over your neck or through a pin (like this one) attached to the front of your shirt. OLYMPUS DIGITAL CAMERA

Then, instead of throwing the yarn like you would while knitting continental, you kind of… flick the yarn with your left hand.

It blows my mind.

Here’s a video (if you want to teach yourself, this YouTube-er has some pretty good videos, but they’re not all in English):

The craziest thing about this style of knitting is that you end up knitting inside out!  Since your yarn is basically tied to the front of your shirt, it’s hard to get it behind your knitting (for the knit stitch).  So, since it’s so much easier to purl, when you’re working in the round, you just purl all the time!  I started making a hat, and it’s inside-out!

OLYMPUS DIGITAL CAMERA

Then, when it’s finished, I’ll turn it inside-out!

OLYMPUS DIGITAL CAMERA

And, bonus, knitting stranded color work inside-out like this means that you don’t have to worry about your floats making the fabric all pucker-y.  Don’t ask me how- it just works!

Magic!

Have you ever done Portuguese knitting?  What style do you like to knit?

Itty Bitty Faces

As I’ve said before, I’m a big fan of all things tiny.  And when I make tiny stuffed animals, I need to make tiny faces, too.

Because of the way knit fabric is created, often teeny tiny embroidered faces end up looking kind of dumb and stretched out.

So that’s where this cool face technique comes in.  I’d pretend that I came up with it myself, but alas, I’m not that clever.  Julie at Little Cotton Rabbits came up with it, and generously included the tutorial with her instructions for her teeny tiny toys.

It’s so simple, and so perfect, I’m kicking myself that I didn’t come up with it on my own.

6a00d83451d24769e200e5520787618833-800wi[1]Simply cut out a little piece of felt and hold it behind the doll’s face before you stuff the critter.  The felt is dense enough to allow you to embroider to your heart’s content without worrying about the sewing into knit stitches, and it is soft enough that you don’t even notice it once you’ve finished the little guy.

Genius!

I used her technique on my tiny teddy bears, and they turned out perfectly!

OLYMPUS DIGITAL CAMERAIt worked so well that I think I’ll probably use the same technique on my Mother Bears, too!

Have you ever come across an insanely-simple-but-totally-perfect technique before?

You spin me right ’round

I love stripes, and I adore knitting stripes especially.  The whole “knitting with two colors at the same time” is pretty much the best.  But I do not love weaving in all the ends at the end of a project.  It’s like the world’s worst knitting practical joke.  “Oh, you think your sweater’s done?  HAHA NO!  You get to spend the next six hours weaving in ends. Sucker!”  Not fun.

So, here’s a trick that I like to use when I want to make something in the round with itty bitty stripes.  Essentially, I’m working both colors at the same time, spiraling them together.  This way, it looks like I have perfect jogless stripes, AND I don’t have to worry about a million little ends to weave in at the end.  (Also, despite my poor description, it’s actually quite easy.)

Please forgive the messy drawings… I’m still figuring out the whole “graphics” thing.

1.  Cast on with your first color, and join in the round using a set of 5 dpns (4 to hold your knitting, and one to use).  Knit a few rows (it can get too fiddly if you don’t have a good solid base before adding the second color).

Swirl 12. At the beginning of the round, start knitting with the second color, but don’t cut the first color.  Knit needles 1, 2, and 3 with the second color.

Swirl 23. Stop knitting with the second color, but don’t cut the yarn.  Pick up the first color and start knitting where you left off.  This time, only knit two needles (needles 1 and 2).

Swirl 3

4.  Pick up the second color again, and knit two needles (in this case, needles 4 and 1)

Swirl 45.  Keep going in pattern, picking up the first color and knitting two needles (needles 3 and 4).

Swirl 56. See how the pattern is going?  You knit two needles of the first color, then two needles of the second color.  This way you keep building up a spiral of stripes, until you end up with a great big long spirally/striped scarf/hat/mitten etc.

Swirl 6When your project gets long enough, knit until your secondary color is back at the beginning of the row, then cut it.  Do a couple more rows in the first color, and bind of as usual.

Easy!

Actually, it is the size of the boat that matters

Gauge is a tricky concept to talk about, because it’s kind of abstract, but it’s not a tricky concept to understand. Gauge really means the size of the stitches of the knitting that you are producing. It’s usually measured in stitches per inch (for example, if you see a ball of yarn that says “4 sts/in” on the label, that means that the yarn manufacturer thinks that the yarn works best at 4 stitches per inch).

Gauge can play a HUGE role in how a project turns out. For example take a look at these two hats:

OLYMPUS DIGITAL CAMERA

These hats are (I kid you not) exactally the same. They were both made with the Chunky Hat pattern that I posted Wednesday. The only thing I did was change the yarn and needles to change the gauge. The blue hat was knit at a gauge of about 2 stitches per inch, the red hat was knit at a gauge of about 8 stitches per inch.

So how do you get different gauges? You change two variables. Your yarn and your needles. First pick a yarn that will get you close to your gauge (by looking at the label on the yarn package you can get a rough estimate of your expected gauge). Then, through trial and error, try different needles to get your desired gauge (again the yarn label will suggest a needle for you to use).

The yarn you use will dictate (to a point) what needles you can use. For example, the bulky blue yarn is super thick, so you could probably use needles from about a 10 to about a 15. 15s are going to give you a loosely knit (large gauge) fabric, and 10s are going to give you really dense fabric with a tighter gauge.  If you tried to use smaller needles (like 5s or 3s), you’d have almost no chance of being able to knit, since the needles would be so much smaller.