Category Archives: FYI

Skein Rhymes With Pain

Before we get started dying your yarn, we need it in a skein.  A skein of yarn is basically a nice neat loop of yarn held together in a couple spots by scrap yarn.  It’s good for dying , since it lets your dye get to every little bit of your yarn, but prevents your yarn from becoming the world’s biggest knot.

Sometimes you can buy yarn already in a skein (usually from knitting specialty stores), but usually it comes in balls when you buy it from JoAnn’s or something like that.  Putting it in a skein is a bit of a pain, but it’s worth it.

So, how’s it done?

OLYMPUS DIGITAL CAMERAFirst, wrap your yarn around something.  I’m using the backs of two chairs sitting next to each other.  You could use a really big book, or the hands of a very patient friend.  Keep wrapping until you have it all wrapped up.  (I’m actually splitting my ball of yarn in half, and making two even-ish skeins of wool.  This way, I can dye them separately and have two different colors of yarn.)  Tie the ends of your yarn together to keep everything neat.

OLYMPUS DIGITAL CAMERAThen, using scrap yarn or embroidery floss, add a couple ties around your skein.  Hold the embroidery floss behind the yarn, while it’s still wrapped around the chair back (or whatever).  Split the yarn in half with your thumb.

OLYMPUS DIGITAL CAMERATake the bottom end of the floss, and loop it behind the middle of the floss, in between the two halves of the yarn.

OLYMPUS DIGITAL CAMERAKnot the ends of the floss together.  Make sure the tie is secure, but loose around the yarn.  If it’s too tight, you’ll end up with white spots in your dyed yarn.  And no one wants that.

Add a couple more ties around the skein.

Slip the skein of yarn off the chair back, and you’re ready to start dying.  (The yarn, that is.  Don’t actually die.  That would suck.)


So Fluffy!

I was lucky enough to spend last week at a family reunion up on Whidbey Island.  We rented a gigantic house (think “The Godfather”) and spent the week hiking, beachcombing and generally having a fantastic time.

But one of my favorite things we did was to visit Fern Ridge Alpaca Farm, which was near where we were staying.  We got to meet a whole mess of alpacas (probably about 20 or so).  They are adorable little(ish) dudes.  We got to feed them and pet them.  They are ridiculously fluffy.

2013-07-31_17-45-34_115

Did you know that alpacas are often raised with guard llamas?  That’s something I learned.  They’re fierce (although they look like they need a good set of braces)!

2013-07-31_17-39-22_111

I was able to buy the softest, most beautiful chocolate brown yarn, and a big bag of light gray roving from the super friendly owners of the farm.

OLYMPUS DIGITAL CAMERA

The best part was that I got to meet Electra, the alpaca that my yarn came from.  She was super pregnant, skittish, and a little dopey looking.  But I’ll give her some leeway, since she produced such beautiful yarn!

2013-07-31_17-36-01_145

Now I just have to come up with something really special to make from her yarn.  250 yards of worsted weight Alpaca.  I’m thinking something with cables.  Any thoughts?

Christmas is coming

ChristmasTreeChristmas will be here in 5 months from yesterday.  If you’re planning on doing knitting for Christmas gifts, you should start thinking about it now.

You have been warned.

Persistence

Gather ’round boys and girls, and let me tell you the tale of the Green Yarn and the sweater(s) it became.  Our story begins in the year 2008…

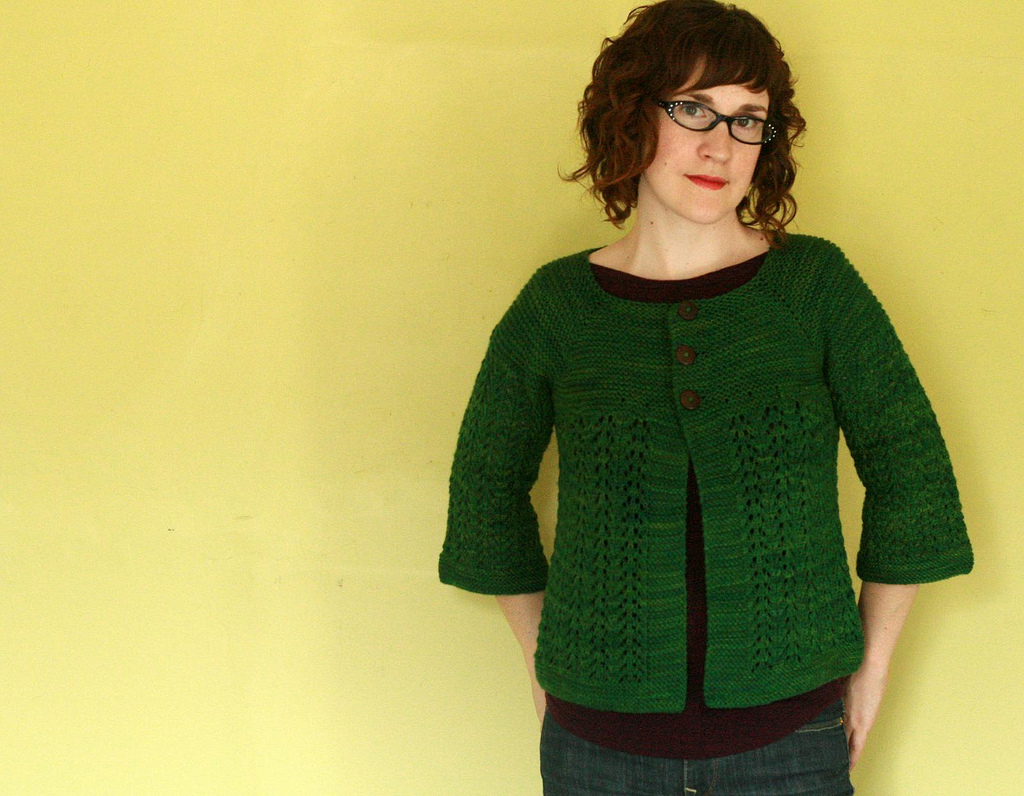
A hopeful young knitter named Allison found a beautiful pattern called the February Lady Sweater.

2557274228_d668e752a6_b

It was gorgeous… cozy, comfy, lacy, and a beautiful shade of green.  She had to have it.

As a graduate student, Allison went the cheapest route and bought a whole pile of white yarn from Knit Picks and dyed it with food coloring.  It turned out… with varying results.  Some of the skeins were greener, some were browner, and one even had bright red blotches in it.  It was odd, but it wasn’t going to defeat our knitter.  She went ahead and meticulously knit up the February Lady Sweater, carefully using each skein for only a few rows to mix the slightly different yarns throughout her sweater.  After months of work, and weaving in hundreds of ends, she was done!  She tried on the sweater and!

It. Looked. AWFUL.

It was chunky, too big, and looked like the worst, most stereotypical maternity clothes.  Allison wore it twice (out of stubbornness) and threw it to the bottom of her closet, where it was never thought of again.

Until…

In the summer of 2010, Allison got the itch to knit another sweater, and remembered that green yarn from two years ago, and went to go dig it out.  She found the terrible sweater, and tried it on again (just in case).  It was still ugly.  So, she ripped out the entire thing and balled it all up into a million golf ball sized skeins of yarn.

In the years since she had first knit the sweater, it had sat at the bottom of the closet becoming permeated with dust.  Unraveling the sweater and rolling up the balls of yarn caused both Allison and her husband to have massive allergy attacks.  So, out of spite, she hid the yarn away again, refusing to knit with something that made her sneeze like she had rolled around in a pile of cats.

Around Christmas 2012, Allison got it into her head that she wanted a new sweater.  Something plain, with nice long sleeves, and maybe a simple cable down the sleeves (because why not).

The idea rolled around for a while, until she purchased a book called “The Knitter’s Handy Book of Top-Down Sweaters” by Ann Budd.  “Perfect!” thought Allison, looking at the pattern for a basic saddle-shoulder sweater.  “I’ll make this!  It will be quick and easy, and I’ll be able to use that green yarn that’s been following me around for the past five years.”

She cast on, carefully spit-joining the ends of all her little skeins of yarn.  And, before she knew it she had the top half of a great pullover: sleeves, crew neck, shoulders, and a good 10 inches of body.  Excited, she tried it on:  the sleeves looked perfect, the neck was great, but the body of the sweater was way too big.

More determined than ever, Allison ripped out the body (again) and reknit it, this time decreasing on the sides to bring the size down.  She tried it on (again), and was dismayed to find out that the sweater looked even worse than before!  The body fit around the waist, but now there were weird puffy bits in the armpits of the sweater.  Not good!

She ripped out the body once again and reknit it, this time adding k2p2 ribbing panels on the sides.  She held her breath as she tried it on once more.

It fit!  It looked good! Hooray!

She flew through the remaining 6 inches of body and bound off as quickly as she could.  She blocked out the sweater that night, and kept coming back to look at it as it dried.

Two days later (Seattle is always slightly damp, even in summer), the sweater was cozy and dry!  Allison excitedly put on the “finished” sweater, and was heartbroken to realize that the sleeves, after blocking, were a good 4 inches too long.  After a bit of pouting, she ripped the cuffs back and reknit them in an evening.

Finally!  The sweater was done!  It had been five years since she had purchased the yarn, she had tried two patterns, and had at least 4 major froggings, but at last she had something to show for her work.

 OLYMPUS DIGITAL CAMERA

OLYMPUS DIGITAL CAMERA


So, the moral of the story?  Never, ever, ever, give up.  That’s the great thing about knitting.  No matter how bad you mess up (unless you set your yarn on fire or something), you can always remake a pattern, fix your mistakes, or totally reknit your yarn.

persistence

Giving It Away

If you’ve been knitting for more than a hot minute (especially in public), you probably have had someone request that you make something for them.  It’s always kind of awkward, especially if you don’t really know the person.  I am not opposed to making things for other people, but my response is governed by how I’m asked.

OLYMPUS DIGITAL CAMERA

Here are some responses that I’ve come up with:

1.  “Oh, you knit?  Make me a scarf.”  In my brain I immediately reply “No! You rude person.”  But what I say is:  “Sure!  I’d love to make you something.  If you pick out a pattern and get buy the materials, I’d be happy to make it for you!”  I have never had anyone go through the hassle of actually buying the yarn, so they get no scarf from me.

2.  “I love the socks that you’re making!  Could I pay you to make some for me, too?”  This is trickier, because they are actually willing to put forward some money/effort to get you to make them something, which I approve of.  But, most non-knitters don’t realize how much effort goes into a pair of socks (or any other project).  Let’s say that it takes 10 hours to knit a pair of socks (which is crazy fast, but I like round numbers).  And, minimum wage in Washington is about $9 an hour.  That comes to $90 for labor, plus another $10-20 for materials, so you end up with a $100 pair of socks.  The point is, you’re not going to make money knitting.  If I am actually interested in making the project, I’ll usually will give them the same deal that I give folks from the first group (although they are much more likely to follow through).  If I don’t want to make the project, I usually laugh awkwardly try to change the subject.

3. “Allison, would you be able to make me a very special hat to match the color of my coat, and could it have a pattern so that it goes with those mittens I got for Christmas last year?”  These requests I almost always fulfill.  It’s clear that they have really thought about what they are looking for, and they are very polite about asking for it (weird, right?!).  Usually, though, I’ll keep these projects secret until birthdays or Christmas when I need to pull out a really great present.

The Search for the Perfect Pattern

My absolute favorite part of Ravelry is its searchable pattern database.  It’s super useful.

Imagine, if you will, that you want to knit a small stuffed animal bird.  You don’t want to pay for a pattern, and you also don’t want to have to sew any seams.  That’s a lot of things to have to search for, if you’re just Googleing for it.  Instead, let’s see what we can find using Ravelry’s advanced search tool.

Open up Ravelry, click on Patterns, then click on the “pattern browser & advanced search” button.  (Ravelry was designed by knitters, not by web designers, which is kind of obvious by its semi-terrible user interface.)

Patterns 1

This brings us to a page of ALL of the patterns currently on Ravelry.  If you really wanted to, you could just go page by page and see everything.  Sometimes it’s fun to browse the patterns, but today we’re on a mission.  We’re going to use the search bar and filters to narrow down the patterns that are available to us.  Take some time to see what filters there are available.  Some of the filters are obvious: knitting vs. crochet, free vs. paid, type of item that the pattern is for (sweaters, soft toys, tablecloths, etc.).  Some of the filters are super specific: design elements (lace, ribbing, etc.), construction details (top down, short row shaping, etc.).  Poke around and see what they’ve got.Patterns 2

Every time you click on a filter, you’ll notice that the patterns start to match your selections.  We wanted to knit a bird stuffed animal with no seams, and we wanted the pattern for free, so I clicked on the following filters:

-Free

-Knitting

-Seamless

-Softies

and I put the word “bird” in the search bar, since there isn’t a filter for “Bird.”

Look at all those seamless, free bird patterns!

Patterns 3

When you find one you like, you can click on the picture, and you’ll bring up the pattern page.  From there, you’ve got some options.  Ravelry will link you to where you can find the pattern (in the middle of the page).  Or you can save the pattern in your “Favorites” or your “Queue.”  OR, you could “Cast On” and start a project page for yourself right away.

Patterns 4

I hope this makes your pattern-finding quests a little easier!  Poke around the site and see what you can find.  What else do you use Ravelry for?

Ravelry 101

ravelry login screenIf you’re into knitting and have been near a computer for more than a hot minute, you’ve probably heard about Ravelry.  It’s sort of a Facebook for knitters.  But it’s sooo much more useful than that (Facebook is kind of dumb… don’t shoot me).

Ravelry is free to sign up for, and they don’t send spam or anything.  If you’re even vaguely interested in knitting or crocheting, you should sign up for an account.

There are about a million things that you can do with Ravelry, but I use it mainly for a couple things:

  1. Keeping track of finished projects.  If you’re anything like me, half of what you make goes to friends and family across the country and you never see it again.  Taking pictures of your finished and uploading them to Ravelry gives you a nice trip down memory lane and a great sense of accomplishment.  Also, filling out the yarn/needles/size info can be helpful if you ever want to make a project again.
  2. Talking to other knitters.  This is especially useful if you’re in a small town without a big knitting community, or if you’re teaching yourself by watching YouTube videos (and reading my blog!).  Have a problem with a pattern?  Questions about learning to spin?  Wrestling with a particularly nasty cable pattern?  Post your questions to one of the groups, and people will totally help you out.  Or, you can use the Ravelry groups as a way to totally geek out about whatever it is that you geek out about.  Is it Doctor Who or Harry Potter?  Maybe you’re really into gardening?  Or stock car racing?  There is a group for you.
  3. Finding new patterns.  Ravelry has the biggest searchable database of patterns.  You can sort by almost anything you want.  Want a women’s drop shoulder cardigan on size 3 needles with cables?  You can totally search for that.  Looking for a toy squirrel that uses short row shaping?  You can find that too.  (I’ll show you more about searching on Ravelry on Wednesday.)

So, my point is.  Ravelry:  try it.  It’s a great resource.  You don’t have to use everything, but I guarantee that there is something that it does that you would appreciate.

(FYI,  Ravelry didn’t pay me for this review.  But if they wanted to send me some yarn or something, I would totally be ok with that.)

Yikes! Stripes!

I don’t know about you, but I’ve still got socks on the brain.  They are possibly my favorite project to work on when I’m looking for something easy, portable and fun.  But, sometimes having a million plain socks gets boring, so sometimes I mix it up, and use self-striping sock yarn.  Lots of brands carry self-striping sock yarn, and when you buy it, it just looks like regular variegated sock yarn (except that the label will have the word “stripe” on it…duh):

But, when you knit your socks, you magically end up with beautifully striped socks with absolutely no effort on your part!

OLYMPUS DIGITAL CAMERA

Pretty awesome, right?

So, how do they do it?  Basically the yarn company figures out how much yarn the average knitter uses for every row when she makes her socks.  Then, they dye the yarn in row-long increments, so that each row is a different color.  So, for example, if it takes 1 yard of yarn to knit 1 row, they might dye the yarn sow that 5 yards are blue, then 5 yards are green.  This means that in the finished sock, you will end up with a 5 row stripe of blue followed by a 5 row stripe of green.  Pretty clever!

Flying with Yarn

It’s summertime, and that means traveling!  I just got back from a lovely weekend trip to Pennsylvania to visit my husband’s family.  It’s about a six hour flight from one coast to the other, so I had plenty of time to indulge two of my favorite pastimes:  knitting and reading SkyMall.

WP_20130609_021

When you’re traveling with your knitting, it’s important to keep three factors in mind.  Or, at least these are the three things I keep in mind:

1.  What will the fuzz (the po-po, the man, the 5-O) let you take on the plane?  TSA regulations can be found here.  But basically, the only thing you (as a knitter) need to worry about is that your scissors need to have blades that are less than 4 inches long.  Needles/crochet hooks are allowed.  Now, if you bring a pair of super-sharp 15 inch-long size 10s, they might have a problem with it.  But, I’ve never had an issue with bringing my needles on a plane.

2.  What can I carry?  I like knitting small projects on vacation, so I’m not lugging a great big sweater around with me.  Socks are great, because they don’t take a lot of thinking, and you can pick them up and put them down without worrying you’ll loose your place.  Lacework is fun, too, since you can work on a pretty big project, but it crunches up into a tiny little ball when you’re not working on it.

3.  What will prevent the folks in my row from hating me?  If I didn’t get to knit during a flight, I would probably go insane from boredom.  I have to keep busy.  It’s sort of a nervous tick.  But, when you’re stuck in such a small space with other people, it’s important not to piss them off.  So I like to pick a project that doesn’t take a lot of room to work on.  So, no big, long straight needles that poke my seatmates, no blankets or anything that will take up more than my allotted personal bubble space, and no projects that use multiple balls of yarn that could roll around and get in people’s way.

So, safe travels!  And may the TSA never confiscate your knitting!  (And, if you are thinking of getting me a present for early Christmas, I’m a huge fan of the swamp zombie statue from SkyMall.)WP_20130609_028

Sock Week: Second Sock Syndrome

It’s one of the most feared maladies in the fiber arts community.  It strikes suddenly and without consideration for age, experience, or the general health of the knitter.  It’s sent many a project bag to the back of the closet.  It’s the cause of countless cold feet.  It’s the one, the only,

Second Sock Syndrome-The silent killer (or rather, the cause of people getting bored with their socks and not making the second one of the pair)

Don’t fall pray to Second Sock Syndrome.  Knit your second sock, and make sure your feet get the love that they truly deserve.

Here’s my pair of socks:

OLYMPUS DIGITAL CAMERA

I made sure to follow the exact same pattern that I used to make my first sock, so that they match perfectly.  Count your rows in the leg and instep, so that one sock doesn’t end up longer or shorter than the other one.

OLYMPUS DIGITAL CAMERA

Also, in case you were wondering, I didn’t make a whole sock in two days.  I’m fast, but not that fast.