I love stripes, and I adore knitting stripes especially. The whole “knitting with two colors at the same time” is pretty much the best. But I do not love weaving in all the ends at the end of a project. It’s like the world’s worst knitting practical joke. “Oh, you think your sweater’s done? HAHA NO! You get to spend the next six hours weaving in ends. Sucker!” Not fun.
So, here’s a trick that I like to use when I want to make something in the round with itty bitty stripes. Essentially, I’m working both colors at the same time, spiraling them together. This way, it looks like I have perfect jogless stripes, AND I don’t have to worry about a million little ends to weave in at the end. (Also, despite my poor description, it’s actually quite easy.)
Please forgive the messy drawings… I’m still figuring out the whole “graphics” thing.
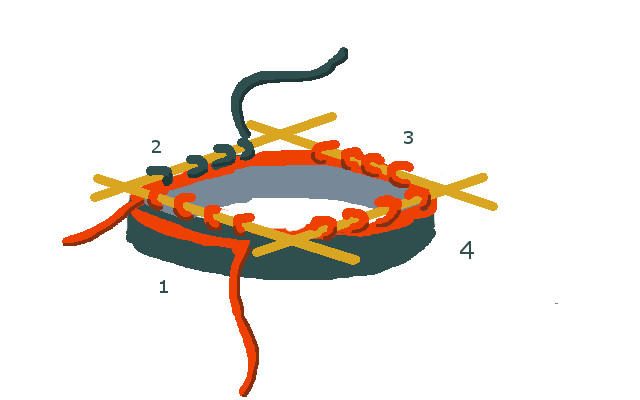
1. Cast on with your first color, and join in the round using a set of 5 dpns (4 to hold your knitting, and one to use). Knit a few rows (it can get too fiddly if you don’t have a good solid base before adding the second color).
 2. At the beginning of the round, start knitting with the second color, but don’t cut the first color. Knit needles 1, 2, and 3 with the second color.
 3. Stop knitting with the second color, but don’t cut the yarn. Pick up the first color and start knitting where you left off. This time, only knit two needles (needles 1 and 2).

4. Pick up the second color again, and knit two needles (in this case, needles 4 and 1)
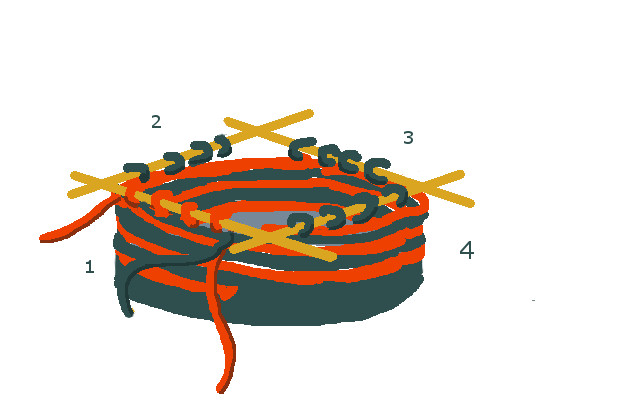
 5. Keep going in pattern, picking up the first color and knitting two needles (needles 3 and 4).
 6. See how the pattern is going? You knit two needles of the first color, then two needles of the second color. This way you keep building up a spiral of stripes, until you end up with a great big long spirally/striped scarf/hat/mitten etc.
 When your project gets long enough, knit until your secondary color is back at the beginning of the row, then cut it. Do a couple more rows in the first color, and bind of as usual.
Easy!