Tag Archives: travel knitting

Travel Socks in Progress

Last weekend was a whirlwind!  I had an amazing time traveling down to LA to visit friends (and their perfect tiny baby!  Hi, Janey!), watch comedy, dance, and eat way too much good food.  I still feel like I have a hangover, despite not drinking anything since Saturday.  I guess it’s just an emotional “Why can’t I still be on vacation” hangover.

LA isn’t that far from Seattle- a couple hours on the plane isn’t that bad.  But, it still gave me plenty of time to get started on my Travel Socks.  And, I gotta tell you, I had almost as much fun working on these socks as I did the rest of the weekend.  (OK, maybe that’s an exaggeration, but they’re turning out really, really cool!)

I mean, look at this stitch pattern!You’d never know it was so freaking simple to knit.  It’s ingenious!

I showed it to a bunch of knitters over the weekend, and none of them could figure out how it was worked.  (And even when I told them what I was doing, they had a hard time believing me!)

It’s a 1×1 row stripe (1 navy row, one light blue row).  Every dark row, you knit, and every light row, you work K1, P1, alternating back and forth just like in seed stitch.  The finished fabric is beautiful, squishy and soft.  I think this stitch pattern might just start showing up in other knitting patterns.  (Right now, I’m dreaming of a raglan sweater with this pattern.  Maybe with variegated yarn?  Or maybe with stripes!  Or maybe with variegated stripes!)

I’m using the dark (MC) to make a simple cuff, heel and toes, which I think is going to look really classy- instead of an obnoxious striped sock, I’m going to have very cool, interestingly-patterned socks.  I can’t wait until I’m finished!
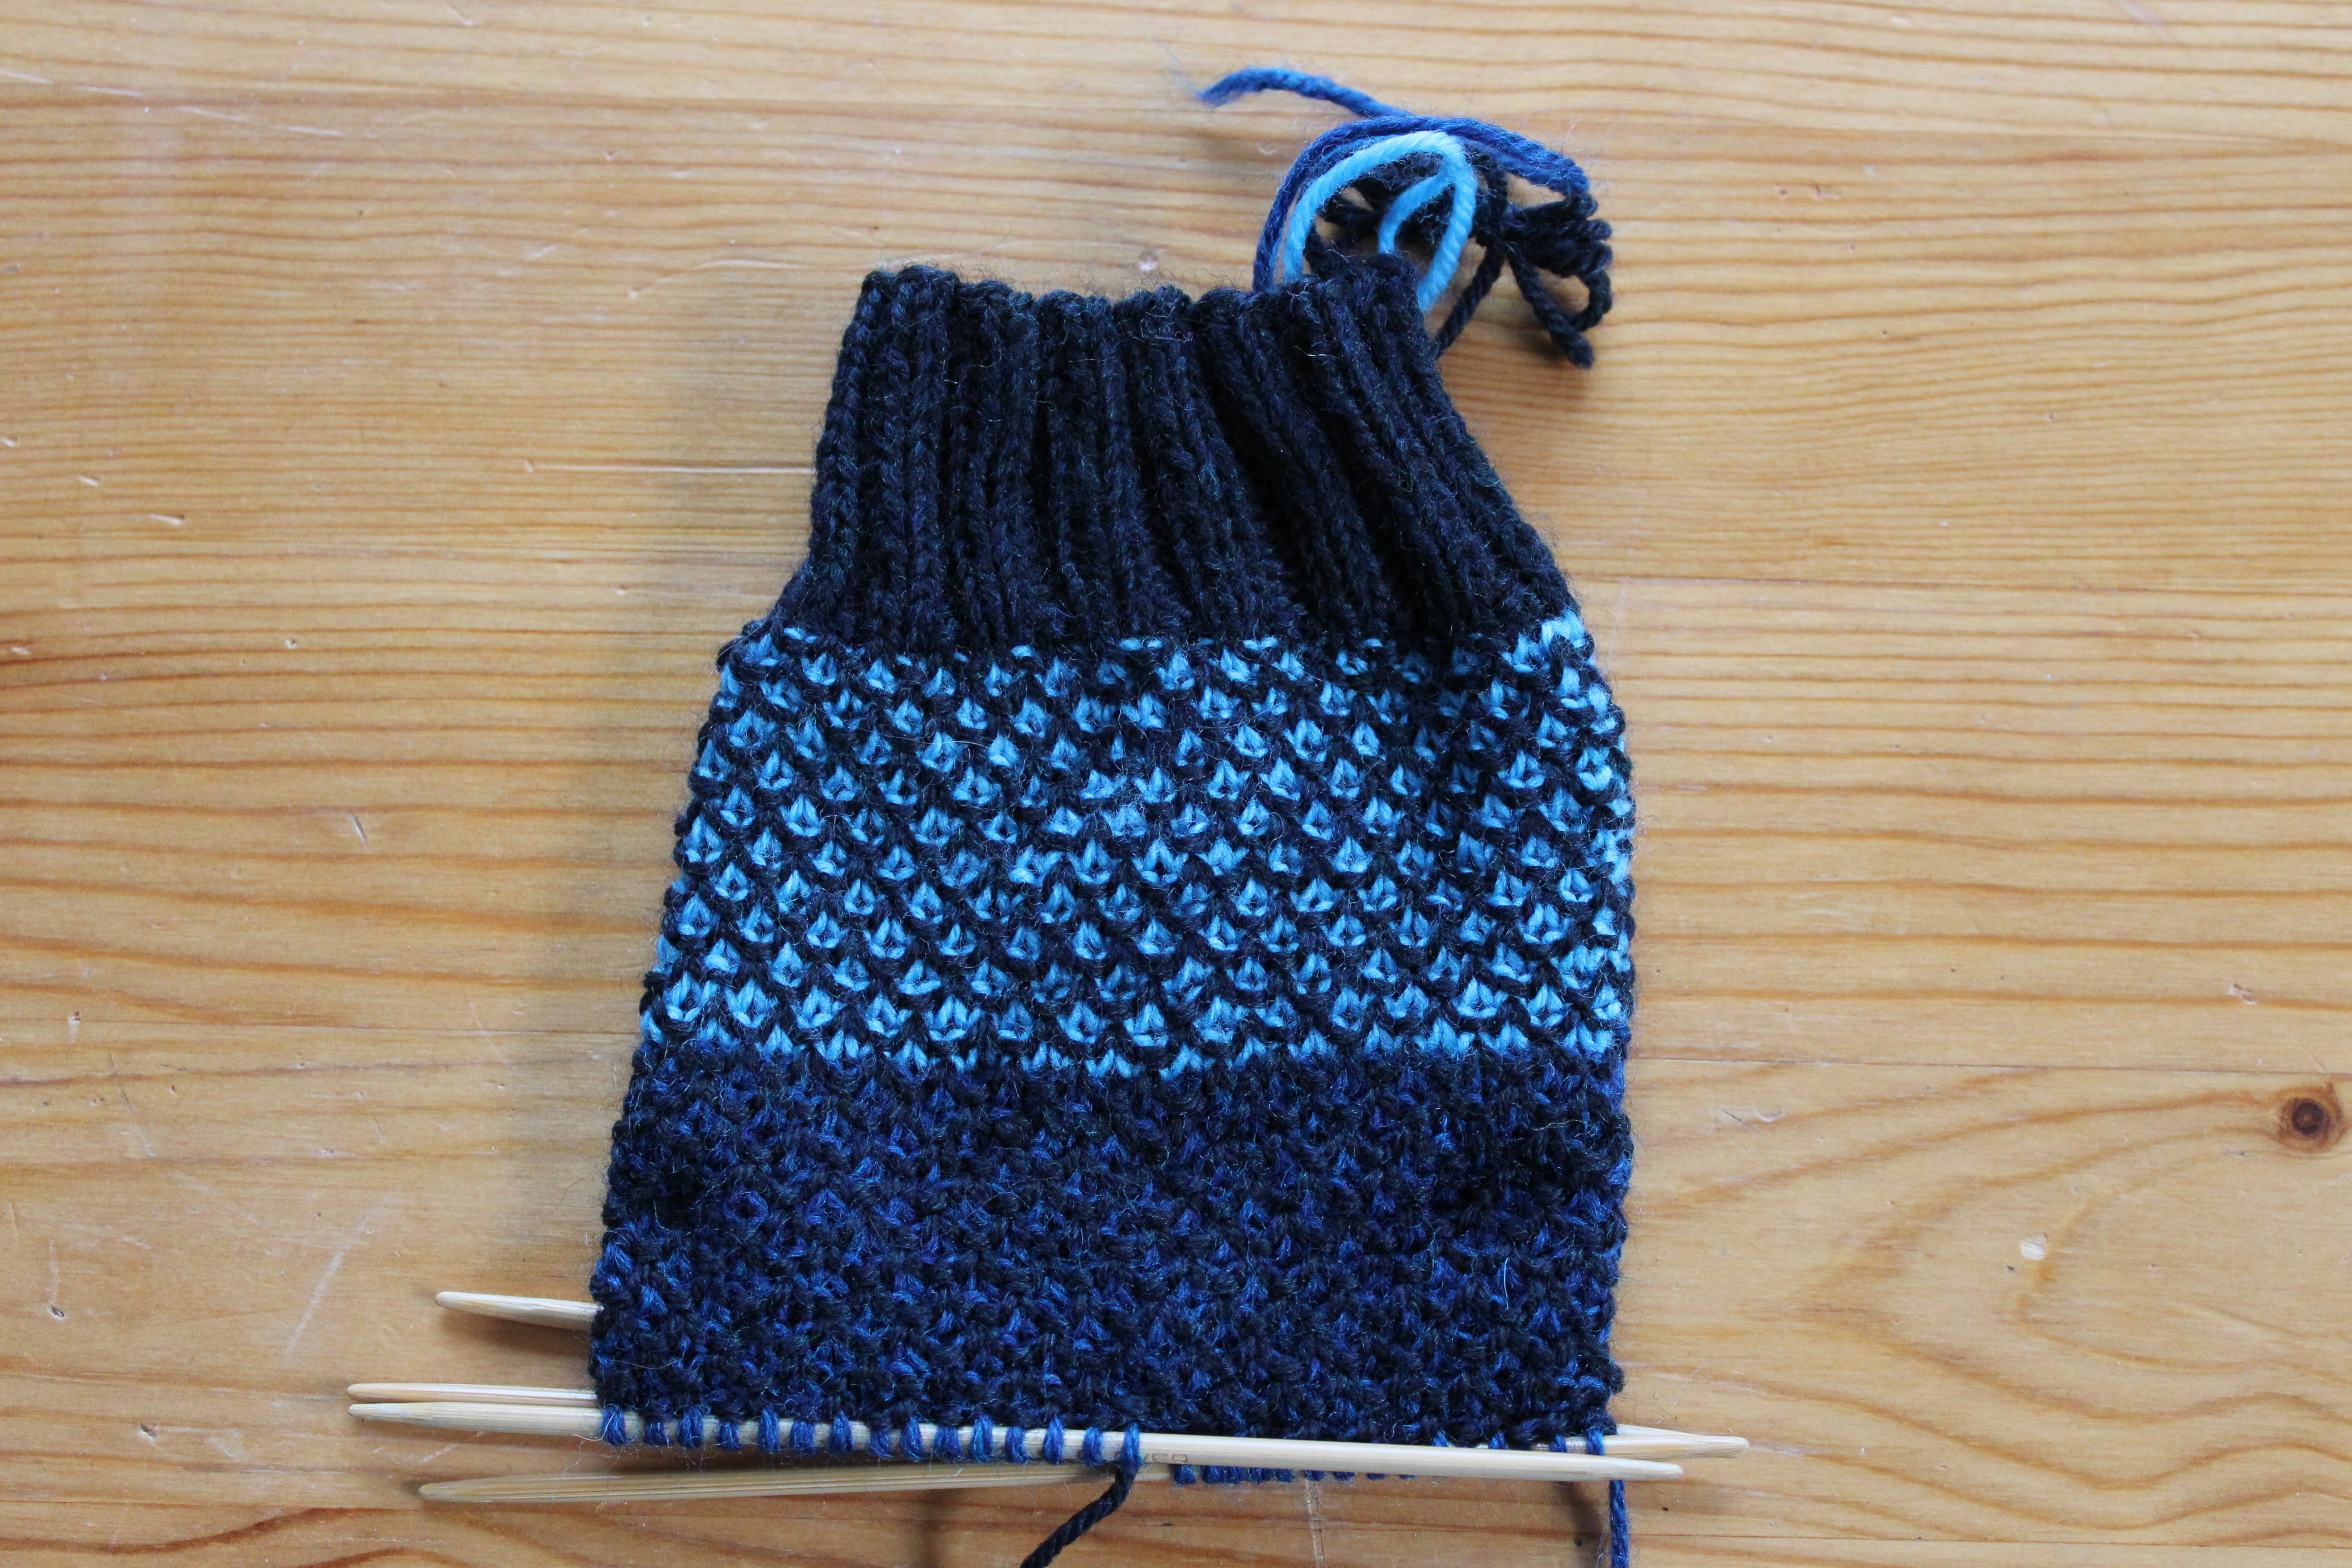
What’s the last project you got really excited about?

Stellar’s Jay Sweater: Progress!

Hey!  Look what I managed to get done last week!   It’s an almost-finished Stellar’s Jay Sweater!

OLYMPUS DIGITAL CAMERAIsn’t it amazing what you can get done when you only bring one project on a week-long car trip?

My husband and I spent the week driving up the Oregon Coast.  Well, mostly he drove, and I knit (because I’m a rather nervous driver, especially on those twisty-turny roads).  The Oregon coast is absolutely gorgeous!  If you live within a three-state radius of Oregon, make sure you visit.  There are lush redwood forests, beautiful rocky cliffs teeming with sea birds, gray whales and sea lions frolicking in the ocean, and tide pools full of neon green sea anemones.  It’s a magical place.

Unfortunately, right about when we made it back up to Portland, I ran out of yarn!  That’s why there’s a rather large chunk missing between my left elbow and shoulder.  It’s not me being avant-garde, it’s me being bad at ordering enough yarn to finish a project.

I’ve put the order in, and you’d better believe that as soon as that package hits my front door, I’ll grab my needles and finish up my soon-to-be favorite sweater!

Always Be Prepared

I was never a boy scout (because of rather obvious genetic reasons), but I would like to think that I would have been a good one.  After all, I am great with knots, I look damn good in a neckerchief, and I am always prepared.

I’m especially prepared when it comes to my knitting.  I always (always always) have a little stash of emergency knitting.  You never know when it will come in handy,  Maybe you’ve just finished that big sweater you’ve been working on, and you don’t know what to work on next.  Maybe you are halfway through that unending afghan for your cousin Sue’s wedding, and unless you put it down for a little while, you’re going to cut it in half with a pair of kitchen shears out of frustration.  Or maybe you’re stuck inside your parent’s condo, hiding from the stupid cold weather for a week straight after your plane ride home was canceled because of a Polar Vortex freezing the entire contiguous United States (except, for some reason, Seattle).

My emergency knitting project is always socks.  Socks are portable, and require minimal futzing.  No seams to sew, no buttons to mess with, nothing to measure (once you know your sock number).  At home, I have a whole box of sock yarn, ready to be knit up whenever I need a small, useful project.  And, when I travel, I always throw a skein or two of sock yarn into my bag, just in case.

WP_20140108_006(Sorry about the picture quality.  While I was prepared enough to bring extra knitting, I neglected to bring my good camera.  So, you get a photo taken by a potato.)

And lucky I did, too!  I finished the sweater I was working on more than a week before the end of my vacation.  The last few days, I’ve been busy, knitting away on my emergency socks and watching way too much Portlandia with my Mom.   Not a bad way to spend  the Great Snowpocalypse, if I say so myself.

What’s your emergency knitting project?

Fat Quarter Project Bag

Now that you know the important parts of your knitting kit, you might want to put one together for yourself.  Here’s a quick and easy pattern for a sewn project bag that you can put together in an afternoon or less.  I’ve used a sewing machine, but you could totally sew it by hand, if you don’t have access to a machine.  I’ve also used eyelets and an eyelet setter to make the holes for my draw string.  It’s not a terribly expensive tool, and I’ve used mine more than I ever expected to.  But, if you don’t want to invest in an eyelet setter, you can use your sewing machine to stitch button holes to thread your ribbon through.

Materials:

2 fat quarters in coordinating colors (available at fabric and quilting stores)

Coordinating thread

Sewing machine (or needle and thread if you like to kick it old school)

Eyelet setter

8 1/4 inch eyelets (8 fronts and 8 backs)

Ruler

Pencil

Iron (optional)

1 yard of ribbon or cord

  1. Iron the fat quarters and cut 3 inches off the long edge of each piece of fabric, and trim off the selvage edge.  Discard the small pieces, or use them to make tiny quilts for mice or something.OLYMPUS DIGITAL CAMERA
  2. Lay out the fat quarters, right sides in, and sew them along one long edge with a ½ inch seam allowance.OLYMPUS DIGITAL CAMERA
  3. Fold the fabric in half long ways (like a hot dog as my elementary art teacher said) and pin along the outside edge.  You’ll have your lining fabric pinned to itself, and your outside fabric pinned to itself.  Sew around the edge, leaving a ½ inch seam allowance.   Leave a  3 inch gap on the lining end.  You’ll need this gap to turn the project inside-out.OLYMPUS DIGITAL CAMERA
  4. Clip the corners, and turn the bag right-side out.OLYMPUS DIGITAL CAMERA
  5. Press the opening  so that the edges of the opening are flush with the seam on either side.  Stitch the opening closed.  OLYMPUS DIGITAL CAMERA
  6. Push the lining into the bag and press the whole thing, making it as neat as possible.  Make sure the seam between the lining and the outside fabric is even (this is the very top edge of the bag’s opening.OLYMPUS DIGITAL CAMERA
  7. Measure 2.5 inches from the top edge of the bag.  Evenly mark 4 points across this line on the front of the bag (front or back doesn’t really matter, but just put 4 points on one side… we’ll put the others on there later).  These points will be where you put in the grommets.OLYMPUS DIGITAL CAMERA
  8. Using the instructions that came with your eyelets, install the 4 eyelets on the front of the bag.OLYMPUS DIGITAL CAMERA
  9. Lay the bag flat, and mark where your eyelets fall on the back of the bag (just poke your pencil through the front of the bag).  This makes sure that your eyelets are evenly spaced around the whole bag.  Install the remaining 4 eyelets.OLYMPUS DIGITAL CAMERA
  10. Weave the ribbon through the grommets.OLYMPUS DIGITAL CAMERA

Done!  Now go fill it with knitting or other projects.  This bag is a good size for small to medium projects (1 or 2 skeins).  If you want a bigger project bag, start with bigger pieces of fabric, but use the same technique.    Because the bag is double-layered, even the pointiest needles won’t poke through, and it’s strong enough to keep your delicate yarn nice and clean and protected.OLYMPUS DIGITAL CAMERA