Tag Archives: men’s sweater

Husband’s Sweater Update

I’ve finished my husband’s sweater!  Woo!

(Sort of.)

It’s got a collar and a body, and two arms that end in nicely finished cuffs.

OLYMPUS DIGITAL CAMERA
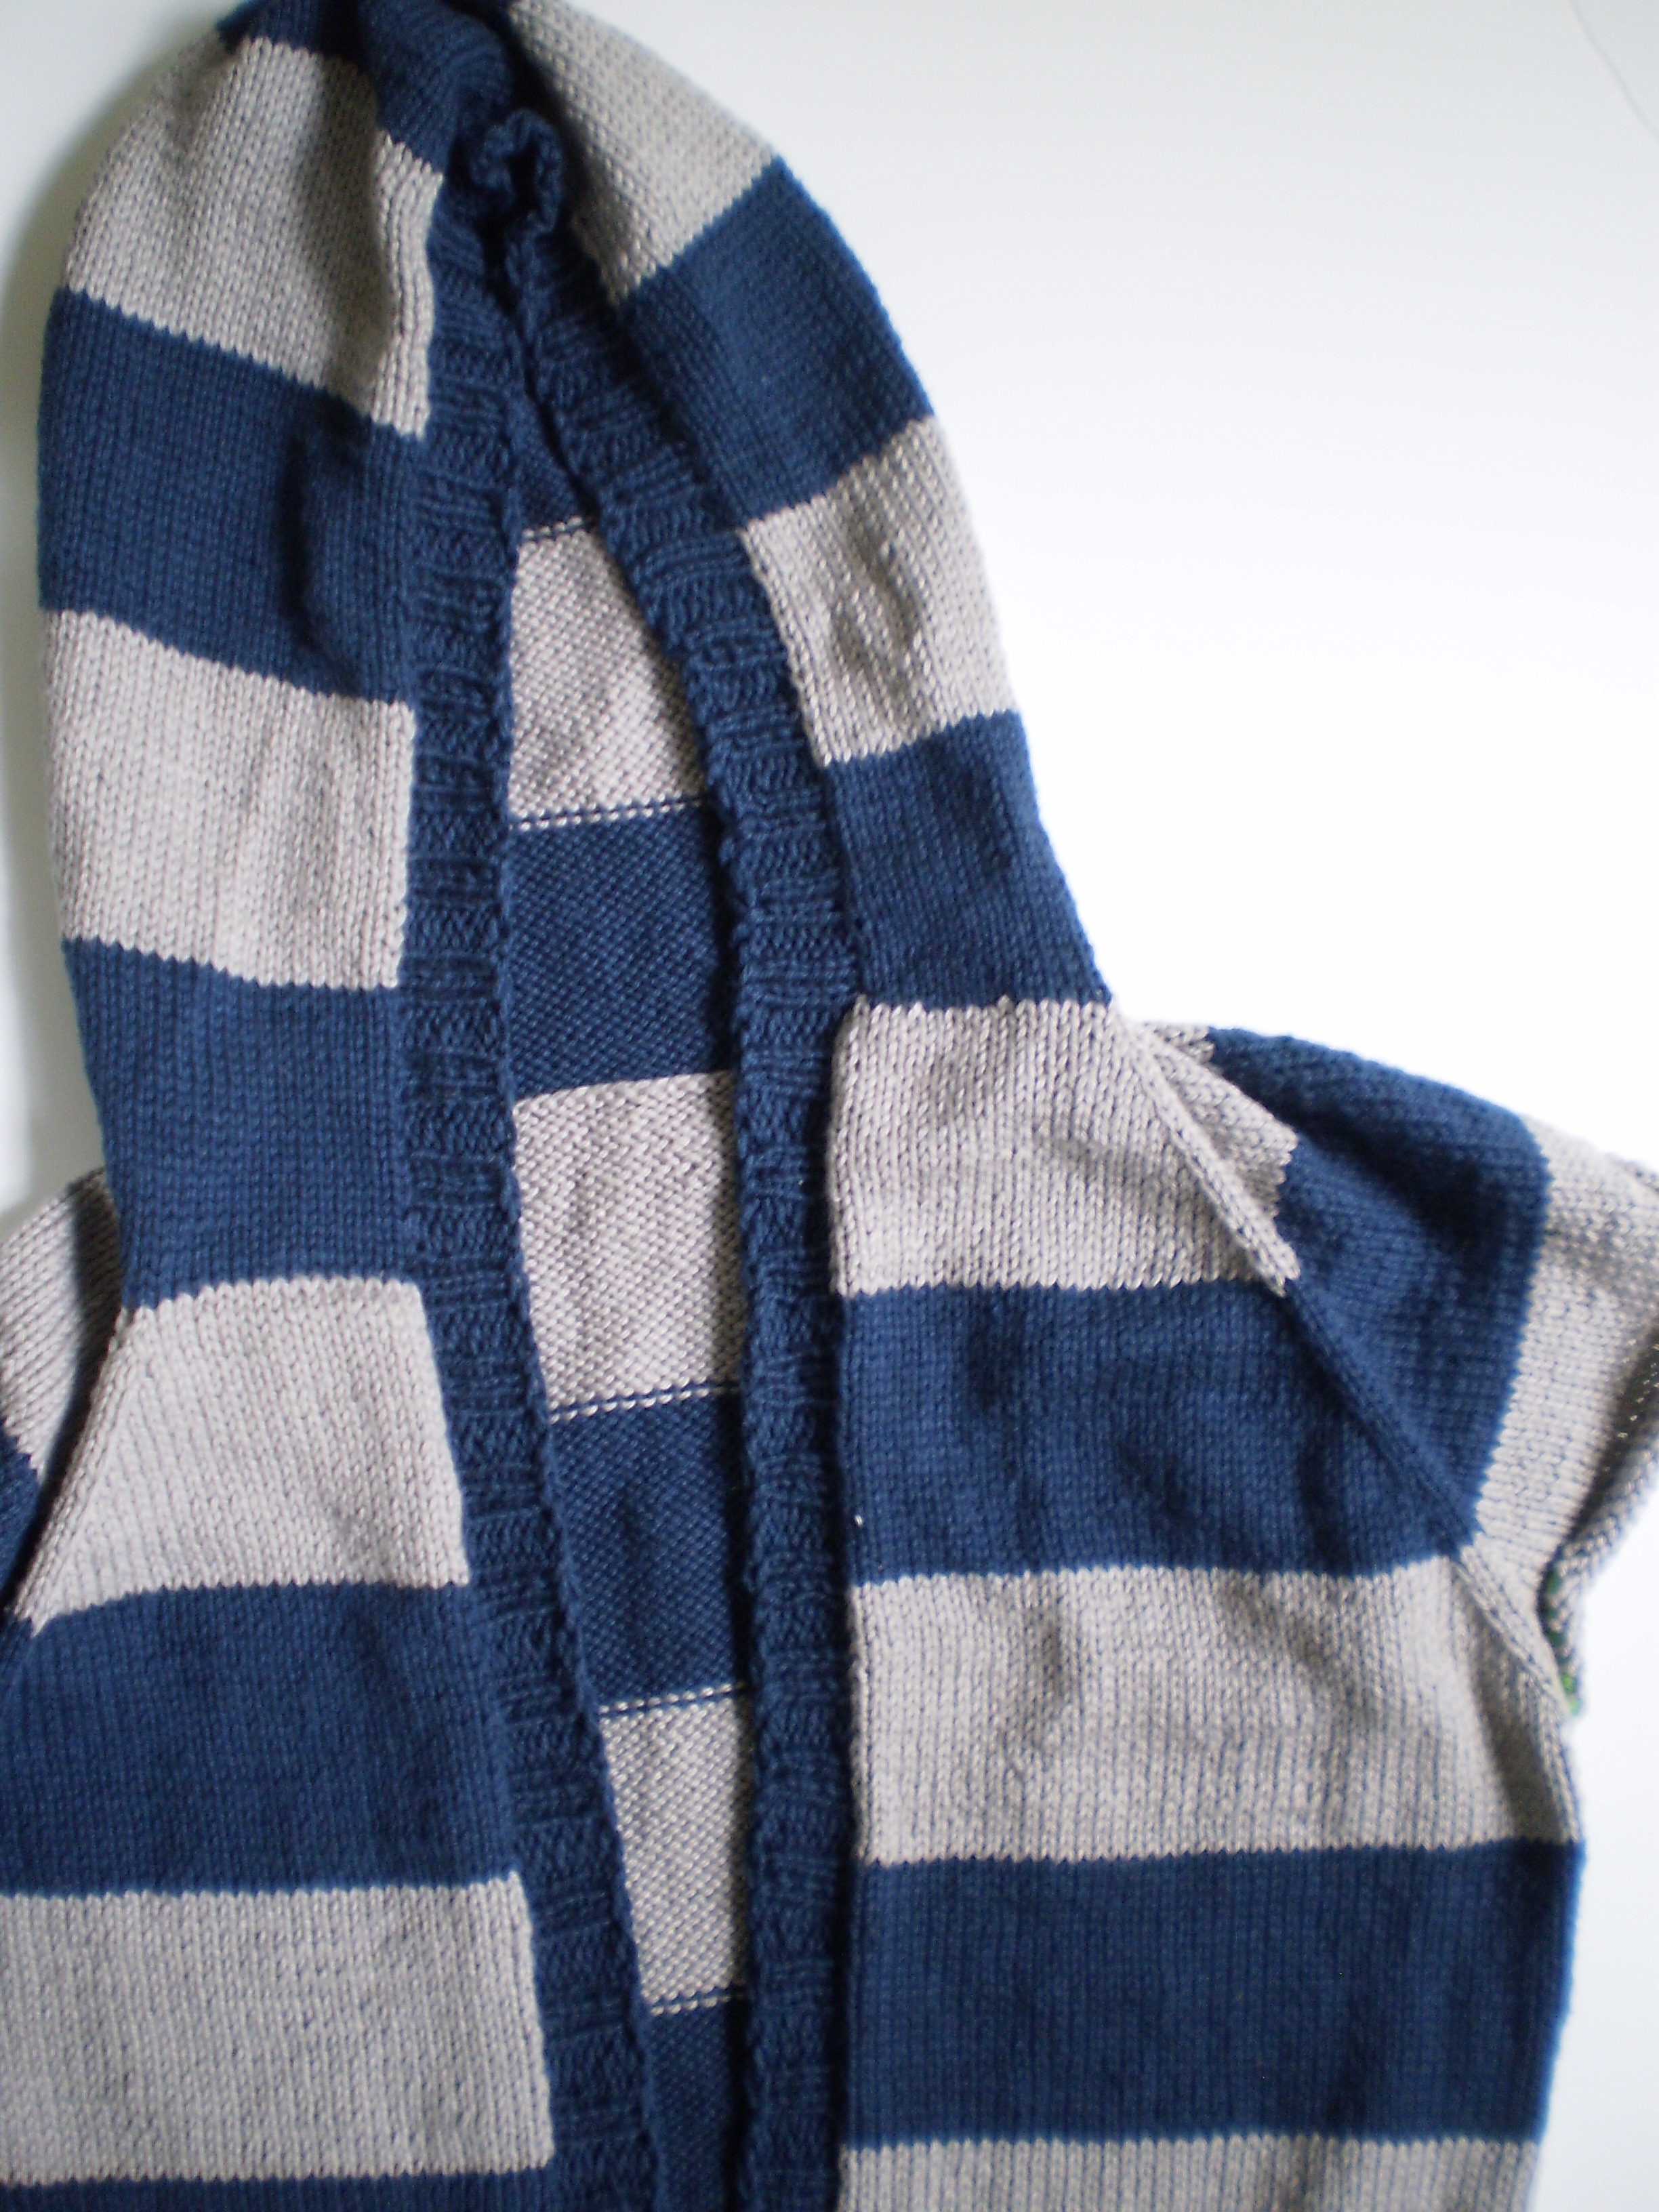
I really am quite pleased with how this sweater has turned out.  I like the moss stitch yoke, and it actually fits my husband pretty well.  Not bad for a quick, semi-improvised sweater project!

Now I’ve just got to actually finish it:

  1.  It need buttons.  I’m thinking pewter, but my husband is campaigning for wood.  What do you think?
  2. I think it’s still a half-inch too short.  (Even after ripping it back and re-knitting the waist.  I think it might have some sort of curse.) I’m going to try steam-blocking it, in the hopes that I can avoid re-knitting the hem for a third time.  Wish me luck!

Not bad, if I say so myself.

So, what are you working on?

Husband Sweater Update!

I’ve been cranking away at the sweater I’m making for my husband, and I’m making good progress!

The shoulders are done and I love the seed stitch and reverse stockinette, though they look a little narrow, but they should stretch out with wear/blocking.  I have to trust the pattern- Ann Budd hasn’t let me down before.  And, I’m almost to the bottom of the hem!  Just an inch or two more, and it’s on to the sleeves.

I’m really pleased with how the yoke and neckline have turned out.  I really wanted to make a Henley sweater for my husband.  I think Henley are very flattering, and fall nicely in-between a fancy-pants cardigan and comfy-casual pullover.  Also, we all know how much I like buttons.

OLYMPUS DIGITAL CAMERASo, I started the sweater following Ann Budd’s instructions for a cardigan leaving off 2 stitches from the mid-line on each side to accommodate the extra width of the button band.  I joined up the underarms and worked back and forth for a few inches.  Then, I began to work the sweater in the round, casting on 4 stitches at the center to get the full stitch count.

I kind of improvised the button band (do you know how lovely and relaxing this sweater has been?  I haven’t had to take one note the whole time!  And I only have to knit it in a single size!  Delightful!).  I picked up and knit stitches on either side for the button bands, working a 2×2 rib, and making “k2tog, yo, yo, k2tog” button holes on the left side (I had to check with my husband’s shirts- I can never remember which side buttons go on!).  After binding off each side, I picked up and knit the neckband, which went from the edge of one button band to the other.  I worked the neck in a 2×2 rib, too (except the ends, where I knit 3.  That’s a trick I picked up from an old knitting book to compensate for the curling that inevitably happens at the edge of your knitting) and worked a final button hole in line with the others I worked on the left side.

Then, I  sewed the bottom ends of the button bands into place, overlapping them and trying to make them as flush with the body of the sweater as possible.

I’m very pleased with how it’s turning out!  Now I just have to make the rest of the body, the sleeves, and pick out the buttons.  Almost done… right?

Oh!  And don’t forget to sign up for the 52 More Weeks of Dishcloths giveaway!

Husband Sweater: The Sleeves

I think it’s high time that this dang sweater stops looking like a muscle shirt when my husband tries it on.  Don’t you agree?

The only problem is that he’s not a fan of the fairly over-sized sleeves that the original pattern calls for.  Ugh.  Nothing is ever simple.

So, it’s time to get out my scratch paper (or rather, the back of the pattern), my calculator and start figuring out what I need to do.

OLYMPUS DIGITAL CAMERAOK.  Before I even have to start doing math I know a few things:

1.  I have 82 stitches (about 20 inches) at the top of the sleeve, set aside from when I split the body for sleeves.

2.  I need to get down to about 40 stitches (about 10 inches) at the top of the cuff.

3.  My sleeve needs to be about 15 inches (about 105 rows) from where I’ll pick up my stitches to the top of the cuff.  (I based this on my husband’s arm length, and the length of the sleeves of his favorite sweater.)

Now it’s math time.

If I need to go from 82 to 40 stitches, I need to do 42 decreases somewhere on the sleeve.

(82 sts at the shoulder-40 sts at the cuff=42 decreases)

I’ll do two decreases per decrease row, so I’ll need to do 21 decrease rows.

(42 decreases/2 decreases per row=21 decrease rows)

And, I want to space those decreases out evenly over 105 rows, so I’ll work a decrease row every 5th row.

(105 rows/21 decrease rows=5 rows per decrease row)

OLYMPUS DIGITAL CAMERASo that means, I’ll knit four rows evenly (while still making sure the stripe pattern matches up with the body), then I’ll work a decrease row (knitting all stitches, except for working two decreases at the underarm).  Easy!

Hopefully, this’ll look good.  It’s a more extreme decrease than I usually use for sleeves, but it might work.  Luckily, I’ll be able to finish one sleeve, have the husband try it on, and get his approval for the next sleeve (or, heaven forbid, find out I have to redo the sleeve!  Cross your fingers for me).OLYMPUS DIGITAL CAMERAHave you ever had to rejigger part of a pattern?  How did it turn out for you?

Husband Sweater: Button (er- Zipper) Band

I feel like it’s been a hot minute since I gave you an update on the sweater I’m working on for my husband.  Oof- actually it’s been almost a month.  (Sorry, husband!  Hopefully I’ll have it finished by August at this rate!)

Anyway, this time, I knit up the button band (or rather, the zipper band).  Instead of using the pattern, I used my own standard button band (mostly because I lost my paper copy of the pattern).

OLYMPUS DIGITAL CAMERA

My button bands actually start when I’m knitting up the sweater body.  I always slip the first stitch of each row.  This creates a nice, neat edge that makes it easy to pick up stitches evenly all the way around.  And I’ve found that picking up one stitch for every two rows makes a button band with just the right tension.  This way, you don’t even have to count, except for making sure you have an even number of stitches to make your ribbing come out right.

OLYMPUS DIGITAL CAMERA

I worked the button band on this sweater for about an inch, in a 2×2 rib.  This is a little narrower than my usual button bands, but that’s because I’ll be using a zipper, not buttons.  If you use buttons, the button bands will overlap, so you’ll need a wider band.  If you use a zipper, the bands don’t overlap, so you need a narrower one.

Next up-I’ll start working on the sleeves!

Husband Sweater: The Hood

I admit, it’s been a while since I updated you on the sweater situation (almost a month-eek!).  I’ve been busy with some dog stuff, some quilting, and generally catching up with other projects around the house (I even tried my hand at some very simple woodworking- I made a slightly wobbly window seat for the dog!).

But, I’m back on track with my husband’s sweater, and have the hood all finished!

OLYMPUS DIGITAL CAMERATa-da!

I actually went off-pattern for this hood, because if you remember, the one outlined by the pattern was a little, well, big:

uploadedImage_medium2[1]Instead, I based the shape of the hood off of my husband’s favorite hoodie.  I measured the height of the hood from the neck to the crown.  This was the total height of my finished hood.  Then, I measured the hood from the neck to the start of the head-shaped curve.  This was how far I would knit before starting my decreases.

The hood ended up looking like this:

OLYMPUS DIGITAL CAMERAI picked up stitches from the neck, and knit even (in pattern) for about 8 inches.  Then, I marked the center back of the hood and started decreasing on either side of the mark.  At first I decreased every fourth round, then every other round, then right at the top of the head, I decreased every round.  Finally, I grafted the hood together  at the top of the head to make a seamless-looking hood that fits my husband (almost) perfectly.

Phew!

Next, I’ll start working on the button band, once I get up the energy to pick up all those stitches!

Have you ever changed a part of a pattern?  What did you change and why?


Husband Sweater: The Body

My husband’s sweater is coming along (slowly, but I’m still making progress).  It’s looking pretty good, if I say so myself.

I split off the arms a while ago and have been working on the body.

See?

OLYMPUS DIGITAL CAMERAI actually modified the body a bit from the pattern, which should make the sweater a little more fitted.  When I was measuring my husband’s favorite cardigan to pick the size for this one, I noticed that the torso was slightly tapered.  The chest measurement was 40″, while the waist was 36″ around.

I figured, why not add a little waist shaping into this sweater?  That’s why we knit, right?  To make beautiful, customized garments.

So, it was time to do some math (Yay!).

I knew I wanted to decrease 4″ (which comes to about 20 stitches, based on my gauge).  And, I wanted to arrange the decreases in pairs underneath the armpits, along the “side seams” (this sweater is knit in the round, so there aren’t seams, but you can imagine where they would be).  This means, that each time I work a decrease row, I’m decreasing 4 stitches (2 under each arm).

So: 20 decreases total / 4 decreases per row = 5 decrease rows.

I wanted the decrease rows to be spread evenly down the torso.  Based on the Emilien pattern, there are 88 rows between the armpits and the top of the hem ribbing.

So: 88 rows total / 5 decrease rows = 17.6

Because you can’t knit .6 of a row, round to 18.  So, I work a decrease row (decreasing 4 stitches under the arms) every 18th row (ish).

A couple inches doesn’t seem like it’d make a lot of difference, but you’d be surprised.  Adding just a few k2togs will change this sweater from a standard, boxy cardigan to a cool, slightly fitted one.  I hope my husband will like it!

Husband Sweater: The Beginning

This year, I didn’t even try to get my husband’s Christmas present finished in time.  I didn’t even have time to start it before Christmas.

(Sorry, Tristan.)

Instead, when we did our gift exchange, I told him my plan.  I am going to make him a sweater of his choice.

And, because the last one I made for him never gets worn (except when we go back to the Midwest for Christmas Break), I asked him to pick out everything about the project, so that he would end up with exactly the sweater he wants.

He’s typically pretty simple in his clothing choices, so I suggested a few patterns for him to start from.  He’s a big cardigan guy, so I started there:

Cambridge Jacket by Ann Budd

I could see Tristan wearing this sweater all the time.  It’s simple (almost too simple), and very manly.  No goofy colors or weird stitches.  Not even a button band.

3500883460_570d467ee9_z[1]Ranger by Jared Flood

I really like this sweater, even though it’s a little fancier.  (I actually might make this for myself.  I guess just like Jared Flood Sweaters… I’m actually wearing my Cobblestone, right now.)

Ranger1_medium2[1]But, no.  Tristan would have none of the sweaters I suggested.  He went down to his office in the basement, and looked at Ravelry for more than an hour.  (I thought he was playing Diablo… apparently not.)

And he picked out this one:

Émilien by Ariane Caron-Lacoste

img_4328_medium2_medium[1]I know!  Crazy!  Colors! Stripes! A hood!

But, as surprising as it was, he was very sure about what he wanted.  So, here we go!  A stripey, zip-up hoodie for my husband.

Inspiration: Father’s Day

It’s Father’s Day this weekend, and that means it’s time for lame Father’s Day gifts.  Every year it’s the same old same old: ties, golf balls and barbecue tongs.  Does your dad really want that?  I don’t think so.

How about doing something epic?  Something awesome.  Something that I totally should have planned out months ago, instead of the Friday before Father’s Day.

A hand-knit sweater, that your dad would actually wear.

Here are a couple of my favorite men’s sweaters:

Cobblestone Pullover by Jared Flood

871051258_9bada4cb0f_z[1]Ranger by Jared Flood

Ranger1_medium2[1]Guston by Ann Budd

Guston2_medium2[1](By the way, Happy Father’s Day, Dad!)