Tag Archives: colors

Choosing

OK, it’s officially official. I’m out of green yarn. (OK, not 100% out of green yarn, but close enough that I know for a fact I won’t make it to the end of this sweater. Unless I make this into a crop-top with 3/4 sleeves.)

So now, it’s time to buy some more yarn. In a perfect world, I’d love to get more of the same yarn (Douglas Fir), but I can’t imagine that the dye lots will be exactly the same, 10+ years after I bought this yarn.

So, I’ve gone through the Webs and picked out a couple favorite colors to do a series of mock-ups.

(My favorite) Fennel. Fairly low-contrast. I like the green-on- green, and I’d imagine it won’t take too much away from the subtle mistake-rib yoke.

(The kid’s favorite) Black Cherry. Honestly, they wanted red red, but I talked them down to this pretty garnet-y shade. Looks nice, but I can’t help but thinking it looks a little Christmas-y.

Oats. A nice neutral-y cream. Not too white (to hide the dirt that will inevitably build up on the sweater), but still nice.

Aubergine. A pretty dark purple. I’m a sucker for purple and green. Plus, the kid looks great in purple.

Thoughts? Feelings? Have I missed any fantastic color choices?

Design Series: Color!

I know, I know, I know.  This sock-design project is taking longer than maybe you (and certainly I) expected.  But, honestly, these are all the questions I have to ask myself while designing any pattern.  I’ve just never put my thought process into words before.  It’s a bit of work at the beginning, but it’s worth it to get started the right way.

Last week, we talked about the technical theme of the socks.  And, it looks like “Simple socks” won by a hair!

IMG_2698_medium2[1]We’ll be making super cozy socks in a simple pattern with two or three colors. (Maybe we could even make them at a big, cozy gauge!  That would be fun!)

So, the next question of course is:  What color are our socks going to be?

Actually, what colors are our socks going to be?

Lets first pick a main color:Maincolors

And then we can pick an accent color:Accentcolors

Vote, Vote, Vote!  Or, if there’s a color I didn’t include, let me know and I can add it in!

A Swatch Dilemma

I’ve been knitting away, and have swatched up my Biggo yarn for my Grandma’s Christmas Sweater.  And, well…

I am not pleased.

I give you Figure 1 (Gray Snowflakes with Pink Border):

OLYMPUS DIGITAL CAMERAEw!  No!  The contrast between the blue and gray is way to low.  All that work, and you can barely see the snowflake pattern.  (It looks even worse in real life…. ugh!)

I give you Figure 2 (Pink Snowflakes with Gray Border):

OLYMPUS DIGITAL CAMERABetter, but not great.  I think the gray is just too low-contrast.

So, I have three options:

1.  Just deal with it.  Knit up the sweater as shown in Figure 2, and let it go.

2.  Forget about trying to use both gray and pink, and just make the sweater out of pink and blue yarn.

3.  Order more gray yarn from Knit Picks in a lighter shade.

I will sit here and sulk for a while, then, I suppose I’ll make a decision.  (At least I did the swatch first… That would have been so frustrating if I’d already started working on the sweater?  Ugh.)

Oh Yeah! Dying With Kool-Aid

IMG_5541_edited-1

Dying is super fun and rewarding (and surprisingly easy).   It’s a great way to play with yarn when it’s too hot to sit around with a big pile of sweater on your lap.

There are a million ways to dye yarn, but this is the easiest one I’ve found.    You probably have everything that you need in your kitchen right now. I’ll do further yarn dying posts about more complicated dying processes later, but this should get you started (and you end up with a whole bunch of fruity-smelling yarn).

Please note, this will only work with wool or animal fibers (cashmere, angora, silk, etc.).  Dying other fibers (cotton, linen, anything synthetic etc.) takes a lot more effort as well as some fairly toxic chemicals, so I don’t bother with that.  But doing this is super easy and fun.  It’s a little like making magic potions, and you can do it with kids, if you’ve got some around that want to help.

You’ll only need a couple things to dye your wool:

  • Wool.  Duh.  You can use a wool blend, but know that the wool fibers and the acrylic (or whatever) fibers will take up the dye differently, which can give you a heathered look.  Superwash wool works well, and you won’t have to worry about your yarn getting felted in the process.  You can dye colored yarn or white yarn, just know that if you start with dark yarn, you’ll never dye it so that it ends up lighter.  If you’re trying to get bright or pastel colors, start with white.
  • Kool-Aid (in the color of your choice) I’m using “Ice Blue Raspberry Lemonade”.  Get the kind in packets, not the kind in the big tubs with sugar pre-added.
  •  Water-From the tap.  Nothing fancy.
  • A non-reactive pot in which to do your dying. A stainless steel, enamel or non-stick pot works well if you’re trying to get a solid (or mostly solid) color.  Copper or cast iron pots can cause weirdness when you try to dye in them.

So how do you do it?

  1. Soak your yarn in warm water.  Make sure it’s nice and wet through.  If the yarn is wet to start with, it will take up color more evenly.OLYMPUS DIGITAL CAMERA
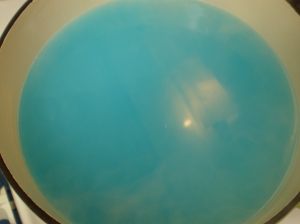
  2. Mix up your dye.  Just add a packet or two (or three or four) of Kool-Aid to a pot full of water.   It’s better to err on the too light side than the too dark side, since you can always add more color, but you can’t remove it.  I’m going for a pastel blue color, so I’m going with just one packet of color.  Heat up your dye until you just barely start to see little bubbles.  Don’t actually boil the water, but get it close.OLYMPUS DIGITAL CAMERA
  3. When your dye is steaming hot, and just about to start simmering, turn the heat way down and throw in your yarn.  Submerge all your yarn at once, and poke it around a little bit, so that each strand of yarn gets plenty of exposure to the dye.
  4. Set the color.  Keep your dyepot nice and hot, until the color transfers from the dye water to the yarn.  You know you’re done when the water is no longer colored.  Adjust the temperature to make sure that the dye stays nice and hot, but make sure not to burn or boil the yarn.  (Most Kool-Aid flavors will end up turning totally clear.  I picked one of their lemonade flavors, which they put something in to turn the water cloudy.  You’ll never get lemonade colors totally clear, but as long as the water turns white instead of blue (or yellow or whatever), you’re good to go.)OLYMPUS DIGITAL CAMERA
  5. Carefully (without burning yourself) move the yarn to a colander, and rinse the yarn under hot water from the tap.  Slowly lower the temperature of the rinse water until you can touch it without burning yourself.  Don’t immediately shock the yarn with cold water, because it can damage the yarn and cause felting.  Once you can touch the yarn without screaming in pain, keep rinsing out the yarn, gently flipping and turning it until no more color rinses out of the yarn.OLYMPUS DIGITAL CAMERA
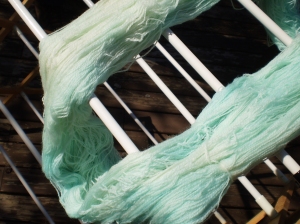
  6. If you are happy with your color, hang up the yarn to dry.  If you want to add more color (this is called over-dying) go through the steps again with more dye.
  7. Knit something fabulous with your new hand-dyed yarn.OLYMPUS DIGITAL CAMERA